A presentation is a collection of settings that define how
Mediasite should encode, record, stream, and publish audio, video, and images.
You can add presentations for recording later or add presentations using
pre-recorded MP4 and WMV video files. When you add a presentation for recording
later, you can make it available to your audience as a live broadcast and for
on-demand viewing.
When a template is present in a folder, Mediasite pre-fills
new presentations added in the folder with its settings, thus reducing the time
and effort required. Templates define how presentations are created, published
and the media format types available. When using templates, you only need to
specify the Name, Description, Record Date, Record Time, and Duration.
However, you can modify all settings if you choose.
If there are not any templates in the folder, when you add
a new presentation, you must fill in all settings as described below.
Stream group considerations
When selecting a stream group for your presentation or
adding streams individually, consider the following:
•
The streams you select will determine which server groups are associated
with your presentation.
•
If you have multiple video streams, by default, Mediasite syncs the audio
to play back from the lowest number video stream, which is the stream with the
primary content. However, you can synchronize the audio with a different video
stream, for example a video stream featuring the presenter talking, by selecting
it from the drop-down list. This change can also be made after the presentation
has been recorded.
•
To create audio-only presentations, you must select an audio-only stream
group. Note that when you record an audio-only presentation, the Recorder will
capture the video and allow you to monitor the recording sessions and preview
the final presentation. However, the video will not be available for playback in
Mediasite Player.
•
Once you add a stream group to a presentation, you can enable the
following additional features:
o OCR
detection: You can enable OCR detection on video and slide streams. You
will enable OCR detection to extract text from slides. When a presentation with
OCR detection enabled is published to Mediasite, OCR detection is automatically
done for its slides. OCR detection allows users to search a presentation's slide
text by entering key words or phrases. Users can then use the search results to
view the presentation at the times where the search term is found. In cases
where OCR detection fails, Mediasite allows you to resubmit OCR detection.
o Slide
generation: When you enable slide generation on a video stream, Mediasite
automatically generates slides from the video stream. In on-demand
presentations, the generated slides are used in place of secondary video streams
on mobile devices and are used in seek player views when using the MultiView
Player.
Security considerations
When creating and securing your presentations, it is
important to have a basic understanding of Mediasite security. In the following
two topics, you will find information on permissions and permission
templates.
Permissions
You will secure presentations by assigning roles and user
profiles permissions:
|
Permission
|
Description |
|
Read |
•
Users must have read permissions on a presentation to
o see it in a shared
folder.
o add it to a channel,
showcase, or catalog.
•
Users with read permissions on a system component, such as a player
or template, can see the item and use it when creating a presentation or
schedule. |
|
Write |
•
Users are automatically given read permissions when assigned write
permissions.
•
Users must have write permissions on a presentation to update its
settings, record it, and edit it.
•
Users must have write permissions on a catalog, folder, or showcase
add presentations to it. |
|
View |
View permissions determine which presentations or
shortcuts users can see in a catalog or showcase and play back in
Mediasite Player. |
|
Execute |
Execute permissions determine which operations users
can perform in management applications. |
|
Annotate |
Annotate permissions allow Showcase users to add
annotations to a presentation and participate in annotation discussions.
|
|
Moderate |
•
Moderate permissions determine which users can view questions from
the audience on a presentation’s properties page. When a role or user
profile is assigned moderate permission for a presentation, it is
automatically given read permission for it.
•
If a user is assigned Moderate and Annotate permissions, they can
moderate a presentation’s annotation discussions.
•
User will receive notifications when comments or annotations are
flagged on a presentation. |
|
Approve |
Approve permissions determine which users can comment
on a presentation, review edited versions of it, recommend changes, and
approve or reject content updates. |
Permission templates
Alternatively, you can secure resources using permission
templates (pre-defined jobs). The appropriate permissions are assigned to items
secured in this manner. Permission templates are available as additional options
for users with “advanced security” access. Users with “basic security”
permissions can only secure resources using permission templates:
The following permission templates are available in
Mediasite:
|
Permission
Template |
Description |
|
Writer |
User can view and update the presentation in the
Portal or My Mediasite. |
|
Viewer |
User can view the presentation in the
Player. |
|
Reader |
User can view an item’s settings in the Portal or My
Mediasite. |
|
Editor |
User can edit a presentation using the web-based
editor. The user will be able to launch the Editor from the presentation’s
summary page. |
|
Approver |
User can comment on a presentation as well as approve
or reject changes made to it. |
|
Moderator |
User can view and respond to questions from the
audience. The user will be able to launch the Q & A forum page from
the presentation’s summary page. The user will also receive notifications
when comments or annotations are flagged on the presentation.
If a user is assigned Moderate and Annotate
permissions, they can moderate a presentation’s annotation
discussions.
 When a user is assigned moderate
permissions for a presentation, questions will be forwarded to the email
address associated with their valid user profile unless the user opts out
of moderator emails or provides an alternate moderator email
address. When a user is assigned moderate
permissions for a presentation, questions will be forwarded to the email
address associated with their valid user profile unless the user opts out
of moderator emails or provides an alternate moderator email
address.
|
 For more information on security in
Mediasite, contact your Mediasite administrator or see the Mediasite
Configuration Guide.
For more information on security in
Mediasite, contact your Mediasite administrator or see the Mediasite
Configuration Guide.
Add new presentation
To add a presentation:
1. Click
Content, navigate to the folder in which you want to
add the presentation, right-click it, and select Add
Presentation.
2. If you
do not want to use the default template, click Change
Template. Selecting a new template will overwrite all data except for the
Title, Description, Tags, and Folder fields.
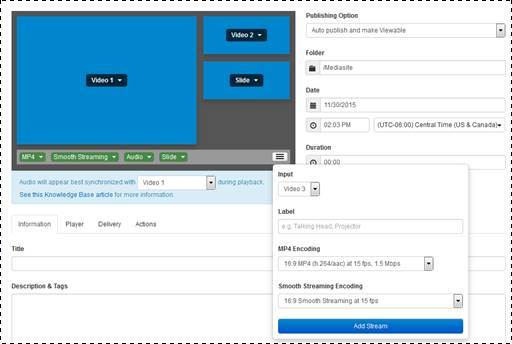
3. Click
the stream options button in the lower-right corner of the stream window to
choose the presentation’s streams by adding streams individually, choosing a
stream group, or choosing a stream group and updating it as needed:
|
Options |
Details |
|
Add a stream |
Click this option, select the
input type, and choose a label for the stream. If adding a slide stream,
select the slide encoding setting. Click Add
Stream. Repeat for each stream you want to add. Once you have added
all the streams, choose the media type for the video streams. |
|
Select a different Stream
Group |
Click to select the stream group you want to use for
the presentation. The settings, labels, and media types are already
selected for each stream, but you can update these settings as
needed. |
Add new presentation, add streams
individually

Add new presentation, select
stream group
4.
Specify the remaining presentation settings as needed:
|
Options |
Details |
|
Publishing Options |
From
the drop-down list, select how you want presentations
published:
•
Auto publish and make
Viewable: Select to have the recorded
presentation automatically published to Mediasite and made available for
viewing.
•
Auto publish and make
Private: Select to have the recorded
presentation automatically published to Mediasite. However, the
presentation will not be available for viewing by other users. You will
have to update the presentation's status later to make it available for
viewing. This option is recommended for users who want to review and edit
presentations prior to sharing them with their audience.
•
Manual publish and make
Viewable: Select to publish the recorded
presentation manually to Mediasite using the Recorder. Once you publish
the presentation, it will be made available for viewing.
•
Manual publish and make
Private: Select to publish the recorded
presentation manually to Mediasite using the Recorder. Once you publish
the presentation to Mediasite, only you can view it. It will not be
available for viewing by other users. You will have to update the
presentation's status later to make it available for
viewing. |
|
Date/Time/Duration |
Specify the date and time, including the time zone,
the presentation will be recorded and its duration (hours:minutes).
Entering the presentation's record date, time, and duration does not limit
you to starting and ending the presentation at the specified date and
times. |

Add new presentation, general
settings
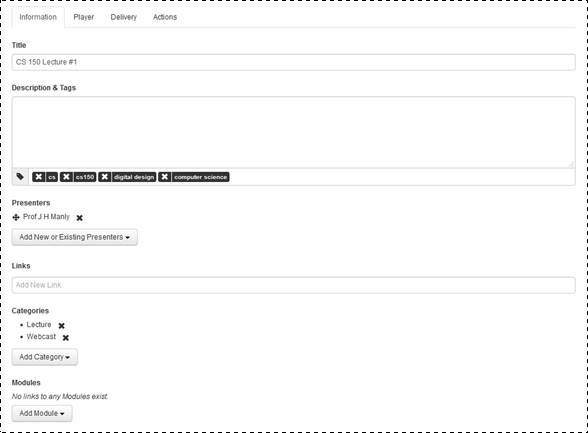
5. On the
Information tab, specify the following settings:
|
Setting |
Details |
|
Title |
Enter a descriptive name for the
presentation so that you and other users will be able to identify it
easily. |
|
Description |
Enter a short description for the presentation.
Viewers can search for presentations using words and phrases in the
description. |
|
Tags |
Enter the tags that you want
associated with this presentation. For example, if this presentation will
be used for a computer science class titled "CS150: Components and Design
Techniques for Digital Systems," you may want to include the following
tags: CS 150, digital design, computer science. |
|
Presenters |
Click Add New or Existing
Presenters to add presenters. Use the search feature to find
presenters that have already been added on the Mediasite. |
|
Links |
Add hyperlinks to your presentation that will allow
your audience to view other websites or online documents. To add a link,
click in the field and enter the link's name as it will appear in the
Player and the URL for the document or website to which the link will
point. Click Add. |
|
Categories |
Click Add Category and select
categories for your presentation. When a presentation is published to
YouTube™, the uploaded video is placed in matching YouTube
categories. |
|
Modules |
Click Add Module and select
a module. A module serves as an advanced integration point and maps to a
course in a Learning Management Systems (LMS). |
Add new presentation, Information
tab
For more information on categories, see
Publishing
presentations to YouTube™" XE "publish:
external sites, to" . For more information
on modules, see the Configuration
Guide. If you are integrating Mediasite with an LMS and using
automatic module provisioning, refer to the appropriate integration guide for
detailed instructions. All guides are available on the Mediasite Customer Care
Portal at www.sonicfoundry.com/support.
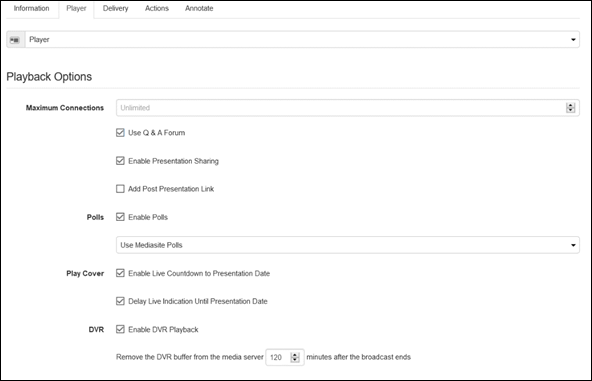
6. Click
the Player tab to specify the player used for the
presentation as well as the features available in the player:
|
Settings |
Details |
|
Player |
Select a player from the
drop-down list. Use the search feature as needed to locate the player you
are seeking. If you want to add and select a new player, click Quick Add and specify the player’s details. Click
Save. |
|
Maximum Connections |
Enter a number if you want to make your presentation
viewable for only a certain number of concurrent viewers. The default
value is unlimited connections. The default value is unlimited
connections. |
|
Use Q & A Forum |
Select this check box to allow
audience members to ask questions during live and on-demand presentations
using the Mediasite Player.
When a user is assigned moderate
permissions for a presentation, questions will be forwarded to the email
address associated with their valid user profile unless the user opts out
of moderator emails or provides an alternate moderator email address.
Users can opt out of moderator emails or provide an alternative email
address as part of their user profile settings. |
|
Enable Presentation
Sharing |
Select this check box to allow users to share this
presentation using the Player. |
|
Add Post Presentation
Link |
Select this check box to allow users to share this
presentation using the Player. |
|
Enable Polls |
Select this check box to use polls in the presentation.
Polls allow you to interact with your audience during a presentation and
receive direct feedback. Select the type of polls you want to use in
your presentations:
•
Use Mediasite Polls: Select this option
to add polls to your presentations using Mediasite.
•
Link to External Polls: Select this
option to use a third-party survey system and then enter the URL for the
poll. |
|
Play Cover |
Select the check box next to the features you want to
make available in the presentation’s play cover:
•
Enable Live Countdown to Presentation
Date: Select this option to display a countdown in the play cover
that ends the day of the presentation.
•
Delay Live Indication Until Presentation
Date: Select this option so the live broadcast indicator does not
appear until the date presentation goes live. |
|
Enable DVR Playback |
Select this checkbox to allow users to use the DVR
feature when watching a live broadcast. DVR playback allows users to seek
within the DVR window or pause a live broadcast. Specify the DVR Buffer settings:
•
Media Duration + __ minutes: Specify the
duration of the DVR window in the Player. This maps to the buffer time.
When the live broadcast has ended, the Media duration + buffer is the
window available for viewing the "live" broadcast.
•
And not to exceed __ minute: Specify the
maximum value for the DVR window. |
Add new presentation, Player tab
7. Click
the Delivery tab to select how you want to make
content available to your audience:
|
Settings |
Details |
|
Audio Transcriptions |
Select this check box to enable captioning for this
presentation. Select the appropriate audio transcription profile from the
drop-down list. The audio transcription profile contains the credentials
needed to connect to your automated captioning provider. You must already
have an existing account with valid credentials. Once you add the
presentation, you will have the option of uploading files manually.
|
|
Live |
Select this check box to
broadcast this presentation live. |
|
Podcast |
Select this check box to enable podcasting. Select
the quality (encoding rate) from the drop-down list. The higher the rate
at which the MP3 files are encoded the higher the quality during playback.
However, this also increases the size of the file. |
|
Video podcast
(composite) |
Select this check box to enable video podcasting.
Select a video podcast project from the drop-down list.
|
|
Publish to Go |
Select this check box to enable
the publishing of self-contained presentations that do not require a
network connection to the Mediasite and a media server for viewing. The
servers listed on this will be updated to include the Publish to Go
Server. |
|
Thumbnail Generate
Option |
From the drop-down list, select how you want to
generate thumbnail images.:
•
From Stream: If you have selected a
stream group, you will see each of the streams in the drop-down list, for
example: From Stream: Video 1. When you
select a video or slide stream, Mediasite captures its first frame as the
thumbnail image.
•
Capture Application Default: Select this
option to use the thumbnail generated by the system (Recorder, Catch, or
EVP) when media captured, uploaded, or imported.
•
Never Generate: Select this option to
turn off auto-generation of thumbnail images. This option is must useful
when recording live presentations or importing content. In this case, you
will upload thumbnail images manually.
Once a presentation is recorded
and published, the thumbnail generation options are not available. You can
replace the thumbnail image by going to the Edit
tab and updating the image manually. For more information, see Add
thumbnail images manually. |
|
Servers |
Verify the servers listed are the
ones you want. If they are not, click Wrong servers?
Select a different Server Group and locate the server group you
want to use. |
For users to
download content (podcasts, vodcasts, caption files, and portable
presentations), they must have read permissions on a presentation and for the
“Download Mediasite Content” Portal resource. To download Publish-to-Go content,
users must also have permissions for the “Publish to Go” operation.
For more information, see the
Mediasite Configuration Guide and the help available on
docs.mediasite.com for the My Mediasite, Catalog, Channel and Showcase
applications. Also, see the following: Downloading
portable presentations, Managing catalogs, and Managing channels.

Add new presentation, Delivery
tab
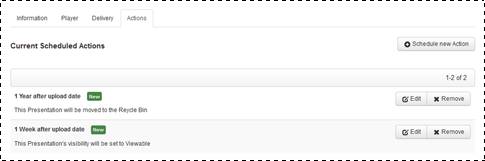
8. Click
the Actions tab to schedule the following actions:
update visibility, remove adaptive bitrate (smooth streaming) content, and send
the presentation to the Recycle Bin.
Add new presentation, Actions
tab
1. Click
the Annotate tab to specify who can modify time-based
annotations once they have been added to the presentation. From the Annotation Mode drop-down list, select one of the
following:
|
Settings |
Details |
|
Moderated |
Select this option to allow users
with annotate permissions to update or delete their own annotation
content. Only presentation owners and annotation moderators (users
with moderate and annotate permissions) can hide flagged or
inappropriate annotations and comments. |
|
Unmoderated |
Users with annotate permissions can post annotation
content in Showcase but will be unable to edit or delete content.
Annotations and discussion posts cannot be modified or deleted. Only
presentation owners and annotation moderators can hide flagged or
inappropriate annotations and comments. |
Specify annotation mode
Time-based annotations are only
available in Showcase and users must have Annotate permission for the
presentation to post annotations and comment on annotations posted by others.
For more information, see Enabling time-based
annotations in showcases and Showcase Help.
2. Click
Save. You can now record the presentation or upload a
video file to it by clicking Upload New Video. Once
you add a presentation, you can enhance it by choosing its publishing options
and adding additional content to it—links, polls, and closed captions.
