Use Mediasite Captioning to submit captioning requests through captioning services using credentials for an existing account. Mediasite has built-in support for the following captioning services: Automatic Sync Technologies, 3Play Media, 3Play Media-ASR (Automated Speech Recognition), Cielo 24, IBM Speech to Text service, Verbit, and AI Media.
Overview
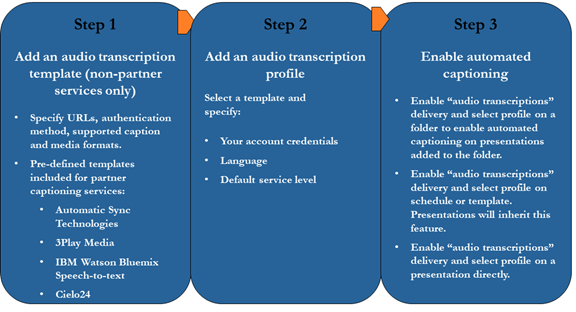
There is a two-step process for setting up and using automated captioning using a partner captioning service. If you are using a non-partner captioning service, there is an additional step:
Overview of setting up automated captioning
Step 1: Add an audio transcription template (non-partner captioning services only). If you are using a non-partner captioning service, you must add an audio transcription template for it. Mediasite has pre-defined audio transcription templates for its partner captioning services: Automatic Sync Technologies, 3Play Media (including 3Play Media’s Automated Speech Recognition service), Cielo 24, and IBM’s Speech to Text captioning services.
Step 2: Add an audio transcription profile. When you add an audio transcription profile, you will select an audio transcription template and provide credentials and other information used to access your account. Mediasite encrypts this information in the database and never shares it. Information in the provider profile is used only for submitting captioning jobs for billing purposes and querying the status of captioning items.
When Mediasite submits media files for captioning, it uses the audio transcription profile to access your account. Mediasite then uploads media files along with a manifest describing the captioning job to your captioning provider. The captioning provider then captions the media and posts a DFXP, SRT, or SMI file back to Mediasite.
For IBM’s Speech to Text service, Mediasite sends audio directly to IBM and the service then processes and returns the results in a DFXP file in approximately half the length of the presentation’s runtime.
 Contact your captioning
service provider directly for more information on the captioning service
processing times and other details.
Contact your captioning
service provider directly for more information on the captioning service
processing times and other details.
Step 3: Enable automated captioning on folder, presentation, template, or schedule. When you add “audio transcriptions” delivery on a folder, presentation, schedule, or template you are enabling the automated captioning feature on them. You must select an existing audio transcription profile or add a new one when enabling this feature.
 When you add audio
transcriptions delivery on templates and schedules, all presentations created
using them inherit this feature.
When you add audio
transcriptions delivery on templates and schedules, all presentations created
using them inherit this feature.
To use a non-partner captioning service with Mediasite, you must add an audio transcription template for it. Once you add a template for a captioning service, you can choose it as a setting in an audio transcription profile. For example, if you name the provider template “Custom,” you will choose that option in the Template drop-down list when you add the audio transcription profile.
Before your captioning
service will work with Mediasite, your captioning provider must contact our
technical support experts to get more information about Mediasite’s captioning
automation process. Your captioning provider must then implement software at
their end to pick up jobs submitted for captioning and then post closed caption
files back to Sonic Foundry. Once your captioning provider implements and
deploys the required code, you can add an audio transcription template in
Mediasite for them. Contact our technical support experts for more
information on the Customer Care Portal at
www.sonicfoundry.com/support.
To add an audio transcription template:
1. Click Settings > Audio Transcription Templates > Add New and specify the following:
|
Settings |
Details |
|
Name |
•Enter a name for the provider template that will help you easily identify it. |
|
Server URL |
•Enter the URL that will be used to upload projects for captioning to this service provider. |
|
Tracking URL Format |
•Enter the URL that will form the basis of URLs used to track projects using this service provider. You will get this information, if applicable, from your captioning service provider. |
|
Authentication Method |
Select the authentication methods available for this profile: •Password: Select this option if your captioning service requires a password. •Encryption Key: Select this option if your captioning service requires an encryption key. •Password or Encryption Key: Select this option if either a password or encryption key can be used to connect to the captioning service.
|
|
Supported Caption Formats |
•Select the check box next to all captioning formats supported by the provider (DFXP, SRT, SMI). |
|
Supported Media Formats |
•Select the check box next to media formats supported by the provider (WMV, MP3, MP4, WMA). |
2. Click Save. Users can now select this template to add a new audio transcription profile or to enable automated captioning on a folder.

Add new provider profile template
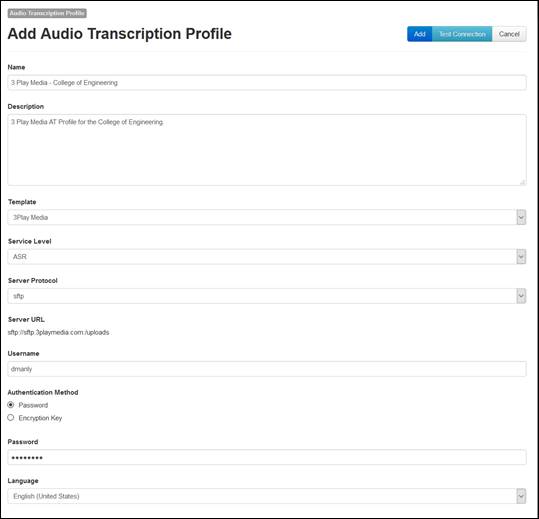
Add a 3Play Media audio transcription profile to send your media files to 3Play Media for automated captioning. You must already have an account with 3Play Media to use this service with Mediasite.
Mediasite provides
pre-defined templates for 3Play Media’s traditional captioning and automated
speech recognition captioning services. If you are not sure which service
your organization is using, contact your 3Play Media account
representative.
To add a 3Play Media audio transcription profile:
1. Click Settings > Audio Transcription Profiles > Add New and enter a name and description for the profile that will help you and others identify it easily.
2. Select 3Play Media from the Template drop-down list,
3. From the Service Level drop-down list, select the service level that will be used for all captions unless you specify otherwise on your presentation.
4. Select the Server Protocol that will be used to upload the audio file to the service for captioning: FTP or SFTP.
5. Enter the username needed to connect to the service and select the Authentication Method:
|
Settings |
Details |
|
Password |
•Select this option if your account requires a password. Enter the password in the field that appears. |
|
Encryption key |
Select this option if your account requires an encryption key. You can generate a new key or use an existing key: •Generate Key: Click to create a new key. Once you save this encoding setting, you will click Show Encryption Key on the profile’s summary page to view the generated key. You must then copy the key and register it with your caption provider. •Import Key: Click to locate and select the file containing your encryption key. If not already registered, you will have to register this key with your caption provider. The key must be in PEM-encoded (base64) private key format. • |
6. Select the language the service will use to create captions: English (United States) or Spanish.
7. Click Test Connection at the top of the page to verify you can connect using the credentials specified.
8. Click Add.
Add 3PlayMedia audio transcription profile
 The service cannot
differentiate between multiple languages and will only create captions for the
language you select here.
The service cannot
differentiate between multiple languages and will only create captions for the
language you select here.
 CAUTION: The
service levels are based on information from 3Play Media. Any additional costs
associated with the service level you select should be discussed with the
captioning service in advance. We also strongly suggest using a unique
account for each service level.
CAUTION: The
service levels are based on information from 3Play Media. Any additional costs
associated with the service level you select should be discussed with the
captioning service in advance. We also strongly suggest using a unique
account for each service level.
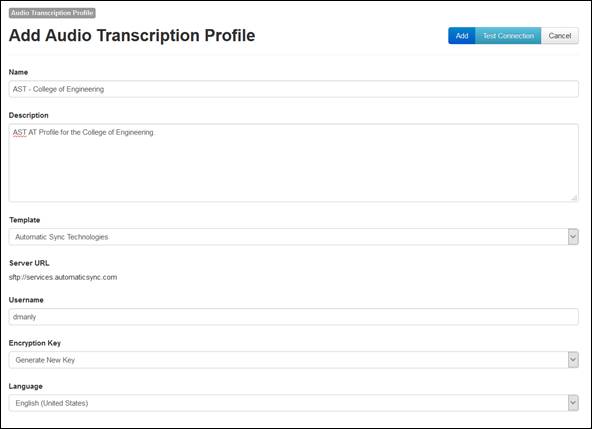
Add an AST audio transcription profile to send your media files to AST for automated captioning. You must already have an account with AST to use this service with Mediasite.
To add an AST audio transcription profile:
1. Click Settings > Audio Transcription Profiles > Add New and enter a name and description for the profile that will help you and others identify it easily.
2. Select Automatic Sync Technologies from the Template drop-down list and specify the following:
|
Settings |
Details |
|
Username and encryption key |
•Enter the username needed to connect to AST. You can generate a new key or use an existing key: •Generate Key: Click to create a new key. Once you save this encoding setting, you will click Show Encryption Key on its summary page to view the generated key. You must then copy the key and register it with your caption provider. •Import Key: Click to locate and select the file containing your encryption key. If not already registered, you will have to register this key with your caption provider. The key must be in PEM-encoded (base64) private key format |
|
Language |
Select the language the service will use to create captions: English (United States). |
3. Click Test Connection at the top of the page to verify you can connect using the credentials specified.
4. Click Add.
Add new AST audio transcription profile
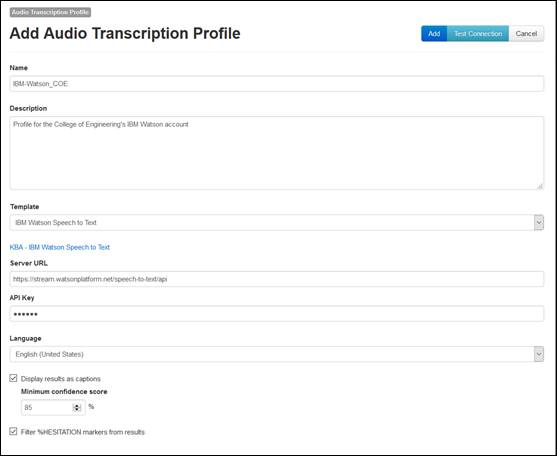
Add an IBM Watson Speech to Text audio transcription profile to send your media files to IBM for caption creation using their service. You must already have an IBM Cloud account to use this service with Mediasite.
 By default, Mediasite uses
IBM’s Speech to Text service to generate keywords that will appear in player,
catalog, and showcase search results. The initial quality provided by this
service, which is indicated by the confidence level, may not meet the needs of
viewers who require captions. My Mediasite includes Caption Editor, which
can be used to correct generated text. However, you may want to consider other
tools also. See KBA4026 on the Customer Care Portal and My Mediasite Help
for more details.
By default, Mediasite uses
IBM’s Speech to Text service to generate keywords that will appear in player,
catalog, and showcase search results. The initial quality provided by this
service, which is indicated by the confidence level, may not meet the needs of
viewers who require captions. My Mediasite includes Caption Editor, which
can be used to correct generated text. However, you may want to consider other
tools also. See KBA4026 on the Customer Care Portal and My Mediasite Help
for more details.
To add an IBM Speech to Text audio transcription profile:
1. Click Settings > Audio Transcription Profiles > Add New and enter a name and description for the profile that will help you and others identify it easily.
2. Select IBM Watson Speech to Text from the Template drop-down list and specify the following:
|
Settings |
Details |
|
Server URL |
Enter the URL needed to connect to the IBM Speech to Text service. For example: https://stream.watsonplatform.net/speech-to-text/api |
|
API Key |
Enter the API key needed to connect to the service.
|
|
Language |
Select the language the service will use to create captions. The service cannot differentiate between multiple languages and will only create captions for the language you select here.
|
|
Display results as captions |
By default, this option is not selected. Select this check box if you want to include text generated using Speech to Text as captions for all presentations using this service. |
|
Minimum confidence score |
Enter a number to specify the lowest confidence score for using speech-to-text results as captions. The confidence score of a presentation is the percentage of words with high confidence. The default value is 85, which means the confidence score for results must be 85% and higher to be used as captions.
|
|
Filter %HESITATION markers from results |
Select this check box to remove the “%HESITATION” marker displayed from audible hesitations such as “um” or “ah”. |
3. Click Test Connection at the top of the page to verify you can connect using the credentials specified.
4. Click Add.
Add IBM Watson Speech to Text audio transcription profile
Add a Cielo24 audio transcription profile to send your media files to Cielo24 for automated captioning. You must already have an account with Cielo24 to use this service with Mediasite.
To add a Cielo24 audio transcription profile:
1. Click Settings > Audio Transcription Profiles > Add New and enter a name and description for the profile that will help you and others identify it easily.
2. Select Cielo24 from the Template drop-down list and specify the following:
|
Settings |
Details |
|
Service Level |
•Select the service level that will be used for all captions unless you specify otherwise on your presentation. |
|
Username and password |
Enter the username and password needed to connect to Cielo24’s captioning service. Click Test Connection at the top of the page to verify you can connect using the credentials specified. |
|
Language |
Select the language the service will use to create captions. The service cannot differentiate between multiple languages and will only create captions for the language you select here. |
3. Click Add.
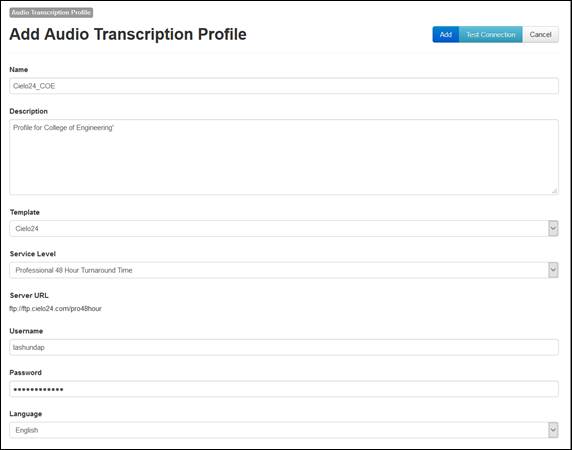
Add new Cielo24 audio transcription profile
 CAUTION: The
service levels included in this list are based on information from Cielo24. Any
additional costs associated with the service level you select should be
discussed with the captioning service in advance. We also strongly suggest
using a unique account for each service level.
CAUTION: The
service levels included in this list are based on information from Cielo24. Any
additional costs associated with the service level you select should be
discussed with the captioning service in advance. We also strongly suggest
using a unique account for each service level.
Add an AI Media audio transcription profile to send your media files to AI Media for automated captioning. You must already have an account with AI Media to use this service with Mediasite.
To add an AI Media audio transcription profile:
1. Click Settings > Audio Transcription Profiles > Add New and enter a name and description for the profile that will help you and others identify it easily.
2. Select AI Media from the Template drop-down list and specify the following:
|
Settings |
Details |
|
Service Level |
•Select the service level that will be used for all captions unless you specify otherwise on your presentation. |
|
Username and password |
Enter the username and password needed to connect to the captioning service. Click Test Connection at the top of the page to verify you can connect using the credentials specified. |
|
Language |
Select the language the service will use to create captions. The service cannot differentiate between multiple languages and will only create captions for the language you select here. |
3. Click Add.
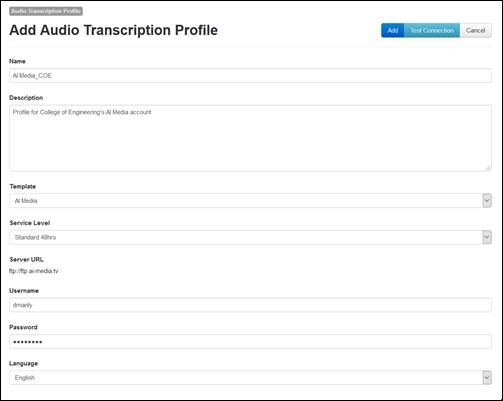
Add new Cielo24 audio transcription profile
CAUTION: The
service levels included in this list are based on information from AI Media. Any
additional costs associated with the service level you select should be
discussed with the captioning service in advance. We also strongly suggest
using a unique account for each service level.
Add a Verbit audio transcription profile to send your media files to Verbit for automated captioning. You must already have an account with Verbit to use this service with Mediasite.
To add a Verbit audio transcription profile:
1. Click Settings > Audio Transcription Profiles > Add New and enter a name and description for the profile that will help you and others identify it easily.
2. Select Verbit from the Template drop-down list and specify the following:
|
Settings |
Details |
|
Service Level |
•Select the service level that will be used for all captions unless you specify otherwise on your presentation. |
|
Username and password |
Enter the username and password needed to connect to the captioning service. Click Test Connection at the top of the page to verify you can connect using the credentials specified. |
|
Language |
Select the language the service will use to create captions. The service cannot differentiate between multiple languages and will only create captions for the language you select here. |
3. Click Add.
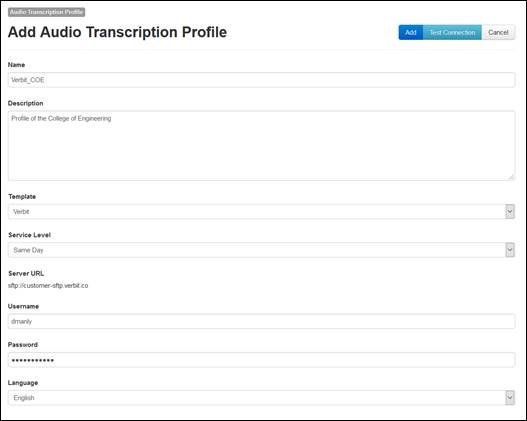
Add new Verbit audio transcription profile
CAUTION: The service levels included in this list are based on information
from Verbit. Any additional costs associated with the service level you select
should be discussed with the captioning service in advance. We also strongly
suggest using a unique account for each service level.
Mediasite allows you to download your presentation’s captions as a DFXP file.
To download caption files:
1. Navigate to your presentation. On its properties page, click Download Captions.
2. Save the file and navigate to the download location. The name of the DFXP file will match the presentation’s title.
3. You can now share the caption file with others as needed.
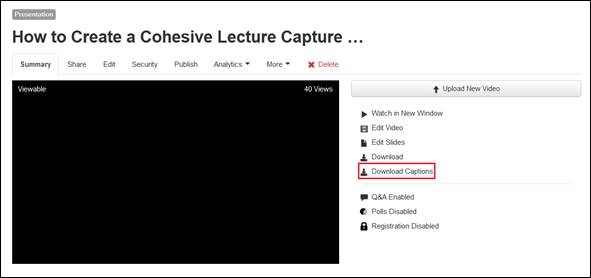
Download caption file
When you enable audio transcriptions delivery on a folder and then add or publish recorded presentations to it, Mediasite automatically uploads their media files to the captioning service. Once captioning is complete, the service downloads your closed caption files to Mediasite.
If the folder already has presentations when you add audio transcriptions delivery to it, Mediasite adds this delivery option to all presentations with this feature disabled and immediately creates a captioning job for them.
To enable audio transcriptions delivery on a folder:
1. Right-click the folder, click Manage Content > Add Delivery.
2. Select the Audio Transcriptions check box and select the audio transcription profile from the drop-down list.
3. Click Save.

Enable audio transcriptions delivery on a folder
You can enable audio transcriptions (automated captioning) delivery on a presentation directly from its summary page.
To enable automated closed-captioning delivery on a presentation:
1. Navigate to the presentation you want. On the presentation’s summary page, click Edit > Delivery tab.
2. Select the Audio Transcriptions check box and select the Choose a Provider radio button.
3. Select your audio transcription profile from the drop-down list. Click Save.

![]() Enable automated captioning on
presentation
Enable automated captioning on
presentation
At any time, you can remove “audio transcriptions” delivery on any folder or presentation with this feature enabled.
 Removing audio transcriptions delivery
on a folder will delete all related jobs. However, if you have already submitted
media to the captioning service, billing may still occur. If you would like to
retain any closed caption files in the folder, back them up in a safe location
BEFORE removing audio transcriptions delivery on the folder.
Removing audio transcriptions delivery
on a folder will delete all related jobs. However, if you have already submitted
media to the captioning service, billing may still occur. If you would like to
retain any closed caption files in the folder, back them up in a safe location
BEFORE removing audio transcriptions delivery on the folder.
Remove “audio transcriptions” delivery on a folder
Removing audio transcriptions delivery on a folder disables this feature for all presentations in the folder, deletes all pending jobs, and deletes all closed caption files from completed jobs.
To remove “audio transcriptions” delivery on a folder:
1. Right-click the folder, click Manage Content > Remove Delivery.
2. Select the Audio Transcriptions check box and click Save.
Remove “audio transcriptions” delivery on a presentation
When you disable audio transcriptions delivery on a presentation that already has a closed caption file uploaded to it, Mediasite deletes the file. If you want to replace the deleted file, you will have to enable this feature again, upload the file manually (if you backed it up to an external location) or resubmit the job to your captioning service at an additional cost.
To disable captioning on a presentation:
1. Navigate to the presentation and click Edit > Delivery on its summary page.
2. Clear the Audio Transcriptions check box and click Save.
 When an encryption key is
used, users using this audio transcription template to create an audio
transcription profile can generate or import an encryption key. The key
must be in PEM-encoded (base64) private key format.
When an encryption key is
used, users using this audio transcription template to create an audio
transcription profile can generate or import an encryption key. The key
must be in PEM-encoded (base64) private key format.