Mediasite allows you to schedule actions on templates,
schedules, and presentations, that will help you manage content availability and
storage space. Actions include automated visibility updates, removing adaptive
bitrate (smooth streaming) content, and sending presentations to the Recycle
Bin. These actions can be set for a specific date or period after a
presentation’s upload date. We also provide a “scheduled actions” status report
that includes data about successful, failed, and upcoming scheduled actions.
 When specifying actions on
folders, templates, and schedules, a best practice is to use the “relative to
upload” option to schedule when an action occurs. This allows you to put into
place a defined time frame for changing visibility and removing old content.
When specifying actions on
folders, templates, and schedules, a best practice is to use the “relative to
upload” option to schedule when an action occurs. This allows you to put into
place a defined time frame for changing visibility and removing old content.
Also, system jobs perform scheduled actions daily. When there are
scheduled actions against many presentations (for example, 10,000
presentations), it is unlikely that all jobs will be processed in a single day.
You will schedule actions on an item’s properties page and can do it when
creating a new item or when updating it.
 You can also schedule
actions against folders by right clicking the folder and selecting Manage Content > Schedule New
Action. For more detailed instructions, see Mediasite Configuration
Guide.
You can also schedule
actions against folders by right clicking the folder and selecting Manage Content > Schedule New
Action. For more detailed instructions, see Mediasite Configuration
Guide.
Schedule “Change Visibility” actions
Schedule actions to update visibility to manage when
content becomes available to your audience.
To schedule actions to update visibility:
1. Create
a new presentation, schedule, or template and click the Actions tab. If you are editing an existing item, click
Edit and navigate to the Actions tab.
2. Click
Schedule new Action and specify when the action should
be done:
|
Options |
Details |
|
Relative From Upload |
Select this option to have the
visibility update occur a certain amount of time after a presentation’s
content uploads to Mediasite. Select the amount of time. |
|
Relative From Last
View |
:
Select this option to have the visibility update occur a certain
amount of time after a presentation was last viewed. |
|
On Exact Date |
Select this option if you want to
update the presentation’s visibility (or in the cases of templates and
schedules, all presentations created them) on a certain day and use the
calendar to select the date |
3. Select
Change Visibility from the Action
Type drop-down list and select one of the following from the New Visibility drop-down list:
|
Options |
Details |
|
Viewable |
Select to allow users with
appropriate permissions to view the presentation. In this state, if
publishing to external sites is enabled, the presentation’s audio or video
podcasts are published to the sites. |
|
Private |
: Select so only the owner can
view, search for, and update the presentation. Other users will be
able to see the presentation in Mediasite applications, but they will not
be able to view it. Changing a presentation’s visibility to private allows
the owner to fine-tune it before making it available for
viewing. |
|
Offline |
Offline: Select so no one can view the recorded
presentation. Offline presentations are not available for viewing or
in searches and only the presentation owner can update them. |
4. Click
Add. Save the item you are creating or updating.
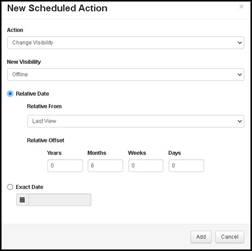
Add “visibility update” action
Schedule “Move to the Recycle Bin” actions
Schedule actions to send presentations to the Recycle Bin
to help manage storage space usage on Mediasite.
To schedule actions to send presentations to the
Recycle Bin:
1. Create
a new presentation, schedule, or template and click the Actions tab. If you are editing an existing item, click
Edit and navigate to the Actions tab.
2. Click
Schedule new Action and specify when the action should
be done:
|
Options |
Details |
|
Relative to Upload
Date |
Select this option to have the
presentation moved to the Recycle Bin a certain amount of time after a
presentation’s content uploads to Mediasite. Select the amount of
time. |
|
On Exact Date |
Select this option if you want to have the
presentation sent to the Recycle Bin (or in the cases of templates and
schedules, all presentations created using them) on a certain day and use
the calendar to select the date. |
3. Select
Move to the Recycle Bin from the Action Type drop-down list.
4. Click
Add. Save the item you are creating or updating.

Add “Move to Recycle Bin” action
Schedule “Remove Adaptive Bitrate” actions
Schedule actions to remove Adaptive Bitrate content from
presentations to help manage storage space usage on Mediasite. When this
action is selected, all smooth streaming content will be completely removed.
Once the system deletes the content, you cannot recover it from the Recycle Bin.
This action will never remove the last content type so the presentation must
also have MP4 content for this action to be processed.
To schedule actions to remove smooth streaming
content from presentations:
1. Create
a new presentation, schedule, or template and click the Actions tab. If you are editing an existing item, click
Edit and navigate to the Actions tab.
2. Click
Schedule new Action and specify when the action should
be done:
|
Options |
Details |
|
Relative to Upload
Date |
Select
this option to remove smooth streaming content a certain amount of time
after a presentation’s content uploads to Mediasite. Select the amount of
time. |
|
On Exact Date |
Select this option if you want to remove smooth
streaming content on a certain day and use the calendar to select the
date. |
3. Select
Remove Adaptive Bitrate from the Action Type drop-down list.
4. Click
Add. Save the item you are creating or updating.
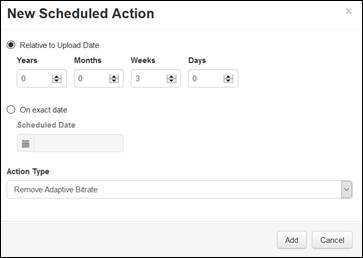
Add “Remove Adaptive Bitrate” action