 Using Catch with EVP requires
additional licenses. For more information, contact your sales
representative. For detailed instructions on using Catch with Mediasite, see the
Mediasite Catch Deployment Guide available on the Customer Care Portal.
Using Catch with EVP requires
additional licenses. For more information, contact your sales
representative. For detailed instructions on using Catch with Mediasite, see the
Mediasite Catch Deployment Guide available on the Customer Care Portal.
A schedule is a collection of user-defined settings used to automate the recording and publishing process on Recorders and Catch devices. Schedules are created using Management Portal and include the following information:
•Presentation properties—basic details (information tab), folder, publishing and delivery options, player settings, security (folder overrides), and actions
•Presentation naming convention (based on schedule name)
•Recurrence settings—when and how often presentations are created
•Recording device associated with schedule—Recorder or Catch device
•Level of automation—how much of the recording and publishing process is automated
•Email notification details
When you create a schedule, the scheduler does not immediately create all its presentations. Instead, the service creates presentations as specified in the schedule – either a few days, hours, or minutes prior to recording.
Recorders and Catch devices then retrieve their schedules and create, record, and publish presentations using the settings and recurrence pattern defined in each schedule. For fully automated schedules, the recording device works with Mediasite to handle the following tasks: creating presentations, recording, publishing, and managing notifications.
Using Catch with EVP requires
additional licenses. For more information, contact your sales
representative. For detailed instructions on using Catch with Mediasite, see the
Mediasite Catch Deployment Guide available on the Customer Care Portal.
Consider the following when using scheduling to automate recording and publishing on your Recorders:
Recurrence details and scheduled events
•When adding a schedule, you can add multiple recurrences to it. For example, if you want to create a schedule for a class that has lectures on Tuesdays and Thursdays at 9AM and honors seminars on Mondays at 3 PM, you do not need to create two separate schedules. Instead, you can create a single schedule and add two recurrences to it, one for the lectures and one for the seminars.
•Once you create a schedule, you can update its recurrence details as needed—you can add new recurrences as well as update or delete existing recurrences. For example, if you have a schedule that is set to record daily at 1PM but today’s class will start 15 minutes late, you can go into the schedule, cancel the event for that day, and add a new one-time recurrence for that day, starting at 1:15 PM.
•When you update a schedule’s recurrence details, it is important to synchronize the Recorder or Catch device to ensure the updates take effect. This is especially important when you make updates very close to the time that a presentation using that recurrence is scheduled for recording.
•In the recording calendar, you can delete specific scheduled events without updating a schedule’s recurrence settings.
General considerations
When scheduling presentations, you should consider the following:
•The clocks on your Mediasite and recording devices must be synchronized to ensure they can communicate effectively when it is time for the device to pull down schedules from Mediasite. Scheduling is not affected when Mediasite and recording devices are in different time zones because scheduled presentation times are stored in Coordinated Universal Time (UTC).
•Do not leave unrecorded presentations open on your Recorders. If a presentation is open or being recorded on a Recorder, then the Recorder is "in use" and cannot open or record other presentations during that time. This applies only to unrecorded presentations that are opened manually. To avoid scheduling conflicts, recurring presentations that have been opened but not recorded will automatically close after the specified duration has passed.
•You should always allow additional time between scheduled presentations when recording live broadcasts. There is at least a 60-second wait period after you stop recording a live presentation. Also, in some instances, the Recorder may take several minutes to process the presentation files after a live broadcast has ended.
•Mediasite deletes presentations created in advance when the following updates are made to the schedule: record time, duration, start date, end date, server group, encoding profile, live or on demand setting, recurrence pattern, or time zone.
•Mediasite does not delete presentations created in advance when you update a schedule’s Player, presenters, name, advance creation settings, etc. However, you must update these presentations manually with the new schedule settings.
•There is a known issue, in which editing the start time or duration of a presentation created through a schedule creates a new one-time recurrence for the schedule. However, in the Portal both the old and new occurrence are listed in the schedule views.
•Before you can delete a presentation, you must delete all events (recurrences) and unrecorded presentations associated with the schedule and then permanently remove them from the Recycle Bin.
•Create in advance times do not guarantee that the presentation will be created at the exact time specified. Schedules may be created 10-15 minutes after the scheduled creation time. For example, presentations scheduled to be created 1 day in advance will not be created exactly 24 hours prior to the record time.
Schedule import files
•When creating schedule import files, the following items are optional: Recorder information, automated operations, notification information, live/on-demand setting, and presenter information. The live/on-demand setting and presenter information override the template settings.
•You can specify module IDs in schedule import files, which is useful when integrating Mediasite with a Learning Management System (LMS).
Before you add a new schedule, go to the Availability page to verify the Recorder you want to use is available for the dates and times you need to record presentations.
On this page, you will see schedules assigned to each Recorder over a week's span. You will also see exclude dates—global schedule exclusion dates during which the scheduler does not add new recurring presentations for recording.
To check a Recorder’s availability:
1. Click Content > Availability and select a time zone from the Show times in drop-down list.
2. Select the Show Schedules check box to include schedules. Select a Recorder in the drop-down list to view only its schedules. By default, Recorders that are currently recording are included. Clear the Busy check box to remove them from the calendar.
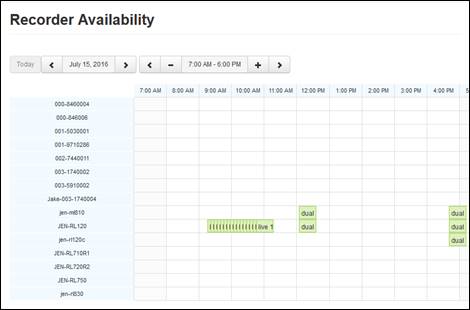
Recorder Availability
You will use the Calendar view to get a complete view of upcoming presentations and schedules and Recorder availability. On this page, you view a schedule or presentation's summary, edit it, quickly add a similar schedule or presentation using the Add Like feature, and delete it.
To view schedules and presentations in the recording calendar:
1. Click Content > Calendar and select a time zone from the Show times in drop-down list.
2. Select the Show Schedules check box to include schedules in the calendar. Select a Recorder in the drop-down list to view only its schedules. By default, Recorders that are currently recording are included. Clear the Busy check box to remove them from the calendar.
3. Clear the Show Presentations check box to filter out individual presentations. When presentations are included, you can filter them by status.
4. Navigate to the date you want in the calendar and click the time slot where you want to add a schedule.

![]() Recording Calendar
Recording Calendar
When a template is present in a folder, Mediasite pre-fills schedules with the template’s settings, thus reducing the time and effort required. Templates define how presentations are created, published and the media format types available. You only need to specify the Name, Description, Record Date, Record Time, and Duration. However, you can modify all settings if you choose. If there are not any templates available, you must fill in all settings each time you add a new schedule.
To add a schedule for a Recorder:
1. Click Content, navigate to the folder where you want to add the schedule, right-click it, and select Add Schedule. Alternatively, you can click a time slot in the Calendar or Availability view to initiate this task.
2. If you do not want to use the default template, click Change Template. Switching templates overwrites all data except for the Title, Description, Tags, Recorder Operation, and Folder fields so make sure to choose your template before moving on to the next settings:
|
Options |
Details |
|
Folder |
By default, Mediasite adds the schedule and presentations created using it to the folder from Step 1. Update the folder as needed. |
|
Publishing Options |
Select how you want presentations created from this schedule published: •Auto publish and make Viewable: Select to have the recorded presentation automatically published to Mediasite and made available for viewing. •Auto publish and make Private: Select to have the recorded presentation automatically published to Mediasite. However, the presentation will not be available for viewing by other users. You will have to update the presentation's status later to make it available for viewing. This option is recommended for users who want to review and edit presentations prior to sharing them with their audience. •Manual publish and make Viewable: Select to publish the recorded presentation manually to Mediasite using the Recorder. Once you publish the presentation is published, it will be made available for viewing. •Manual publish and make Private: Select to publish the recorded presentation manually to Mediasite using the Recorder. Once you publish the presentation to Mediasite, only you can view it. It will not be available for viewing by other users. You will have to update the presentation's status later to make it available for viewing. |
|
Time zone |
Select the time zone that maps to the Recorder’s location. |
|
Recurrences |
Click Add Recurrence to update the default recurrence details if they do not meet your scheduling needs. After specifying the recurrence details for your schedule make sure to click Save: •Start Date: Specify the date and time of the first scheduled presentation. When "start recording" is among the selected operations, the Recorder will start recording the presentation at this time. •End Date: By default, Never is selected. However, to avoid creating presentations you should always specify an end date. •Duration: Enter the length (hours:minutes) of the presentation. When Create, open, start, and stop recording is the selected operation, the Recorder will stop recording after this period has passed. •Repeats: Select how often presentations will occur: One Time Only, Daily, Weekly, Monthly, or Yearly. Other options become available based on the item selected in this drop-down list. Select the appropriate settings for your schedule. |
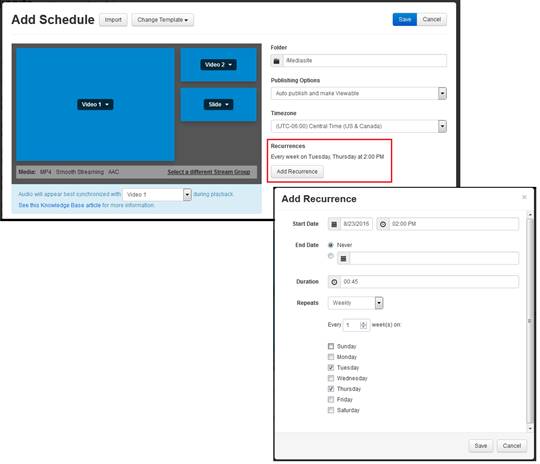
Add schedule: stream group, publishing, and recurrence details
3. Click the Information tab to specify properties that presentations created using this schedule inherit. Once presentations are created, you can update these settings as needed.
|
Options |
Details |
|
Title |
Enter a descriptive name for the schedule. All presentations created from this schedule will include this title as part of their name. |
|
Description |
Enter a short description. Users can search for schedules (and presentations) using content in the description. |
|
Tags |
Enter the tags that you want associated with this schedule. For example, if this schedule will be used for a computer science class titled "CS150: Components and Design Techniques for Digital Systems," you may want to include the following tags: CS 150, digital design, computer science. |
|
Categories |
Select categories for your schedule. When a presentation is published to YouTube™, the uploaded video is placed in matching YouTube categories. |
|
Modules |
If modules are available on your Mediasite, select one for your schedule. A module serves as an advanced integration point and maps to a course in a Learning Management Systems (LMS). |

Add schedule: Information tab
 For more information on categories, see
Publishing
presentations to YouTube™" XE "publish:
external sites, to" . If you are
integrating Mediasite with an LMS and using automatic module provisioning, refer
to the appropriate integration guide for detailed instructions. All guides are
available on the Customer Care
Portal.
For more information on categories, see
Publishing
presentations to YouTube™" XE "publish:
external sites, to" . If you are
integrating Mediasite with an LMS and using automatic module provisioning, refer
to the appropriate integration guide for detailed instructions. All guides are
available on the Customer Care
Portal.
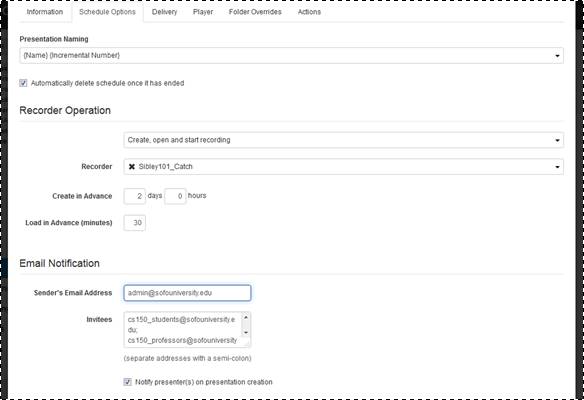
4. Click the Schedule Options tab to specify the scheduling details:
|
Options |
Details |
|
Presentation Naming |
Presentations are named using the schedule’s title. Select the presentation naming convention you want to use: {Name} {Incremental Number} or {Name}{Record Date}. When using incremental numbers, you must also select the starting number. For our example, if the presentation title is CS150, the presentations may be named CS150_1 or CS150_ 8/19/2020. |
|
Automatically delete schedule once it has ended |
Select the check box to remove the finished schedule from the Mediasite automatically after the end date is reached. |
|
Recorder Operation |
Select the tasks you want automated from the drop-down list: •Manually generate presentations: Select this option to have the scheduler create a “place-holder” schedule that is not associated with any recording device. This option is useful when you know the dates and times for your recurring presentations but have not finalized the Recorder’s assignments. •Create and open: Select this option to have the scheduler create presentations and open them for recording on the Recorder at the specified record and date time. You must start recording these presentations manually. •Create, open and start recording: Select this option to have the scheduler create presentations, open them on the Recorder, and start recording at the specified record date and time. You must stop recording these presentations manually. •Create, open, start and stop recording: Select this option to have the scheduler create presentations, open them on the Recorder, start recording at the specified record date and time, and stop recording after the specified duration is reached. •Create, open, and stop recording: Select this option to have the scheduler create presentations, open them on the Recorder. Users will start recording manually and the presentation will automatically stop recording after the specified duration has passed. |
|
Recorder |
Choose a Recorder from the drop-down list. |
|
Create in Advance |
Enter the amount of time, in days and hours a presentation should be created prior to its scheduled record date and time. |
|
Load in Advance |
Enter the amount of time (in minutes) a presentation should be loaded on the selected Recorder prior to its scheduled record date and time. When this value is set to 0, presentations are loaded just in time for recording. |
|
Sender’s Email Address |
Enter the email address that will be used to send out notifications when a new presentation is created. |
|
Invitees |
Enter the email addresses for the people to whom notifications will be sent when a new presentation is created. Enter only one address per line. |
|
Notify presenter(s) on presentation creation |
Select the check box to send the recurring presentation’s primary presenter a notification email each time a presentation is created by the scheduler. |
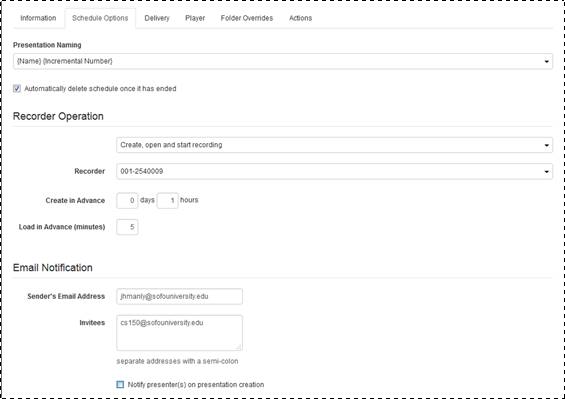
Add schedule, Schedule Options
When you select Manually generate presentations for a schedule, you will
create the schedule's presentations manually on its properties page to make them
available for recording. In addition, because this schedule is not associated
with a Recorder, its events are not visible in the recording calendar. Instead,
they are only shown on the schedule's properties page.
You can always update the schedule's automated tasks and associate it with a Recorder later. For more information, see Create presentations manually for schedules without a Recorder
 If the recurrence details you selected
earlier conflict with those for another schedule on the Recorder, an error
message appears, and you must update them or choose another Recorder.
If the recurrence details you selected
earlier conflict with those for another schedule on the Recorder, an error
message appears, and you must update them or choose another Recorder.
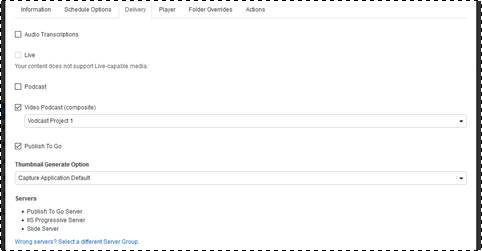
5. Click the Delivery tab to select how you want to make content available to your audience:
|
Settings |
Details |
|
Audio Transcriptions |
Select this check box to enable captioning for this presentation. Select the appropriate audio transcription profile from the drop-down list. The audio transcription profile contains the credentials needed to connect to your automated captioning provider. You must already have an existing account with valid credentials. Once you add the presentation, you will have the option of uploading files manually.
|
|
Live |
Select this check box to broadcast this presentation live. |
|
Podcast |
Select this check box to enable podcasting. Select the quality (encoding rate) from the drop-down list. The higher the rate at which the MP3 files are encoded the higher the quality during playback. However, this also increases the size of the file. |
|
Video podcast (composite) |
Select this check box to enable video podcasting. Select a video podcast project from the drop-down list.
|
|
Publish to Go |
Select this check box to enable the publishing of self-contained presentations that do not require a network connection to the Mediasite and a media server for viewing. The servers listed on this will be updated to include the Publish to Go Server. |
|
Thumbnail Generate Option |
From the drop-down list, select how you want to generate thumbnail images.: •From Stream:If you have selected a stream group, you will see each of the streams in the drop-down list, for example: From Stream: Video 1. When you select a video or slide stream, Mediasite captures its first frame as the thumbnail image. •Capture Application Default: Select this option to use the thumbnail generated by the system (Recorder, Catch, or EVP) when media captured, uploaded, or imported. •Never Generate: Select this option to turn off auto-generation of thumbnail images. This option is must useful when recording live presentations or importing content. In this case, you will upload thumbnail images manually.
|
|
Servers |
Verify the servers listed are the ones you want. If they are not, click Wrong servers? Select a different Server Group and locate the server group you want to use. |
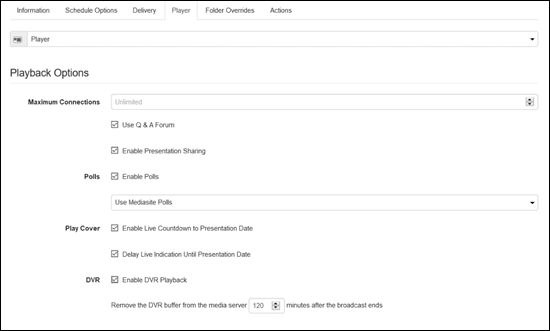
6. Click the Player tab to specify the player used for presentations created using this schedule as well as the player’s features:
|
Settings |
Details |
|
Player |
Select a player from the drop-down list. Use the search feature as needed to locate the player you are seeking. If you want to add and select a new player, click Quick Add and specify the player’s details. Click Save. |
|
Maximum Connections |
Enter a number if you want to make your presentation viewable for only a certain number of concurrent viewers. The default value is unlimited connections. The default value is unlimited connections. |
|
Use Q & A Forum |
Select this check box to allow audience members to ask questions during live and on-demand presentations using the Mediasite Player.
|
|
Enable Presentation Sharing |
Select this check box to allow users to share this presentation using the Player. |
|
Enable Polls |
Select this check box to use polls in the presentation. Polls allow you to interact with your audience during a presentation and receive direct feedback. Select the type of polls you want to use in your presentations: •Use Mediasite Polls: Select this option to add polls to your presentations using Mediasite. •Link to External Polls: Select this option to use a third-party survey system and then enter the URL for the poll. |
|
Play Cover |
Select the check box next to the features you want to make available in the presentation’s play cover: •Enable Live Countdown to Presentation Date: Select this option to display a countdown in the play cover that ends the day of the presentation. •Delay Live Indication Until Presentation Date: Select this option so the live broadcast indicator does not appear until the date presentation goes live. |
|
Enable DVR Playback |
Select this checkbox to allow users to use the DVR feature when watching a live broadcast. DVR playback allows users to seek within the DVR window or pause a live broadcast. Specify the DVR Buffer settings: •Media Duration + __ minutes: Specify the duration of the DVR window in the Player. This maps to the buffer time. When the live broadcast has ended, the Media duration + buffer is the window available for viewing the "live" broadcast. •And not to exceed __ minute: Specify the maximum value for the DVR window. |

Add schedule: Player tab
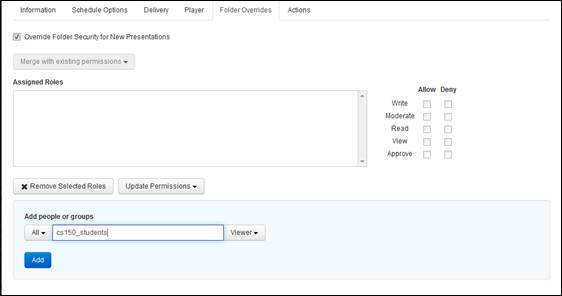
7. Click Folder Overrides and select the Override Folder Permissions for New Presentations check box to assign permissions to presentations created using this schedule that will override their parent folder's permissions.
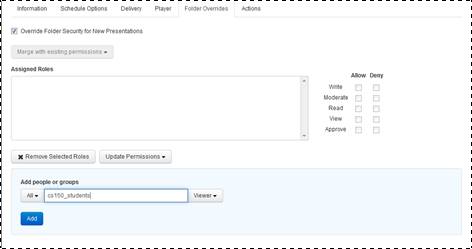
Add schedule, Folder override permissions
8. Select the Enable Review/Edit/Approve Workflow check box to include presentations created using this schedule in the content approval workflow. When this feature is enabled, users (with the appropriate permissions) can take presentations through an iterative review, edit, and approval process before making them available to an audience.
9. Click Merge with existing permissions to choose how you want to override folder permissions:
|
Setting |
Description |
|
Merge with existing permissions |
:Select to have only assigned permissions updated. For example, if you leave the Write check box empty, the write permissions for the selected items will remain the same. |
|
Replace permissions |
Select to update all permissions with new values. Unassigned permissions will replace the current corresponding permissions so that they become unassigned. |
10. Assign permissions as needed by entering a name, email, or group name, clicking Add and assigning permissions using the check boxes or by selecting a job from the drop-down list. When you select a job, the corresponding check boxes are selected.
11. To update permissions at any time, select a role or profile, click Update Permissions and make your updates using the check boxes or the drop-down list.
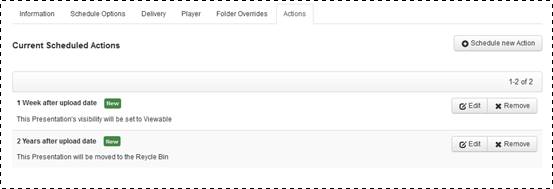
12. Click Actions > Schedule new action to schedule the following actions for presentations created using this schedule: update visibility, remove adaptive bitrate (smooth streaming) content, and send the presentation to the Recycle Bin.
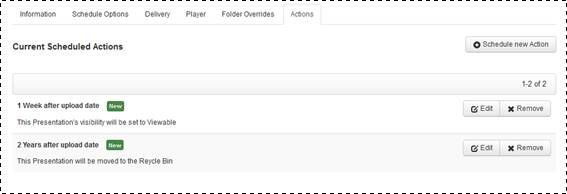
Add schedule, Actions
If the template you used to
create this schedule has actions associated with it, the schedule and
presentations created from it will inherit these actions. However, you can
update or remove these default actions as needed. For more detailed information
on scheduling actions on templates, schedules, and presentations, see Scheduling actions.
13. Click Save. The new schedule is now available on the Schedules page. When the scheduler creates new presentations for this schedule, they are listed in the folder and on the schedule’s properties page.
When you select a Catch device as part of the Schedule Options, Mediasite automatically switches to include only templates that work with Catch. Switching the template overwrites all data except for the Title, Description, Tags, Recorder Operation, and Folder fields. To avoid overwriting data, you should always specify the schedule options first as described below.
To create a schedule for a Catch device:
1. Click Content and navigate to the folder where you want to add the schedule, right-click it, and select Add Schedule.
2. Click Change Template at the top of the page and select one of the Catch templates, which includes the presentation’s streams and their encoding settings, from the drop-down list:
|
Options |
Details |
|
Catch Audio Only Template |
Select this option to record an audio-only presentation. |
|
Catch Camera Only Template |
Select this option to record video from the camera and audio. |
|
Catch Desktop & Camera Template |
Select this option to record the desktop a screencast, video from the camera, and audio. |
|
Catch Desktop Only Template |
Select this option to record the desktop as a screencast and audio. |
|
Catch Slides & Audio Template |
Select this option to record the desktop as a slideshow and audio. |
|
Catch Slides & Camera Template |
Select this option to record the desktop as a slideshow, video from the camera, and audio. When you select this option, you can choose which video to synchronize with the audio during playback. By default, audio is synchronized with the camera’s video. |
 Switching templates overwrites all data
except for the Title, Description, Tags, Recorder Operation, and Folder
fields so make sure to choose your template before moving on to the next
settings.
Switching templates overwrites all data
except for the Title, Description, Tags, Recorder Operation, and Folder
fields so make sure to choose your template before moving on to the next
settings.
3. On the Schedule Options page, select the Catch device and specify which parts of the recording process to automate.
|
Options |
Details |
|
Presentation Naming |
Presentations are named using the schedule’s title. Select the presentation naming convention you want to use: {Name} {Incremental Number} or {Name}{Record Date}. When using incremental numbers, you must also select the starting number. For our example, if the presentation title is CS150, the presentations may be named CS150_1 or CS150_ 8/19/2020. |
|
Automatically delete schedule once it has ended |
Select the check box to remove the finished schedule from the Mediasite automatically after the end date is reached. |
|
Recorder Operation |
Select the tasks you want automated from the drop-down list: •Manually generate presentations: Select this option to have the scheduler create a “place-holder” schedule that is not associated with any recording device. This option is useful when you know the dates and times for your recurring presentations but have not finalized the Recorder’s assignments. •Create and open: Select this option to have the scheduler create presentations and open them for recording on the Recorder at the specified record and date time. You must start recording these presentations manually. •Create, open and start recording: Select this option to have the scheduler create presentations, open them on the Recorder, and start recording at the specified record date and time. You must stop recording these presentations manually. •Create, open, start and stop recording: Select this option to have the scheduler create presentations, open them on the Recorder, start recording at the specified record date and time, and stop recording after the specified duration is reached. •Create, open, and stop recording: Select this option to have the scheduler create presentations, open them on the Recorder. Users will start recording manually and the presentation will automatically stop recording after the specified duration has passed. |
|
Recorder |
Choose your Catch device from the drop-down list. When you select a Catch device, Mediasite automatically loads the “Catch Slides & Audio” template and filters out any templates that are incompatible with Catch. |
|
Create in Advance |
Enter the amount of time, in days and hours a presentation should be created prior to its scheduled record date and time. |
|
Load in Advance |
Enter the amount of time (in minutes) a presentation should be loaded on the selected Recorder prior to its scheduled record date and time. When this value is set to 0, presentations are loaded just in time for recording. |
|
Sender’s Email Address |
Enter the email address that will be used to send out notifications when a new presentation is created. |
|
Invitees |
Enter the email addresses for the people to whom notifications will be sent when a new presentation is created. Enter only one address per line. |
|
Notify presenter(s) on presentation creation |
Select the check box to send the recurring presentation’s primary presenter a notification email each time a presentation is created by the scheduler. |
Add schedule: schedule options
4. Specify the publishing and recurrence settings. These settings determine how often presentations occur, how and in which folder they are published, and the encoding settings:
|
Options |
Details |
|
Folder |
By default, Mediasite adds the schedule and presentations created using it to the folder from Step 1. Update the folder as needed. |
|
Publishing Options |
Select how you want presentations created from this schedule published: •Auto publish and make Viewable: Select to have the recorded presentation automatically published to Mediasite and made available for viewing. •Auto publish and make Private: Select to have the recorded presentation automatically published to Mediasite. However, the presentation will not be available for viewing by other users. You will have to update the presentation's status later to make it available for viewing. This option is recommended for users who want to review and edit presentations prior to sharing them with their audience. •Manual publish and make Viewable: Select to publish the recorded presentation manually to Mediasite using the Recorder. Once you publish the presentation is published, it will be made available for viewing. •Manual publish and make Private: Select to publish the recorded presentation manually to Mediasite using the Recorder. Once you publish the presentation to Mediasite, only you can view it. It will not be available for viewing by other users. You will have to update the presentation's status later to make it available for viewing. |
|
Time zone |
Select the time zone that maps to the Recorder’s location. |
|
Recurrences |
Click Add Recurrence to update the default recurrence details if they do not meet your scheduling needs. After specifying the recurrence details for your schedule make sure to click Save: •Start Date: Specify the date and time of the first scheduled presentation. When "start recording" is among the selected operations, the Recorder will start recording the presentation at this time. •End Date: By default, Never is selected. However, to avoid creating presentations you should always specify an end date. •Duration: Enter the length (hours:minutes) of the presentation. When Create, open, start, and stop recording is the selected operation, the Recorder will stop recording after this period has passed. •Repeats: Select how often presentations will occur: One Time Only, Daily, Weekly, Monthly, or Yearly. Other options become available based on the item selected in this drop-down list. Select the appropriate settings for your schedule. |
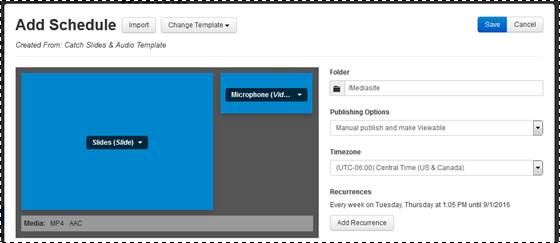
Add schedule: template, publishing options, and recurrence settings
5. Click the Information tab to specify properties that presentations created using this schedule inherit. Once presentations are created, you can update these settings as needed:
|
Options |
Details |
|
Title |
Enter a descriptive name for the schedule. All presentations created from this schedule will include this title as part of their name. |
|
Description |
Enter a short description. Users can search for schedules (and presentations) using content in the description. |
|
Tags |
Enter the tags that you want associated with this schedule. For example, if this schedule will be used for a computer science class titled "CS150: Components and Design Techniques for Digital Systems," you may want to include the following tags: CS 150, digital design, computer science. |
|
Categories |
Select categories for your schedule. When a presentation is published to YouTube™, the uploaded video is placed in matching YouTube categories. |
|
Modules |
If modules are available on your Mediasite, select one for your schedule. A module serves as an advanced integration point and maps to a course in a Learning Management Systems (LMS). |
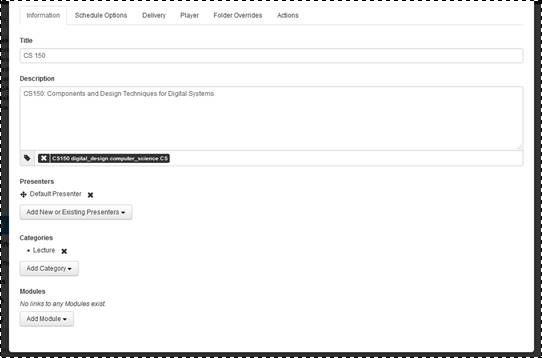
Add schedule: Information tab
6. Click the Delivery tab to select how you want to make content available to your audience.
|
Settings |
Details |
|
Audio Transcriptions |
Select this check box to enable captioning for this presentation. Select the appropriate audio transcription profile from the drop-down list. The audio transcription profile contains the credentials needed to connect to your automated captioning provider. You must already have an existing account with valid credentials. Once you add the presentation, you will have the option of uploading files manually.
|
|
Live |
Live recordings are NOT available when using Catch. |
|
Podcast |
Select this check box to enable podcasting. Select the quality (encoding rate) from the drop-down list. The higher the rate at which the MP3 files are encoded the higher the quality during playback. However, this also increases the size of the file. |
|
Video podcast (composite) |
Select this check box to enable video podcasting. Select a video podcast project from the drop-down list.
|
|
Publish to Go |
Select this check box to enable the publishing of self-contained presentations that do not require a network connection to the Mediasite and a media server for viewing. The servers listed on this will be updated to include the Publish to Go Server. |
|
Thumbnail Generate Option |
From the drop-down list, select how you want to generate thumbnail images.: •From Stream: If you have selected a stream group, you will see each of the streams in the drop-down list, for example: From Stream: Video 1. When you select a video or slide stream, Mediasite captures its first frame as the thumbnail image. •Capture Application Default: Select this option to use the thumbnail generated by the system (Recorder, Catch, or EVP) when media captured, uploaded, or imported. •Never Generate: Select this option to turn off auto-generation of thumbnail images. This option is must useful when recording live presentations or importing content. In this case, you will upload thumbnail images manually.
|
|
Servers |
Verify the servers listed are the ones you want. If they are not, click Wrong servers? Select a different Server Group and locate the server group you want to use. |
Add schedule: Delivery tab
 Once a presentation is recorded and
published, the thumbnail generation options are not available. You can replace
the thumbnail image by going to the Edit tab and
updating the image manually. For more information, see Add thumbnail
images manually.
Once a presentation is recorded and
published, the thumbnail generation options are not available. You can replace
the thumbnail image by going to the Edit tab and
updating the image manually. For more information, see Add thumbnail
images manually.
7. Click the Player tab to specify the player used for presentations created using this schedule as well as the player’s features:
|
Settings |
Details |
|
Player |
By default, when you select a Catch device, Mediasite loads the “Desktop Recorder MultiView” player. The Desktop Recorder MultiView Player is required for dual video (screencast and video) recordings but you can use other players for other recording types. To use a different player, select it from the drop-down list. Use the search feature as needed to locate the player you are seeking. If you want to add and select a new player, click Quick Add and specify the player’s details. Click Save. |
|
Maximum Connections |
Enter a number if you want to make your presentation viewable for only a certain number of concurrent viewers. The default value is unlimited connections. The default value is unlimited connections. |
|
Use Q & A Forum |
Select this check box to allow audience members to ask questions during live and on-demand presentations using the Mediasite Player.
|
|
Enable Presentation Sharing |
Select this check box to allow users to share this presentation using the Player. |
|
Enable Polls |
Select this check box to use polls in the presentation. Polls allow you to interact with your audience during a presentation and receive direct feedback. Select the type of polls you want to use in your presentations: •Use Mediasite Polls: Select this option to add polls to your presentations using Mediasite. •Link to External Polls: Select this option to use a third-party survey system and then enter the URL for the poll. |
|
Play Cover |
Select the check box next to the features you want to make available in the presentation’s play cover: •Enable Live Countdown to Presentation Date: Select this option to display a countdown in the play cover that ends the day of the presentation. •Delay Live Indication Until Presentation Date: Select this option so the live broadcast indicator does not appear until the date presentation goes live. |
Add schedule: Player tab
8. Click Folder Overrides and select the Override Folder Permissions for New Presentations check box to assign permissions to the presentations created using this schedule that will override their parent folder's permissions.
Add schedule, Folder override permissions
9. Select the Enable Review/Edit/Approve Workflow check box to include presentations created using this schedule in the content approval workflow. When this feature is enabled, users (with the appropriate permissions) can take presentations through an iterative review, edit, and approval process before making them available to an audience.
10. Click Merge with existing permissions to choose how you want to override folder permissions:
|
Options |
Details |
|
Merge with existing permissions |
Select to have only assigned permissions updated. For example, if you leave the Write check box empty, the write permissions for the selected items will remain the same. |
|
Replace permissions |
Select to update all permissions with new values. Unassigned permissions will replace the current corresponding permissions so that they become unassigned. |
11. Assign permissions as needed by entering a name, email, or group name, clicking Add and assigning permissions using the check boxes or by selecting a job from the drop-down list. When you select a job, the corresponding check boxes are selected.
12. To update permissions at any time, select a role or profile, click Update Permissions and make your updates using the check boxes or the drop-down list.
13. Click Actions > Schedule new action to schedule the following actions for presentations created using this schedule: update visibility, remove adaptive bitrate (smooth streaming) content, and send the presentation to the Recycle Bin.
Add schedule, Actions
 If the template you used to create this
schedule has actions associated with it, the schedule and presentations created
from it will inherit these actions. However, you can update or remove these
default actions as needed. For more detailed information, see Scheduling actions.
If the template you used to create this
schedule has actions associated with it, the schedule and presentations created
from it will inherit these actions. However, you can update or remove these
default actions as needed. For more detailed information, see Scheduling actions.
14. Click Save. The new schedule is now available on the Schedules page. When the scheduler creates new presentations for this schedule, they are listed in the folder and on the schedule’s properties page.
You can import schedules by uploading an XML file containing schedule and recurrence details, in the appropriate format, to Mediasite. Importing schedules is useful when you have many schedules to create.
Create schedule details XML file
Before you can import schedules, you have to convert your class schedule information into an XML file that uses a pre-defined format. This file can contain multiple schedules.
To create your own file, copy the recorder_schedule_import_complete_example.xml file, located in Management Portal’s installation directory into a new file. Update the new file with the appropriate schedule information and recurrence details and save it to a location that is accessible from the Mediasite. You will find additional recurrence examples—one-time only, daily, weekly, monthly, and yearly recurrences—in the recurrence_import_example.xml file.
 The default location of the sample
files is C:\Program Files\Sonic Foundry\Mediasite Video
Platform\7_0\Manage\LocalStorage\ImportXml. The sample files are only for
reference and cannot be imported.
The default location of the sample
files is C:\Program Files\Sonic Foundry\Mediasite Video
Platform\7_0\Manage\LocalStorage\ImportXml. The sample files are only for
reference and cannot be imported.
For more information on the schedule
import options, see KBA3781 available on the Customer Care Portal at:
www.sonicfoundry.com/support.
To import a schedule:
1. Click Content and navigate to the folder in which you want to add the schedule. Right-click folder and select Add Schedule. Alternatively, you can click a time slot in the Calendar or Availability view to initiate this task.
2. On the Add Schedule page, click Import and specify the following:
|
Options |
Details |
|
Presentation Template |
Select the template you want to use for the schedules. |
|
Import File |
Click Select a file to navigate to and choose the import file you want to use. |
|
Allow folder overrides in the schedule import file |
Select this option if you want to specify different folders and presentations. For example, if there are some schedules that need to go into a different folder or use a different template, you can update them as needed. The remaining schedules will use the folder and template selected above. |
3. Click Select to browse to and select the XML file containing that data you want to import. Click Next.
4. On the Confirm Schedule Creation page, click Finish. The newly created schedules are listed in the folder.

Specify the template and import file

Sample import schedule file
When you create a schedule that does not have a Recorder associated with it, you must create the presentations manually for recording. Once you create presentations, they are listed on the schedule’s properties page and in Management Portal and can be opened for recording in the same manner as other presentations.
To create presentations for schedules not associated with a Recorder:
1. On the schedule’s Summary page, click More > Presentations > Create Presentations. The Create Presentations dialog appears.
2. Click the Create Through field and use the calendar to specify an end date for creating presentations and click Create. Mediasite creates presentations based on the schedule’s recurrence up until the end date specified.
3. When the summary of presentations created successfully appears, click OK.
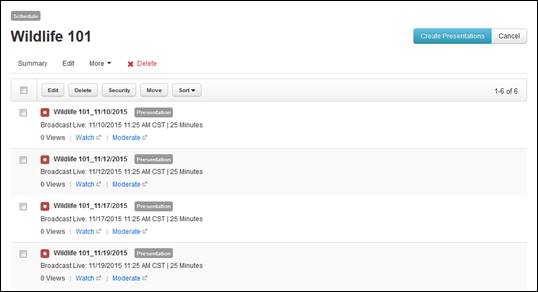
Manually create presentations for schedules without Recorders
When deleting a schedule’s events on the Recording Calendar, you have the option of deleting a single event, multiple events, or the entire schedule. When an event is deleted, the scheduler does not create the presentation(s) associated with it. This is useful if you want to exclude dates in a schedule without creating a global exclude date, if you suddenly cancel presentations, or if you want to schedule a different presentation at that time. Deleted presentations are grayed out in the recording calendar.
To delete scheduled events:
1. Navigate to the scheduled event, click it, and click Delete.
2. When the confirmation message appears, click the button that best fits which events you want to delete:
|
Options |
Details |
|
This instance |
Delete the event scheduled for that time. |
|
All events |
Delete schedule. |
|
All following |
Delete all events scheduled after the selected event. |

Delete event options, availability or weekly view
Before you can delete all events,
which deletes the schedule, you must delete all unrecorded presentations
associated with the schedule. For more information, see Delete schedules.
When events in a schedule are cancelled, they can be restored if they do not overlap with another event that may have been scheduled in its place.
To restore a cancelled event:
1. Navigate to the cancelled event, which will be grayed out in the grid. Click the cancelled event to view its schedule task menu. Click Restore.
2. When the confirmation message appears, click Yes. The cancelled event is restored.

Restore cancelled schedule event
Before you can delete a schedule and all the events (recurrences) associated with it, you must first delete all its unrecorded presentations. You must then permanently remove these presentations from the Recycle Bin.
To delete a schedule:
1. Navigate to the schedule and click it to view its summary page. Click More > Presentations to view all presentations associated with the presentation.
2. Select the check box next to each unrecorded presentation and click Delete to send them to the Recycle Bin.
3. Go to the Recycle Bin and permanently delete the presentations.
4. Navigate back to the schedule and delete it or delete it using the recording calendar.
 If a schedule still does not delete,
then your Mediasite administrator may have to run the deletion job: Settings > Server Settings >
Recycle bin.
If a schedule still does not delete,
then your Mediasite administrator may have to run the deletion job: Settings > Server Settings >
Recycle bin.
 When a user is assigned moderate
permissions for a presentation, questions will be forwarded to the email
address associated with their valid user profile unless the user opts out
of moderator emails or provides an alternate moderator email address.
Users can opt out of moderator emails or provide an alternative email
address as part of their user profile settings.
When a user is assigned moderate
permissions for a presentation, questions will be forwarded to the email
address associated with their valid user profile unless the user opts out
of moderator emails or provides an alternate moderator email address.
Users can opt out of moderator emails or provide an alternative email
address as part of their user profile settings.