You will use presentation templates to create presentations
and schedules for recurring presentations. A template’s settings define how
presentations are created, published and the media format types available.
 Although templates are not
required to create presentations and schedules, it is a best practice to create
a template for each course (or folder). When a template is present in a folder,
new schedules and presentations are pre-filled with its settings, thus reducing
the time and effort required.
Although templates are not
required to create presentations and schedules, it is a best practice to create
a template for each course (or folder). When a template is present in a folder,
new schedules and presentations are pre-filled with its settings, thus reducing
the time and effort required.
Stream group considerations
When selecting a stream group for your template, consider
the following:
•
The streams you select will determine which server groups are associated
with presentations created from this template.
•
If you have multiple video streams, by default, Mediasite syncs the audio
to play back from the lowest number video stream, which is the stream with the
primary content. However, you can synchronize the audio with a different video
stream, for example a video stream featuring the presenter talking, by selecting
it from the drop-down list.
•
To create audio-only presentations, you must select an audio-only stream
group. Note that when you record an audio-only presentation, the Recorder will
capture the video and allow you to monitor the recording sessions and preview
the final presentation. However, the video will not be available for playback in
Mediasite Player.
•
Once you add a stream group to a template, you can enable the following
additional features:
•
OCR detection: You can enable OCR detection on
video and slide streams. You will enable OCR detection to extract text from
slides. When a presentation with OCR detection enabled is published to
Mediasite, OCR detection is automatically done for its slides. OCR detection
allows users to search a presentation's slide text by entering key words or
phrases. Users can then use the search results to view the presentation at the
times where the search term is found. In cases where OCR detection fails,
Mediasite allows you to resubmit OCR detection.
•
Slide generation: When you enable slide
generation on a video stream, Mediasite automatically generates slides from the
video stream. In on-demand presentations, the generated slides are used in place
of secondary video streams on mobile devices and are used in seek player views
when using the MultiView Player.
To add a new template:
1.
Right-click the folder to which you want to add the template, click Add > Template and specify the
template’s settings.
|
Setting |
Description |
|
Stream group |
Click Select a different Stream
Group and select the stream group you want to use for the
template. |
|
Publishing Options |
From the drop-down list, select
how you want presentations published:
•
Auto publish and make Viewable: Select to
have recorded presentations automatically published to Mediasite and made
available for viewing.
•
Auto publish and make Private: Select to
have recorded presentations automatically published to Mediasite. However,
these presentations will not be available for viewing by other users. You
will have to update a presentation's status later to make it available for
viewing. This option is recommended for users who want to review and edit
presentations prior to sharing them with their audience.
•
Manual publish and make Viewable: Select
to publish the recorded presentation manually to Mediasite using the
Recorder. Once you publish a presentation, it will be made available for
viewing.
•
Manual publish and make Private: Select
to publish recorded presentations manually to Mediasite using the
Recorder. Once you publish a presentation to Mediasite, only you can view
it. It will not be available for viewing by other users. You will have to
update the presentation's status later to make it available for
viewing. |
|
Time Zone |
Choose the time zone that will be used when new
presentations are created. |

Add new template, general
settings
2. On the
Information tab, specify the following settings:
|
Setting |
Description |
|
Title |
Enter a descriptive name for the template so that you
will be able to distinguish it from other templates later. |
|
Description |
Enter a short description of the
template. |
|
Tags |
Enter the tags that you want associated with schedules
and presentations created using this template. For example, if this
template will be used for a computer science class titled "CS150:
Components and Design Techniques for Digital Systems," you might want to
include the following tags: CS 150, digital design, computer
science. |
|
Presenters |
Click Add New or Existing
Presenters to add presenters. Use the search feature to find
presenters that have already been added on Mediasite. |
|
Categories |
Select categories for your template. When a
presentation is published to YouTube™, the uploaded video is placed in
matching YouTube categories. |
|
Modules |
If modules are available on your Mediasite, select one
for your template. A module serves as an advanced integration point and
maps to a course in a Learning Management Systems
(LMS). |
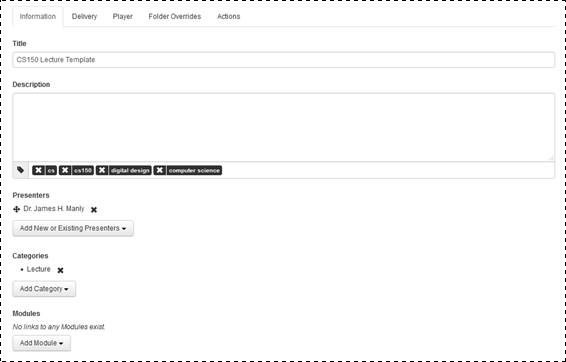
Add new template, Information
tab
 For more information on
modules, contact the person in your organization who is responsible for
integrating Mediasite with your Learning Management system. For more information
on categories, see Publishing presentations to
YouTube™.
For more information on
modules, contact the person in your organization who is responsible for
integrating Mediasite with your Learning Management system. For more information
on categories, see Publishing presentations to
YouTube™.
3. Click
the Delivery tab to specify the following
settings:
|
Setting |
Description |
|
Audio Transcription |
Select this check box to enable captioning for
presentations and schedules created using this template. Select the
appropriate audio transcription profile from the drop-down list. The audio
transcription profile contains the credentials needed to connect to your
automated captioning provider. You must already have an existing account
with valid credentials. |
|
Live |
Select this check box to allow
users to specify live broadcasts when using this template to create
presentations and schedules. If you are using a custom live server or CD,
make sure to enter the publishing point for each stream. |
|
Podcast |
Select this check box to enable podcasting. Select the
quality (encoding rate) from the drop-down list. The higher the rate at
which the MP3 files are encoded the higher the quality during playback.
However, this also increases the size of the file. |
|
Video podcast
(composite) |
Select this check box to enable video podcasting.
Select a video podcast project from the drop-down list.
|
|
Generate Thumbnail |
From the drop-down list, select how you want to
generate thumbnail images. If you have selected a stream group, you will
see each of the streams in the drop-down list. When you select a
video or slide stream, Mediasite captures its first frame as the thumbnail
image. |
|
Servers |
Verify the servers listed are the ones you want. If
they are not, click Wrong servers? Select a different
Server Group and locate the server group you want to use for this
template. |
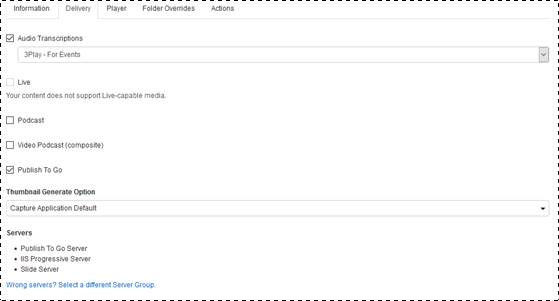
Add new template, Delivery tab
For users to be able to
download content (podcasts, vodcasts, portable presentations), they must have
permission for the “Download Mediasite Content” Portal resource. To download
Publish-to-Go content, users must also have permissions for the “Publish to Go”
operation.
 For more information, see
“Assign permissions to Portal resources” in the Mediasite Configuration
Guide and the help for My Mediasite, Catalog, Channel and Showcase
applications. Also, see Downloading
portable presentations, Managing catalogs, Managing showcases, and Managing channels.
For more information, see
“Assign permissions to Portal resources” in the Mediasite Configuration
Guide and the help for My Mediasite, Catalog, Channel and Showcase
applications. Also, see Downloading
portable presentations, Managing catalogs, Managing showcases, and Managing channels.
4. Click
the Player tab to specify the player used for the
template as well as the features available in the player:
|
Setting |
Description |
|
Player |
Select a player from the drop-down list. Use the search
feature as needed to locate the player you are seeking. If you want to add
and select a new player, click Quick Add and
specify the player’s details. Click Save. |
|
Maximum Connections |
Enter a number if you would like
your presentation to only be viewable to a certain number of concurrent
viewers. The default value is unlimited connections. |
|
Use Q & A Forum |
Select this check box to allow audience members to ask
questions during live and on-demand presentations using Mediasite
Player |
|
Enable Presentation Sharing on
Player |
Select this check box to allow
users to share this presentation using the Player. |
|
Enable Polls |
Select this check box to use polls in the presentation.
Polls allow you to interact with your audience during a presentation and
receive direct feedback. Select the type of polls you want to use in your
presentations:
•
Use Mediasite Polls: Select this option
to add polls to your presentations using Mediasite.
•
Link to External Polls: Select this
option to use a third-party survey system and then enter the URL for the
poll. |
|
Play Cover |
Select the check box next to the features you want to
make available in the presentation’s play cover:
•
Enable Live Countdown to Presentation
Date: Select this option to display a countdown that ends the day
of the presentation.
•
Delay Live Indication Until Presentation Date:
Select this option so the live broadcast indicator does not appear
until the date presentation goes live. |
|
Enable DVR Playback |
Select this checkbox to allow users to use the DVR
feature when watching a live broadcast. DVR playback allows users to seek
within the DVR window or pause a live broadcast. Specify the DVR Buffer settings:
Media Duration + __ minutes:
Specify the duration of the DVR window in the Player. This maps to the
buffer time. When the live broadcast has ended, the Media duration +
buffer is the window available for viewing the "live" broadcast.
And not to exceed __ minute:
Specify the maximum value for the DVR window. |
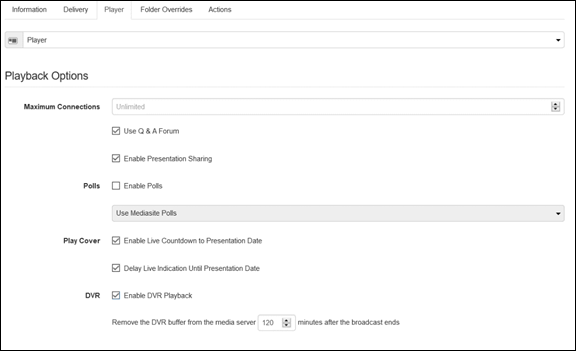
Add new template, Player tab
5. Click the Folder
Overrides tab and select the Override Folder
Permissions for New Presentations check box to assign permissions to
presentations created using this template that will override their parent
folder's permissions.
6. Select
the Enable Review/Edit/Approve Workflow check box to
include presentations created using this template in the content approval
workflow. When this feature is enabled, users (with the appropriate permissions)
can take presentations through an iterative review, edit, and approval process
before making them available to an audience.
7. Click
Merge with existing permissions to choose how you want
to override folder permissions:
|
Setting |
Description |
|
Merge with existing
permissions |
:Select to have only assigned
permissions updated. For example, if you leave the Write check box empty, the write permissions for the
selected items will remain the same. |
|
Replace permissions |
Select to update all permissions
with new values. Unassigned permissions will replace the current
corresponding permissions so that they become
unassigned. |
8. Assign
permissions as needed by entering a name, email, or group name, clicking Add and assigning permissions using the check boxes or by
selecting a job from the drop-down list. When you select a job, the
corresponding check boxes are selected.
9. To
update permissions at any time, select a role or profile, click Update Permissions and make your updates using the check
boxes or the drop-down list.
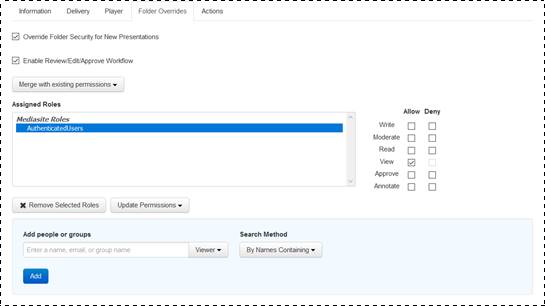
Add new template, Folder Overrides
tab
For more information on assigning
permissions, contact your Mediasite administrator or see the Mediasite Configuration
Guide.
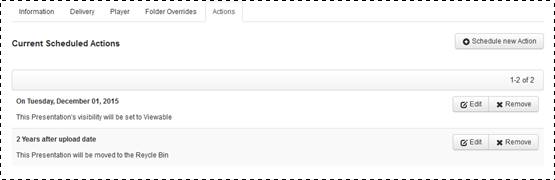
10. Click Actions > Schedule new action
to schedule the following actions for presentations created using this template:
update visibility, remove adaptive bitrate (smooth streaming) content, and send
the presentation to the Recycle Bin.
Add new template, Actions tab
When you schedule actions on templates,
all schedules and presentations created using them will inherit those
actions. However, you can update or remove these default actions as
needed. For more detailed information on scheduling actions on templates,
schedules, and presentations, see Scheduling actions.
11. Click Save.