When you add a showcase, there are many setting and options available for you to customize its look and feel.
To add a new showcase:
1. Click Publishing > Showcases > Add Showcase.
2. On the Display Options page customize the Showcase’s look:
|
Settings |
Details |
|
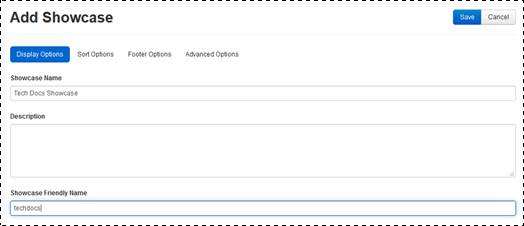
Showcase Name |
Enter name for your video library. The default name is Mediasite Showcase. |
|
Description |
•Enter a description that will allow you and other users to identify the showcase easily. |
|
Showcase Friendly Name |
Specify a keyword for the channel to customize its URL. This value will replace the showcase ID number in the URL. For example, if the friendly name is “myshowcase”, the URL uses this name instead of the showcaseID: URL using showcase ID: http://myserver.mynetwork.net/Mediasite/Showcase/ed968dc9872f456e93500b35872b3 URL using myshowcase as the friendly name http://myserver.mynetwork.net /Mediasite/Showcase/myshowcase |
Add new showcase (display options)
|
Settings |
Details |
|
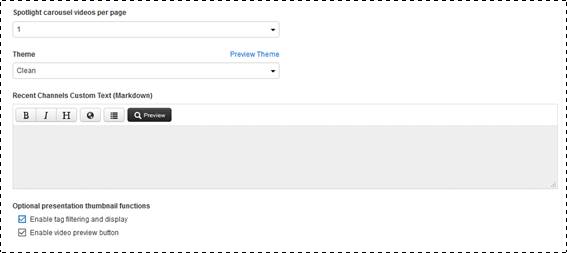
Spotlight Carousel videos per page |
•Select how many presentations will appear on each page as users navigate the spotlight carousel. |
|
Theme |
•Determine the look and feel of your showcase by selecting a theme. A theme is a set of files that determines the colors, fonts, layout, images, and overall design of the showcase. Click Preview Theme to view your Showcase with the selected theme. |
|
Recent Channels Custom Text |
Enter information, including links to external websites, about your recently added channels. Click Preview to see the text as it will appear on the page. |
|
Enable tag filtering and display |
•Select this check box to display a presentation’s tags in your showcase. When a user does a search, presentation tags meeting their search criteria will be included in search results. |
|
Enable video preview button |
Select this check box to display a video preview button for each presentation in the showcase. When users click this button, it will launch the presentation’s video in a pop-up window. Users will then click the Play button to preview the video. |
Add new showcase (display options)
3. Click the Sort Options tab to specify the default sorting in the showcase:
|
Settings |
Details |
|
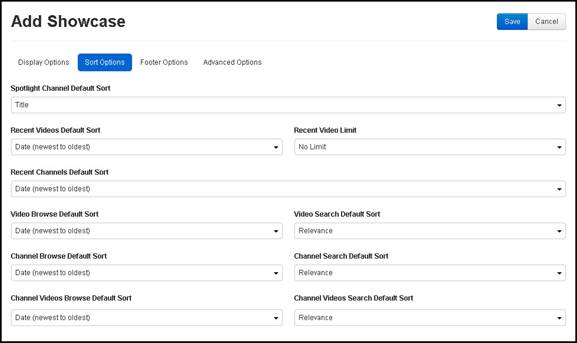
Spotlight Channel Default Sort |
•Select the default sort order of videos in the spotlight channel: Title, Date (newest to oldest), or Date (oldest to newest). |
|
Recent Videos Default Sort |
•Select the default sort order of recently added videos: Title, Date (newest to oldest), Date (oldest to newest), Most Viewed, or Currently Live. |
|
Recent Video Limit |
•Select how far back you want recent videos to go when a user does a search. For example, if you only want to display presentations added to Mediasite within the past 30 days, you will select Last 30 days from the drop-down list. Select No Limit to make all presentations available when a user does a search. |
|
Recent Channels Default Sort |
•Select the default sort order of recently added channels: Date (newest to oldest), Date (oldest to newest), Most Viewed, or Channel Name. |
|
Video Browse Default Sort |
Select the default order of videos when a user browses through the showcase video page: Title, Date (newest to oldest), or Date (oldest to newest). |
|
Video Search Default Sort |
•Select the default sort order of videos in search results: Title, Relevance, Date (newest to oldest), or Date (oldest to newest). |
|
Channel Browse Default Sort |
Select the default order of channels when a user browses through the showcase channels page: Title, Date (newest to oldest), or Date (oldest to newest). |
|
Channel Search Default Sort |
•Select the default sort order of channels in search results: Title, Relevance, Date (newest to oldest), or Date (oldest to newest). |
|
Channel Videos Browse Default Sort |
Select the default order of videos when a user browses through a channel: Title, Date (newest to oldest), or Date (oldest to newest). |
|
Channel Videos Search Default Sort |
•Select the default sort order of videos in channel search results: Title, Relevance, Date (newest to oldest), or Date (oldest to newest). |
Add new showcase, sort options
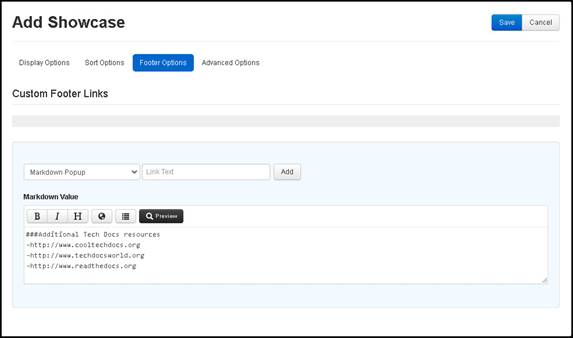
4. Click the Footer Options tab to customize the content displayed on the bottom of each showcase page. Select the type of custom footer link you want to add from the drop-down list. Specify the settings (see below) and click Add. Once you add a link, click it to update and delete it as needed. This will bring up the link's properties and additional buttons. The settings available will vary by type:
|
Settings |
Details |
|
Static Text |
•Select this option to add plain or static text, such as a copyright notice, to the footer. In the Static Text field, enter your content. |
|
Text Link |
•Select this option to add a link to a webpage or document. In the Link Text field, enter the text for the link, as it will appear in the footer. In the Link Value field, enter the URL for the resource. |
|
Image Link |
•Select this option to add an image that links to a webpage or document. In the Alt Value field, enter a description to use in place of the image, for example when a screen reader is reading the page. In the Link Value field, enter the URL for the resource. Click Select a file to navigate to the image file you want to use. |
|
Compliance Policy Link |
•Select this option to display a link to the Compliance Policy, which will display in a pop-up window when clicked. The Compliance Policy can be configured in Server Settings. |
|
Markdown Popup |
•Select this option to add a link that will display as a pop-up window when linked. In the Link Text field, enter the text for the link, as it will appear in the footer. In the Markdown Value editor, enter the content, as you want it to appear in the pop-out window |
|
New Line |
•Select this option to add a new line below the previous content. |
Add new showcase, footer options
 All presentations played back from a
showcase use the MultiView player layout. Once you save your showcase, you can
update its player settings and graphics as needed on the Showcase Player tab. For more information on player
settings, see Player
layout settings.
All presentations played back from a
showcase use the MultiView player layout. Once you save your showcase, you can
update its player settings and graphics as needed on the Showcase Player tab. For more information on player
settings, see Player
layout settings.
5. Click the Advanced Options tab to add scripts to the header and footer and enter Search Engine Optimization (SEO) keywords:
|
Settings |
Details |
|
SEO Keywords and Marketing Text |
•Enter SEO keywords and specific marketing text to help people find your site using online search engines. |
|
Header Script Block |
•Enter script to customize the header, for example, display third-party add-ins such as Google Analytics to track traffic to the page. |
|
Footer Script Block |
•Enter script to customize the footer content, for example, add buttons that link to social media sites or other content. |
|
Allow authenticated and registered users to post comments on the presentation page |
•Select this check box to allow users to provide feedback on presentations via comments. |
|
Enable playlist functions in the Showcase |
Select this check box to allow users to create and manage playlists in your showcase. Users can make their playlist available to other showcase users. |
|
Hide the user login controls in the showcase |
•Select this check box to hide the Mediasite login control for your showcase. This is useful if you are using single sign-on, for example, to authenticate users. |
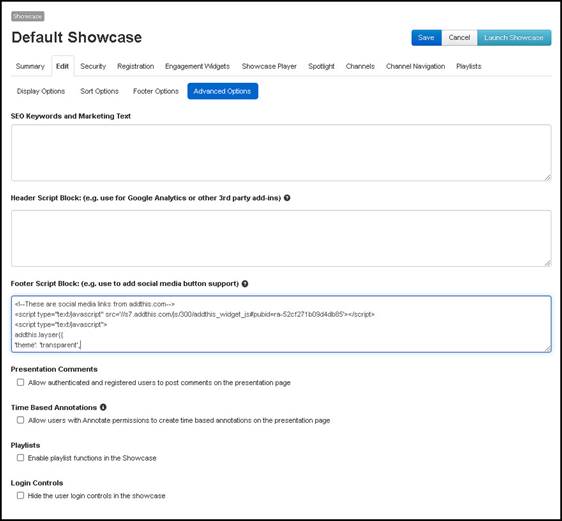
Add new showcase, advanced options
 For more information on
enabling comments, playlists, and time-based annotations in a showcase, see Enabling commenting in
showcases, Enabling time-based
annotations in showcase, and Enabling playlists in showcases.
For more information on
enabling comments, playlists, and time-based annotations in a showcase, see Enabling commenting in
showcases, Enabling time-based
annotations in showcase, and Enabling playlists in showcases.
 If you do not have experience creating
or updating scripts, find someone with the appropriate technical
expertise.
If you do not have experience creating
or updating scripts, find someone with the appropriate technical
expertise.
6. Click Save. Click Launch Showcase to see your updated Showcase page in a new browser window.
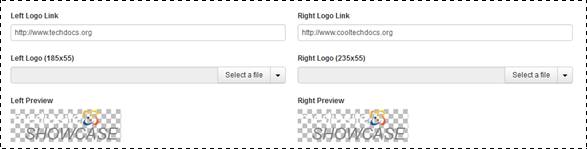
7. Once you save your Showcase, additional display options are available. Click Edit > Display Options and update these settings as needed:
|
Settings |
Details |
|
Left Logo Link |
Enter the URL for the web page you want to link to the logo displayed in the upper-left corner of Showcase. When a user clicks the logo in Showcase, a new browser tab will open with the specified web page loaded. |
|
Left Logo |
Update the logo displayed in the upper-left corner of Showcase by clicking Select a file and navigating to the image you want to use. To display correctly, your logo image must be 185 x 55 pixels. A preview of the logo as it will appear in Showcase is shown. |
|
Right Logo Link |
Enter the URL for the web page you want to link to the logo displayed in the upper-right corner of Showcase. When a user clicks the logo in Showcase, a new browser tab will open with the specified web page loaded. |
|
Right Logo |
Update the logo displayed in the upper-right corner of Showcase by clicking Select a file and navigating to the image you want to use. To display correctly, your logo image must be 235 x 55 pixels. You will see a preview of the logo as it will appear in Showcase. |
8. Click the Security tab to assign permissions to the showcase.
9. Click Save.
Additional showcase display options