Add and edit captions using Caption Editor
Closed captions provide text descriptions of the audio for audience members who are deaf or hard of hearing.
You use Caption Editor to add new captions and update existing ones. Typically, you use Captioning Editor to update captions created using speech-to-text services like Mediasite Captioning or third-party providers including IBM Watson, 3Play Media ASR (Automated Speech Recognition), and SyncWords. The Caption Editor allows you to update a caption's content and the time it appears in the presentation. You can also remove captions.
|
Note When you download a presentation’s captions (DFXP file) or share your presentation with others, the changes made with Caption Editor are included. We strongly recommend downloading and making a backup copy of your original captioning file (one created using a captioning service or third-party tool) before making updates using Caption Editor. |
To add and edit your presentation’s captions:
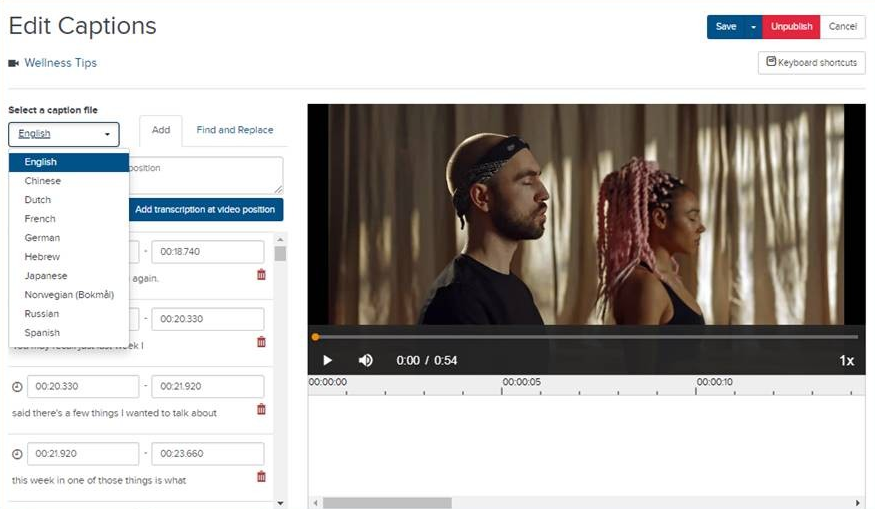
- On the presentation’s properties page, click Edit Captions. Caption Editor launches in a new page and the presentation begins playing.
- Each caption in the presentation appears in the caption panel and the timeline. You can use either the panel or timeline to navigate to and select the caption you want to update.
- By default, the video automatically starts playing and the timeline tracks the video positions. Clear the Track timeline while video plays and Autoplay video check boxes to disable these features. You can also use keyboard shortcuts to toggle these features on and off. Click Keyboard shortcuts for more information.
- Click the Add tab to update your captions as needed.
|
Add caption |
Navigate to the point in the timeline where you want to add the caption. Enter the information in the field and click Add transcription at video position. |
|
Edit caption text |
Navigate to the caption and click it to edit. |
|
Delete caption |
Click Delete |
|
Find text in caption |
Click the Find tab, enter the text you are seeking and click Find. Optionally, select the Case sensitive and/or Whole word check boxes to limit the results. |
|
Find and replace text in captions |
Click the Replace tab. Enter the text you are seeking and click Find. Enter the text you want to replace the original text and click Replace all. Optionally, select the Case sensitive and/or Whole word check boxes to limit the results. |
|
Combine captions |
Select a caption and then use the shortcut Ctrl+Alt+S to combine the selected caption with the following caption. |
|
Split caption |
Select a caption, place a cursor where you want to split the caption, and then use the shortcut Ctrl+Alt+L to split it. |
|
Adjust rate |
Use the drop-down list or use the shortcut R to speed up or slow down the video. |
- Zoom in and out as needed as you add captions. When you are satisfied with your updates, click Save. Click Save & Exit to return to the presentation’s properties page.
- To make the captions visible to your audience, click Publish. You can click Unpublish at any time to hide captions and make updates.
|
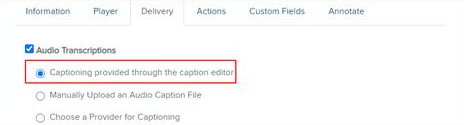
Note When you add captions using Caption Editor, the Delivery settings are updated: the Audio Transcriptions check box is selected and the Captioning provided through the caption editor option is visible and selected.
|