 .
.
Once you have finished preparing for your presentation and configuring Mediasite Mosaic, you are ready to start recording. You can start recording from My Mediasite or you can record offline and upload to My Mediasite later. If you are using Mosaic Pro, you can also record scheduled presentations created by your Mediasite administrator.
You have the option of using a compact overlay view when
preparing for a recording and when you start recording Mosaic automatically goes
into this view. However, you can exit it at any time by clicking the Exit
compact overlay button .
Take the following into consideration when using the compact overlay view:
•The compact overlay only shows the camera preview input and audio meters.
•You can move the compact overlay around as needed. However, if it is placed on the display you are capturing, it will be recorded.
•You cannot rename presentations while using the compact overlay view.
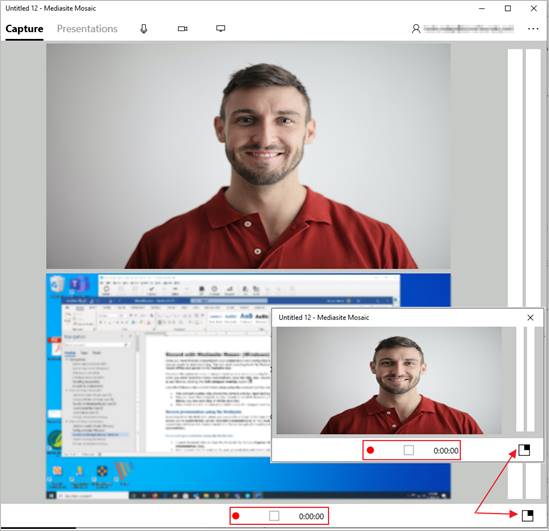
View Mediasite Mosaic in full or compact overlay view (light theme, Windows)
Record presentation using My Mediasite
Recording from My Mediasite allows you to specify settings before you start recording and allows you to automatically upload recorded presentations to it. You must have an Internet connection and have this feature enabled in Mosaic to upload recordings to My Mediasite automatically.
To record presentations using My Mediasite:
1. Launch Mediasite Mosaic from My Mediasite by clicking Capture Video on the Add Presentation page.
2. Enter a name and description for your presentation and choose where you want your presentation to be stored.
3. Click Create and Launch to create the new presentation and launch Mediasite Mosaic.
4.
Click the Record button  . A three second countdown will begin, and
Mosaic will automatically minimize to the compact overlay view once it begins
capturing content.
. A three second countdown will begin, and
Mosaic will automatically minimize to the compact overlay view once it begins
capturing content.
5. If you are recording the desktop, make sure the compact overlay is not in the selected area. Optionally, switch back to full view if you have the display preview enabled in Mosaic and want to see both inputs.
6. Pause and restart recording as needed.
7.
Once you are done recording, click the Stop button  . The
presentation is now available in the Presentations list. You can then
preview and manage the recording as needed. If you have disabled automatic
upload to My Mediasite, you can upload the recording to My Mediasite
manually.
. The
presentation is now available in the Presentations list. You can then
preview and manage the recording as needed. If you have disabled automatic
upload to My Mediasite, you can upload the recording to My Mediasite
manually.
 For more details on creating and
managing presentations in My Mediasite, see My Mediasite
documentation. If this feature is not available, contact your Mediasite
administrator.
For more details on creating and
managing presentations in My Mediasite, see My Mediasite
documentation. If this feature is not available, contact your Mediasite
administrator.
Record offline
Mediasite Mosaic allows you to record presentations offline and upload them to Mediasite later when you have an Internet connection. For example, you may want to make a series of desktop recordings at home and upload them later when you connect to your organization’s network. You can upload recordings made offline to new or existing presentations.
To record presentations offline:
1. Launch Mediasite Mosaic from your desktop from the Windows start menu or taskbar.
2. Select your capture inputs and optionally rename the presentation before recording by clicking the See More button … and then selecting Rename Presentation.
3.
Click the Record button .
A three second countdown will begin, and Mosaic will automatically minimize to
the compact overlay view once it begins capturing content.
4. If you are recording the desktop, make sure the compact overlay is not in the selected area. Optionally, switch back to full view if you have the display preview enabled in Mosaic and want to see both inputs.
5. Pause and restart recording the recording as needed.
6.
Once you are done recording, click the Stop button . The presentation is now available in the
Presentations list. You can then preview and manage the recording as
needed. If you have disabled automatic upload to My Mediasite, you can upload
the recording to My Mediasite manually.
 For more details on creating and
managing presentations in My Mediasite, see My Mediasite
documentation. If this feature is not available, contact your Mediasite
administrator.
For more details on creating and
managing presentations in My Mediasite, see My Mediasite
documentation. If this feature is not available, contact your Mediasite
administrator.
Record scheduled presentations (Mosaic Pro)
Mosaic Pro allows you to record scheduled presentations. These presentations are created using schedules. A schedule, typically created by your Mediasite administrator or content manager, is a collection of user-defined settings used to automate the presentation creation and publishing process. Schedules include the following information:
•Presentation properties—basic details, folder, publishing and delivery options, player settings, security, and actions
•Presentation naming convention (based on schedule name)
•Recurrence settings—when and how often presentations are created
•Email notification details
Scheduled presentations are listed on the Presentations page. When a new presentation is available for recording, you will receive notifications when you successfully connect to Mediasite and five minutes prior to the scheduled start time.
 You must be connected to the internet
and have signed into Mediasite to access and receive notifications for scheduled
presentations.
You must be connected to the internet
and have signed into Mediasite to access and receive notifications for scheduled
presentations.
To record a scheduled presentation:
1. Launch Mediasite Mosaic from your desktop from the Windows start menu or taskbar.
2. Navigate to the Presentations tab and use the filter to view your scheduled presentations.
3.
If you do not see your schedule, click Sync schedules  to connect to Mediasite and retrieve the
latest scheduled presentations.
to connect to Mediasite and retrieve the
latest scheduled presentations.
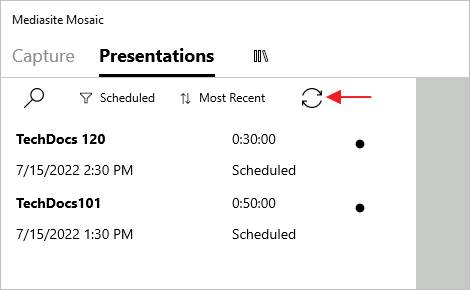
Scheduled presentation
4.
Click the Open presentation button  to the right of the presentation’s title
and duration to load the presentation. You can then begin recording.
to the right of the presentation’s title
and duration to load the presentation. You can then begin recording.
5. Depending on how the schedule used to create your presentations have been configured, the presentation may upload automatically to My Mediasite. Otherwise, you will upload it manually.