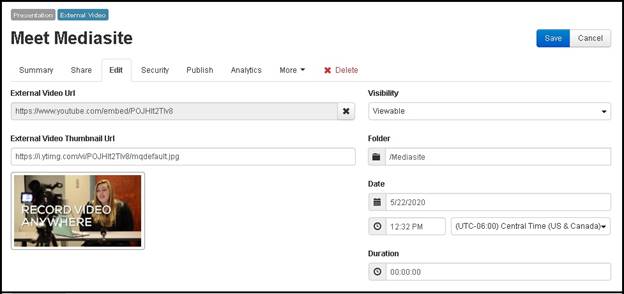
Adding external video
An external video is a Mediasite presentation that has no
video content stored in Mediasite. Video from YouTube, Vimeo, Dailymotion, or
Hihaho may be added to Mediasite as presentations.
 To add an external video, it must be
public. Also, analytics for external video content is not supported in
Mediasite. If your content is hosted on a video sharing site and you are the
content owner, you may be able to view relevant analytics on that
site.

External video general properties
To create a presentation containing external
video:
1. Click
Content, navigate to the folder in which you want to
add the presentation, right-click it, and select Add
Presentation.
2. Paste
the External Video URL or Embed Code into the corresponding field.
3. The
External Video Thumbnail URL will populate automatically, or a custom
thumbnail can be provided by entering a URL here.
4. Select
a Visibility Option:
|
Options |
Details |
|
Viewable |
The
presentation will be published to Mediasite as Viewable by default. Select
to allow viewers with appropriate permissions to view the
presentation. |
|
Private |
Select so only the owner can view the presentation.
Other users will be able to see the presentation in Mediasite
applications, but they will not be able to view it. Only the
presentation’s owner can view, search for, and update the presentation.
Changing a presentation’s visibility to Private allows the presentation
owner to fine-tune a presentation before making it available for
viewing. |
|
Offline |
Select
so no one can view the recorded presentation. Offline presentations are
not available for viewing or in searches and only the presentation owner
can update them. Changing a presentation’s visibility to Offline allows
the presentation owner to hide a presentation without changing its
permissions. |
5. The
Folder field will show the current folder, but a
different content folder may be selected.
6. Date, Time and Time Zone values will be automatically populated, but may be
changed.
7. The
Duration field will show 00:00:00 for external videos.
The duration may be entered manually.
8. On
the Information tab, specify the following
settings:
|
Options |
Details |
|
Title |
The title will be
automatically populated but may be changed. |
|
Description |
Enter a short description of the presentation. Viewers
can search for presentations using words and phrases in the
description. |
|
Tags |
Enter the tags that you want associated with this
presentation. |
|
Presenters |
Click Add New or Existing Presenters to add
presenters. Use the search feature to find presenters that have already
been added on the Mediasite.
|
|
Links |
Add hyperlinks to your presentation that will allow
your audience to view other websites or online documents. To add a link,
click in the field and enter the link’s name as it will appear in the
Player and the URL for the document or website to which the link will
point. Click Add. |
|
Categories |
Click Add Category and select a category from
the drop-down list. This setting is available only if categories have been
enabled on Mediasite. You can select multiple categories. |
|
Modules |
Click Add Module and select a module from the
drop-down list. This setting is available only if modules have been
enabled in Mediasite.
 For more information on modules,
see the Configuration Guide. If you are integrating Mediasite with
an LMS and using automatic module provisioning, refer to the appropriate
integration guide for detailed instructions. All guides are available on
the Mediasite Customer Care Portal at
www.sonicfoundry.com/support. For more information on modules,
see the Configuration Guide. If you are integrating Mediasite with
an LMS and using automatic module provisioning, refer to the appropriate
integration guide for detailed instructions. All guides are available on
the Mediasite Customer Care Portal at
www.sonicfoundry.com/support.
|
9. The
Delivery tab will be empty initially, but after the external video is
saved, the Delivery tab will contain a preview of the automatically generated
thumbnail image, if available. The thumbnail image may be changed after you save
the presentation.
10. Click the
Actions tab to specify one of the following actions: update visibility
updates, remove adaptive bitrate (smooth streaming) content, and send the
presentation to the Recycle Bin.
 To add an external video, it must be
public. Also, analytics for external video content is not supported in
Mediasite. If your content is hosted on a video sharing site and you are the
content owner, you may be able to view relevant analytics on that
site.
 For more information, see