Mediasite allows you to track and allocate storage space
using quota policies. Quota policies also allow you to impose restrictions on
user folders when they exceed their allocated storage space. These must be
well-known users, that is, users with user profiles.
When quota limits are enabled, users can see the amount of
storage space they are using at any given time. Additionally, a presentation’s
size is included on its properties page and users can sort presentations by
size. The following items count against a user’s storage space:
•
Presentations and the files associated with them: media, podcast
(MP3), and video podcast (MP4 composite).
•
Editor projects and archived video files associated with them.
Overview
To use storage quota policies in Mediasite you will do the
following:
Step1: Enable quota levels on the site. When you
enable this feature on the site, additional options become available in
Mediasite.
Step 2: Assign “quota management” permissions. You
must assign all users who will be responsible for managing storage space
permissions to manage quotas and create quota levels in Mediasite.
Step 3: Add quota levels. Quota levels are templates
used to create quota policies. They determine the amount of storage allocated
and what restrictions and notifications, if any, are applied when quotas are
exceeded.
 If you will add users to Mediasite using
user profile provisioning, you can assign a default quota level. Mediasite will
apply this quota level to each user added using provisioning. You will
typically use user profile provisioning for large-scale My Mediasite
deployments. For more information on user profile provisioning, see Setting up user
profile provisioning.
Step 4: Assign quota policies to users. You can
assign quota policies to users individually on their user profile page or to
multiple users at once. You can update or remove quota policies as needed.
Enable quota levels on site
Once you enable quota levels on the site, the Settings > Quota Levels and
related settings become available in Management Portal.
To enable quota levels on the site:
1. Click
Settings > Server
Settings, select the Quota Level check box, and
click Save.
2. Log
out of Mediasite and log back in to see the associated settings.
Assign permissions to quota operations and
resources
You must assign users who will be responsible for managing
users’ storage quota the appropriate permissions. Make sure to notify users that
you have assigned them permissions to these Portal features.
To assign quota permissions:
1. Click
Security > Portal
Resources, select Quota Levels, and assign
Read permissions to all users you want to give access
to the Quota Levels page and related settings.
2. Click
Security > Operations,
select Create Quota Levels, and assign Execute permissions to all users that will be able to create
quota levels.
Add quota levels
Quota levels are templates used to create user quota
policies. Administrators can use quota policies to monitor and restrict users’
storage usage as needed.
To add a new quota level:
1. Click
Setting > Quota Levels
> Add New and specify the following settings:
|
Settings |
Details |
|
Name/Description |
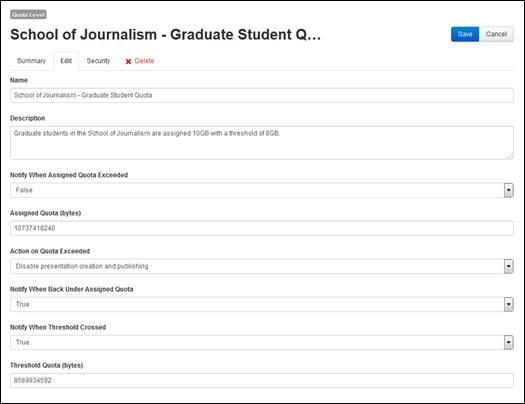
Enter a name and description
that will help you and other users identify this quota easily. |
|
Notify When Assigned
Quota Exceeded |
Select True to have an email notification sent to users when
they exceed their allocated storage space. Users will also see a
notification when they log into Management Portal or My
Mediasite. |
|
Assigned Quota
(bytes) |
Specify the amount of storage space (bytes) users at this
quota level will be given.
|
|
Action on Quota
Exceeded |
Select what should happen
when users exceed their quotas:
•
Disable presentation creation and
publishing: Select to disable users’ ability to create new
presentations, upload new media, and publish audio and video podcasts when
they go over their quota. Users will receive a notification and these
features will be disabled in the UI.
•
Nothing: Select if you are just tracking
storage usage but do not want to impose any consequences. |
|
Notify When Back Under
Assigned Quota |
Select True to have an email notification sent to users when
they have reduced their storage back to the allocated storage space. All
restrictions on their accounts are lifted. |
|
Notify When Threshold
Crossed |
Select True to have an email notification sent to users when
they exceed a certain threshold quota. Users will also see a notification
when they log into Management Portal or My Mediasite indicating that are
getting close to exceeding their allocated storage space. |
|
Threshold Quota
(bytes) |
Specify the amount of storage space (GB) that will trigger
the threshold crossed notification, if enabled. A good rule of thumb is
80% of the assigned quota. For example, if the assigned quota is 10 GB
than you will make the threshold quota 8 GB. |
2. Click
Save.

Sample Quota Level
 You must enable quota levels on
Mediasite and add quota levels on the Settings >
Quota Levels page before you can select a default
quota level.
Apply quota policies to user profiles
Once you have created your quota levels, you will use them
to apply quota policies to user profiles. You can apply quota policies in in
bulk or on individual user profiles.
 You can remove quota limits on users at
any time. However, if a user is over their limit when you remove the quota
policy and the system has disabled their ability to create presentations, you
must manually give them “create presentations” permissions in Security > Operations.
Apply quota policies on multiple user profiles
To apply quota polices on multiple user profiles:
1. Click
Security > Profiles and
select the check boxes next to each user profile you want to update.
2. Click
More > Change Quota
Policy.
3. Select
Apply Quota Limit and select the quota level you want
to apply from the drop-down list.
4. Click
Save.

Apply quota limits to multiple user profiles
Apply quota policies on individual user profile
To apply quota polices on a user profile:
1. Select
the user profile you want and click Change Quota
Policy on the summary page.
2. Select
Apply Quota Limit and select the quota level you want
to apply from the drop-down list.
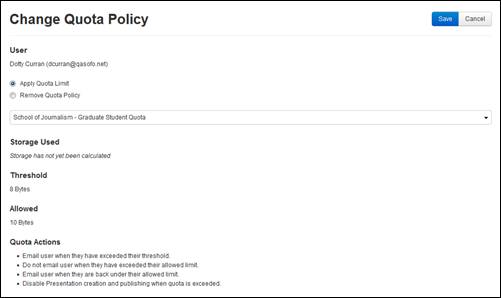
3. Once
you select a quota level additional details appear. Verify these are the correct
settings.
4. Click
Save.

Apply quota limits on user profile
 If you will add users to Mediasite using
user profile provisioning, you can assign a default quota level. Mediasite will
apply this quota level to each user added using provisioning. You will
typically use user profile provisioning for large-scale My Mediasite
deployments. For more information on user profile provisioning, see Setting up user
profile provisioning.
 You must enable quota levels on
Mediasite and add quota levels on the
