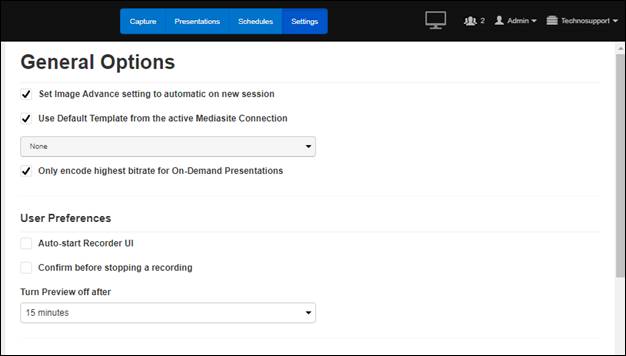
The general options determine how the Recorder handles recording sessions, local resources, and sending images to Mediasite. User preferences are specific to each user and will be remembered each time the user logs in while the other settings apply to all users.
To update the general options:
1. Select Settings > General Options and select the check box next to a setting to enable it.
2. Update the following settings (described) below as needed: general recording, export and publishing, user preferences, MCIP, Delcom device, and LED indicator. Your updates are automatically saved.
|
Setting |
Description |
|
Set Image Advance setting to automatic on new session |
Select this option to reset the Recorder to default settings for each new session: image advance enabled and routing set to video. This ensures that when scheduled presentations are loaded, they will use default settings instead of settings that may have been updated manually. This option is selected by default. |
|
Use Default Template from the active Mediasite Connection |
Select this option to select a default presentation template from the connected Mediasite. This template’s stream input priorities and encoding settings will be used for new presentations created on the Recorder without pre-defined encoding settings. These presentations will then be published automatically to Mediasite. This option is selected by default. |
|
Only encode highest bitrate for On-Demand Presentations |
Select this option to encode Smooth Streaming presentations only at the highest bitrate on the Recorder. Presentations with lower bitrates will be encoded by the connected Mediasite’s Transcode Service instead of the Recorder. Selecting this option allows you to limit the processing load on the Recorder due to encoding. This feature is disabled by default. You must restart the Recorder after you enable this feature. |
User preferences only apply to the user you are logged into the Recorder as. You will set the administrator user preferences separately from the operator’s preferences.
|
Setting |
Description |
|
Auto-start Recorder UI |
Select to launch the Recorder application automatically when the Recorder is turned on. This option is not selected by default. |
|
Confirm before stopping a recording |
Select to display a warning message when you click Stop while recording a presentation. Since this is a user preference, it will only apply to the user you are logged into the Recorder as. This option is not selected by default. |
|
Turn Preview off after |
To limit the number of resources used by the preview windows, you can select how long it can be idle before it turns off. The default time is 15 minutes. |

Settings tab, General Options page: Recorder settings and user preferences
MCIP settings
If you are integrating your RL Recorder into an AV-controlled system, you must enable the following settings:
|
Setting |
Description |
|
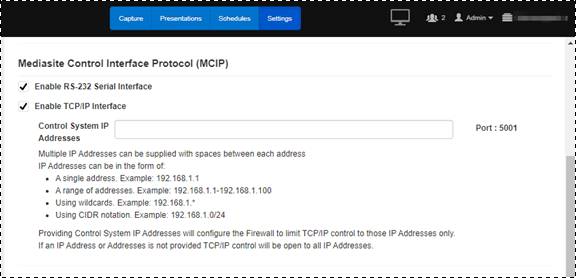
Enable RS-232 Serial Interface |
Select this option to allow a serial control module to send commands to the recorder. This can be done by connecting a third-party AV controller with a RS-232 serial port located at the back of your recorder device. Commands can also be sent through a Serial connection via a command-line interface. |
|
Enable TCP/IP Interface |
Select this option to allow a control module to connect through a network using Ethernet. The default listening port is 5001, this port is hardcoded by default. Enter the IP Address of the control module to connect the recorder with the control module. Commands can be sent through a Telnet or raw connection via a command-line interface. |
|
Control System IP Address (Optional) |
Enter an IP address to limit TCP/IP control to a specific control system. If an IP address is not provided, TCP/IP control will be open to all IP addresses. Multiple IP Addresses can be supplied with spaces between each address and IP addresses can be in the form of: •A single address. Example: 192.168.1.1 •A range of addresses. Example: 192.168.1.1-192.168.1.100 •Using wildcards. Example: 192.168.1.* •Using CIDR notation. Example: 192.168.1.0/24 |

Settings tab, General Options page: MCIP settings
 Enabling the MCIP interfaces is only one step in integrating
your Recorder into your AV-controlled environment. For more information,
see Appendix C:
Integrating the Recorder into an AV controlled system.
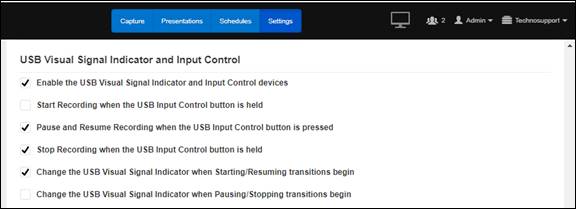
If your Recorder includes a physical device (typically a Delcom device) used to control and mark the state of the recording process, enable the following settings as needed:
|
Setting |
Description |
|
Enable the USB Visual Signal Indicator and Input Control devices |
Select this option to allow Recorder operators to use the device to start, pause, and stop recordings. When you select this option, additional options become available. |
|
Start Recording when the USB Input Control button is held |
Select this option to allow Recorder operators to begin recording by holding the device’s input control button down for 3 seconds. |
|
Pause and Resume Recording when the USB Input Control Button is pressed |
Select this option to allow Recorder operators to pause and resume recording when the device’s input control button is pressed. |
|
Stop Recording when the USB Input Control Button is held |
Select this option to allow Recorder operators to stop recording by holding the device’s input control button down for 3 seconds. |
|
Change the USB Visual Signal Indicator when starting/resuming transitions begin |
Select this option to change the appearance of the device’s light as soon as Recorder operators hit the button to start a new recording or resume a paused recording. |
|
Change the USB Visual Signal Indicator when pausing/stopping transitions begin |
Select this option to change the appearance of the device’s light as soon as Recorder operators hit the button to pause or stop a recording. |

Settings tab, General Options page: Delcom settings
 When changing the appearance of a
device’s lights at the beginning of a transition, it is important to let
Recorder operators and presenters know transitions take a few seconds to reduce
the risk of them not capturing important information when starting or resuming a
presentation.
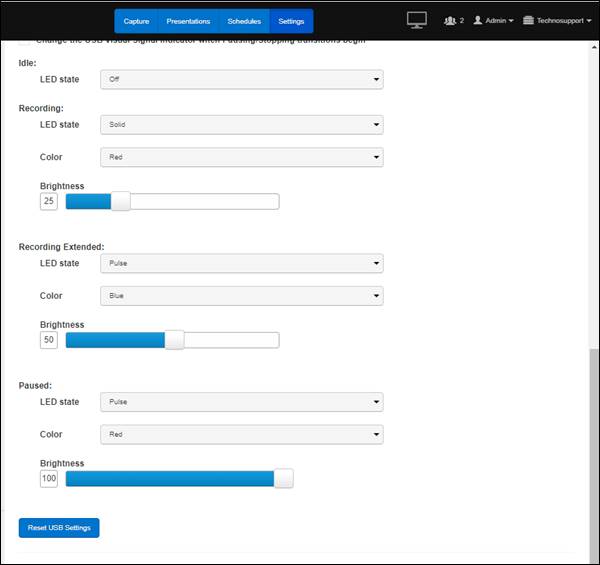
You can customize the Recorder’s LED lights to display different colors (Red, Green, or Blue) and patterns (see below) for different statuses: Idle, Recording, and Paused. You can also change the LED’s brightness setting when recording and paused.
|
LED state |
Description |
|
Off |
The Recorder’s LED light will not illuminate. |
|
Solid |
The Recorder’s LED light will display an unchanging color. |
|
Pulse |
The Recorder’s LED light will brighten and dim every second, repeatedly. |
|
Flash |
The Recorder’s LED light will rapidly brighten and dim. |

Settings tab, General Options page: update USB Visual Signal Indicator and Input Control options
 Click Reset USB Settings at any
time to return to undo your updates and return to the default settings for the
device. By default, the LEDs are off when the Recorder is idle, solid red when
recording, and flashing red when the recording is paused.