 We strongly recommend only using a local
area connection when streaming live presentations. Using a wireless network for
live recordings will reduce the video quality.
Mediasite allows you to connect your Recorder to a wireless network. Connecting to a wireless network is useful when publishing locally recorded presentations to Mediasite from a remote location. You cannot add a wireless connection when using the Recorder interface remotely.
 We strongly recommend only using a local
area connection when streaming live presentations. Using a wireless network for
live recordings will reduce the video quality.
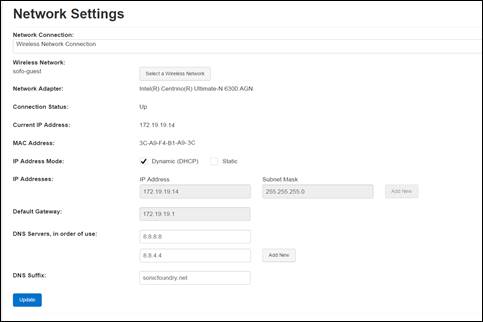
To connect the Recorder to a wireless network:
1. Click Network Settings and select the wireless adapter from the Network Adapter drop-down list.
2. Click Select a Wireless Network and click on the network you want in the Available Networks list.
3. By default, the Connect automatically check box is selected. Clear this check box if you do not want the Recorder to remember the credentials and automatically connect to the network you are selecting.
4. Click Connect and if required enter the password for the network. Click Ok.
5. In some instances, your wireless network provider may require you to accept a terms of service agreement and enter additional information. For those networks, the Recorder will launch a separate browser window. Once you have met the network’s requirements the Recorder will establish the connection.
 If the wireless network connection
automatically logs you out after a certain amount of time, you will see a
message displayed below the connection name. Click Provide input to use
the network to enter the required information and re-establish the
connection.
6. To disconnect the wireless network connection, select it and click Disconnect.

Settings tab, Network Settings page: Recorder connected to wireless network