After you have added Recorders to the Recorder List, you will open their preview windows in the Monitor Grid. Here you can manage the recording process and update inputs and outputs as needed.
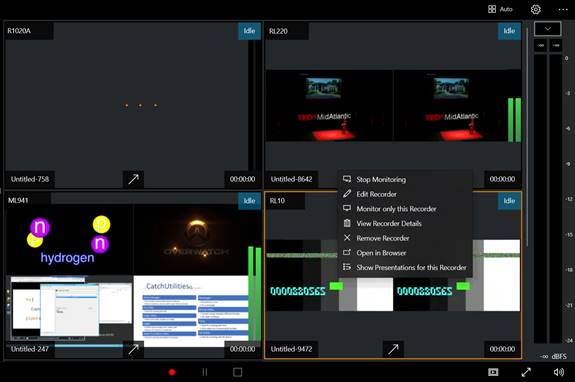
Recorder Selected in Monitor Grid
Use the options available in the Monitor Grid header to control what is available in the grid and initiate recorder management tasks.

|
Button |
Description |
|
|
Click the Recorders List button to open or close the Recorder List. This is where you will manage Recorders connected to Monitor. |
|
|
Click Set Grid Dimensions to adjust the Recorder grid to display a fixed number of Recorders. |
|
|
Click See more for the latest downloads and to view additional information about Mediasite Monitor. This includes third-party notices and Sonic Foundry’s privacy statement. You will also see links that will allow you to submit a case, connect with the Mediasite online community, and get additional information on the Mediasite Customer Care page. You will have to log in using your credentials to submit a case or access KBA articles. |
|
|
After clicking See
More, click Stop Monitoring Selected Recorders to remove
selected recorders from the Monitoring Grid. Single and multiple recorders
may be selected or de-selected by click, shift + click, or ctrl + click.
You may also select and deselect all recorders by clicking one recorder in
the grid, and then pressing Ctrl + A. To restore the recorders to the
grid, click the Monitor button. |
|
|
After clicking See More, click Remove Selected Recorders to remove the selected recorders from the Monitoring Grid and the monitoring list. |
|
|
After clicking See More, click Open Selected Recorders in Browser to open the recorder interface in the default browser. |
|
|
Click Settings to open the Settings menu for Mediasite Monitor. You will go here to add a connection to Mediasite, import Recorders from the server, and add Recorder groups. |
Monitored Recorder Options/Details
For each monitored Recorder, you can track its status and update it as needed.

Selected Recorder Menu Options
|
Area/button |
Description |
|
1 |
Right-click a monitored Recorder’s title to view the following menu items: •Stop Monitoring: Click to close the monitor window for the recorder. •Edit Recorder: Click to update its connection settings and group assignment. •Monitor only this Recorder: Click to remove other recorders from the grid. •View Recorder Details: Click to display details about the recorder, including detailed software, hardware, and network information. •Remove Recorder: Click to delete connection to it. •Open in Browser: Click to launch Recorder interface for it. This is useful if you want to access the advanced settings. •Show Presentations for this Recorder: Click to go to the Presentations tab on which you will only see this Recorder’s presentations listed. |
|
2 |
The Recorder status is shown. |
|
3 |
For each Recorder being monitored, you will see the
title of presentation open on it and the amount of time it has been
recording. You will also see the Expand Recorder button when
available. |
Expanded Recorder Options/Details
Click the Expand Recorder button  to enlarge the selected recorder to fill
the entire window and access management options. Press Esc to return to
the grid view.
to enlarge the selected recorder to fill
the entire window and access management options. Press Esc to return to
the grid view.
|
Button |
Description |
|
|
Click Open List of Inputs for Selected Recorder to add and remove inputs and route them to outputs. For example, you can route your HDMI, DVI-D input to Video 1. |
|
|
Click New Presentation to create a new presentation on the selected Recorder. |
|
|
Click Open Presentation to open an existing presentation on the selected Recorder. |
|
|
Click See More to access more controls and to view additional information about Mediasite Monitor. |
|
|
After clicking See More, Click Rename Presentation to open the Rename Presentation dialog. |
|
|
After clicking See More, click Stop Monitoring Selected Recorders to remove selected recorders from the Monitoring Grid. |
|
|
After clicking See More, click Remove Selected Recorders to remove the selected recorders from the Monitoring Grid and delete the connection to it. |
|
|
After clicking See More, click Open Selected Recorders in Browser to open the recorder interface in the default browser. |
|
|
Click Settings to open the Settings menu for Mediasite Monitor. You will go here to add a connection to Mediasite, import Recorders from the server, and add Recorder groups. |
Footer options
Use the options available in the Monitor Grid footer to control the recording process and adjust the view and volume.

|
Button |
Description |
|
|
Use the Recorder controls to Record, Pause, and Stop recordings on the selected Recorder(s). |
|
|
|
|
|
Click Enable Automatic Select to cycle through monitored Recorders at a set interval. The default value is 20 seconds, but you can update this interval in the monitor settings. |
|
|
Click Full screen to view Monitor in full screen mode. Press Esc, F11, or to exit full screen. |
|
|
Click Mute to mute the audio for the selected Recorder. Use the audio meter to monitor a Recorder’s audio levels. |
Expanded View Options
Power options
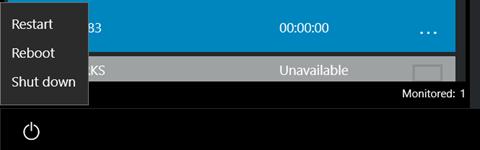
In the
footer, directly below the Recorder List, click the Power options button
 to Shut Down,
Reboot, or Restart the selected Recorder.
to Shut Down,
Reboot, or Restart the selected Recorder.
 You should know the current state of
the Recorder before issuing a Power Off or Restart command. The
Recorder’s OS can become inoperable if the Recorder is busy performing an
operation (i.e., software updates, image restore, etc.) when these commands are
issued.
You should know the current state of
the Recorder before issuing a Power Off or Restart command. The
Recorder’s OS can become inoperable if the Recorder is busy performing an
operation (i.e., software updates, image restore, etc.) when these commands are
issued.


