Editor's workspace
The Editor workspace is divided into three areas—video and slide preview, timeline, and project manager—so that you can easily preview, navigate, playback, and edit your presentations as well as manage different projects.
Video and slide preview windows
Each video and slide stream in your project is visible in the preview windows. The streams appear in the preview as they appear in the presentation. Any changes made to a stream such as hiding it, adding a watermark, or inserting a cut are reflected in the preview window.
You use the controls in the preview area to playback the video or navigate by chapters (if available) or slides.
Project timeline
The project timeline is where you select and edit the media (video, audio, and slide stream) in your project. Each stream is labeled so you can easily navigate to, select, and highlight the portions of the presentation you want to update. The project timeline includes a separate audio stream, which is useful for quickly detecting and removing long periods of silence.
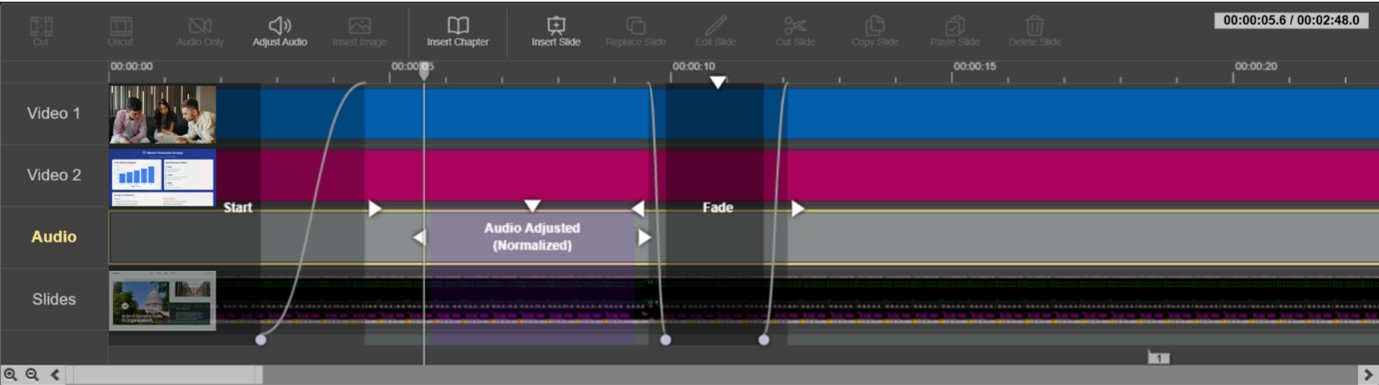
The following buttons appear above the project timeline.
|
Button |
Description |
|---|---|
|
|
Cut. Insert cut (remove content) on a selected region of the video, and then choose the type of cut―basic cut, fade, or dissolve. |
|
|
Uncut. Restore all or a portion of the video that has been cut. |
|
|
Audio Only. Convert selected stream to audio-only (remove video or slides) stream. |
|
|
Insert Image. Insert image (watermark) to selected video stream. |
|
|
Insert Chapter. Add chapters to separate video into segments. You can add titles to chapters. |
|
|
Insert Slide. Add new slide image to slide stream. |
|
|
Replace Slide. Replace selected slide with a new image. |
|
|
Edit Slide. Edit the selected slide’s title and description. |
|
|
Cut Slide. Cut selected slide. |
|
|
Copy Slide. Copy selected slide. |
|
|
Paste Slide. Paste slide into slide stream. |
|
|
Delete Slide. Delete selected slide. |
|
|
Adjust Audio. Adjust the audio of a selection in the video. |


Project manager
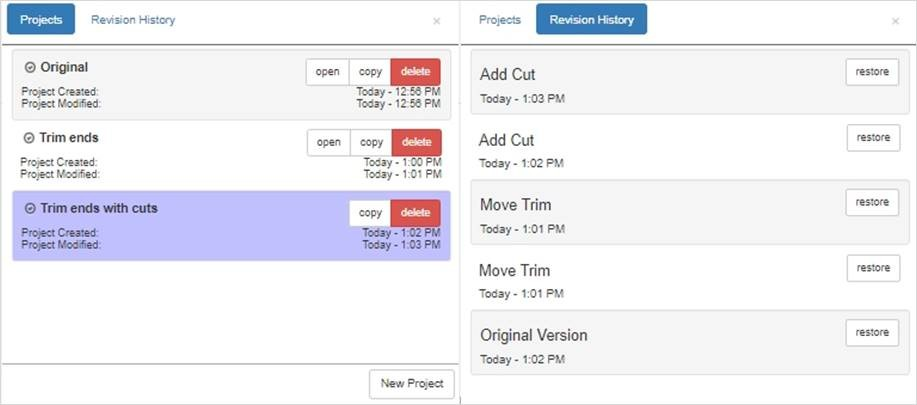
You manage your projects and their associated revisions in the project manager. When you open a presentation for editing, it is saved as a project. Editor saves each change you make to a project automatically and lists it in the project's revision history.
You can create multiple projects for a presentation by copying the original project or by creating a new project. Each project has its own revision history. If you want to create multiple presentations from a single presentation, creating multiple projects is useful. Label each project as needed to reflect the changes you are making. Once you are finished editing a project, you can commit your changes to the original presentation, an existing presentation, or to a new presentation.
To manage your project:
Do one or more of the following.
|
Open project |
To open a project, click open on the same row as a project to load it into Editor. |
|
Copy project |
To copy a project, click copy on the same row as a project to create a new duplicate project. The new project is in the same state the original one was in when the copy was made. For example, if you updated every slide in the original project, the copy also has updated slides. |
|
Delete project |
To delete a project, click delete on the same row as a project to remove it. Retrieve a deleted project by clicking restore. |
|
Create project |
To create a project, click New Project (lower-right corner of project window) to create a new project based on the original presentation. The new project is loaded into Editor. |
|
Rename project |
To rename a project, click the project's title to highlight it and type in a new title. |