Edit videos
Use Editor to insert cuts (cut material from within a presentation) or crop ends of a presentation. Use the audio waveform in the timeline to identify and remove pauses in your presentation.
Insert cuts
Use Editor to remove portions of your presentation. You can insert plain cuts as well as faded and dissolved cuts. Once you insert a cut, video, slides, and chapters within the cut region are not seen in the final presentation.
|
Note When you edit a presentation containing captions, cuts are applied to the video and the corresponding captions to ensure they remain in sync. You can make additional updates to the captions in the edited video using Caption Editor in My Mediasite. |
To insert a cut within a presentation:
- In the timeline, select a portion to cut by clicking and dragging, or "scrubbing" the timeline cursor.
- Click Cut Time and specify the type of cut.
|
Insert a cut |
Select Cut or press C to insert a cut. With a cut, the video simply skips to the end of the cut and continues the presentation. |
|
Faded cut |
Selected Fade press F to insert a cut that fades to black at the beginning of the cut and fades back in at end of the cuts. |
|
Dissolved cut |
Press D to insert a cut with dissolve. Dissolves smoothly fade in and out from one end of the cut to the other. |
- Adjust the lengths of the cut and fade (or dissolve) using the cut and fade handles, respectively.
- Move the selection handle to move the cut. Click the selection handle to display a drop-down menu you can use to change your cut option.
|
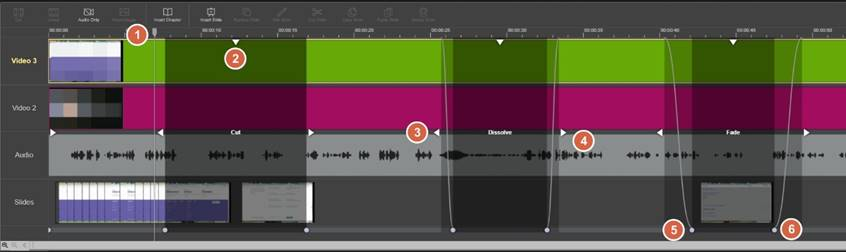
1 |
Timeline cursor. Drag to select cut regions and to navigate through videos. |
|
2 |
Selection handle. Drag to move cut or click to choose type of cut to insert. |
|
3 |
Start cut handle. Drag to change start of cut region. |
|
4 |
End cut handle. Drag to change end of cut region. . |
|
5 |
Fade-out handle. Click and drag to change fade-out position. |
|
6 |
Fade-in handle. Click and drag to change the fade-in position. |
- To retain a portion of the timeline that lies within a cut segment, use the timeline cursor to select the portion you want to retain and click Uncut.
- Click Undo to back out of changes as needed. Once you have completed your edits, save your changes.
Crop presentation
Use Editor to crop the beginning and ends of your presentation. The video, slides, and chapters within the cut region are not seen in the final presentation.
|
Note When you crop a presentation containing captions, cuts are applied to the video and the corresponding captions to ensure they remain in sync. You can make additional updates to the captions in the edited video using Caption Editor in My Mediasite. |
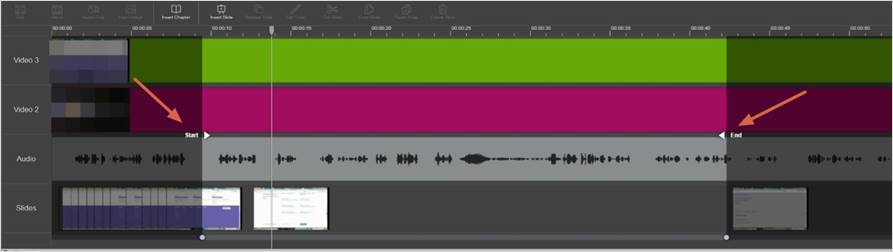
To crop the beginning or end of a presentation:
- Drag the start and the end handles to the new starting ending points, respectively.
- Click Undo or Redo to back out of changes as needed. Once you have completed your edits, save your changes.
Remove long pauses in audio
Use the audio waveform to detect and remove long periods of silence in presentations. The audio waveform is especially useful when editing audio-only presentations.
To remove pauses in presentation using the audio waveform:
- Click and drag the timeline selector to the portion of the presentation where the waveform indicates low audio levels.
- Select a video stream corresponding to the selected audio and insert a cut.
- Click Undo or Redo to back out of changes as needed. Once you have completed your edits, save your changes.