You must configure both Mediasite and the IdP to set up a
fully working trust relationship between both entities and to correctly resolve
users and their respective roles. You will use Management Portal to configure
Mediasite. Configuration of the IdP is system specific, the details of
which are outside the scope of this document.
 Only users with a solid understanding
of SAML 2.0 and their IdP configuration should configure Mediasite for use with
an IdP. If you do not have the prerequisite knowledge, we strongly advise you to
find a more qualified IT professional for assistance.
Only users with a solid understanding
of SAML 2.0 and their IdP configuration should configure Mediasite for use with
an IdP. If you do not have the prerequisite knowledge, we strongly advise you to
find a more qualified IT professional for assistance.
To configure SAML 2.0 on Mediasite:
1. Click
Security > SAML 2.0
Configuration. Note that the Mediasite’s Root URL serves as the Entity ID, which is its unique SP identifier.
2.
Specify the method Mediasite will use to resolve a user's identity from the
IdP's assertion response. The attribute settings will depend on the option
selected:
|
Settings |
Details |
|
Use the NameID in the Assertion
Subject as the UserID |
Select this radio button to resolve a user's identity
using the NameID attribute of the assertion response subject. This option
is selected by default. Specify the following attribute settings:
•
Role Attribute Name: Enter the name or
OID used to identify the role attribute.
•
Role Attribute NameFormat: Optionally, enter the
attribute type. |
|
Use an attribute in the Assertion as
the UserID |
Select this radio button to resolve a user's identity
using another available attribute provided by the IdP in the assertion
response, for example, a user's email address and then specify the
following attribute settings:
•
UserID Attribute Name: Enter the name or
object identifier (OID) used to identify the attribute.
•
UserID Attribute NameFormat: Optionally,
enter the attribute type.
•
Role Attribute Name: Enter the name or
OID used to identify the role attribute.
•
Role Attribute NameFormat: Optionally,
enter the attribute type. |
SAML 2.0 Service Provider Settings (User ID and Role
Resolution settings)
The attributes provided must be
available from and provided by the IdP in the assertion response. Only roles
already defined within Mediasite system will be used for authorization.
Mediasite will ignore unknown roles.
3. Select
the Automatically create User Profiles on Login to My
Mediasite or Management Portal check box to have Mediasite create user
profiles automatically using the User Email Property
Name and a Display Name Attribute.
 For a more detailed discussion on this
feature, see “Setting up user profile provisioning” in the Mediasite Configuration Guide
available https://docs.mediasite.com/.
For a more detailed discussion on this
feature, see “Setting up user profile provisioning” in the Mediasite Configuration Guide
available https://docs.mediasite.com/.
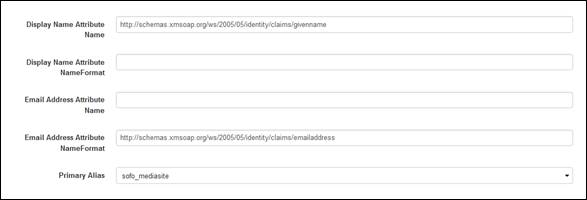
4. Enter
the following attributes as they will appear in the SAML Response:
|
Settings |
Details |
|
Display Name Attribute
Name |
Enter the name or object
identifier (OID) used to identify the display name. |
|
Display Name Attribute
NameFormat |
Optionally, enter the display
name’s attribute type. |
|
Email Address Attribute
Name |
Enter the name or object
identifier (OID) used to identify the email address. |
|
Email Address Attribute
NameFormat |
Optionally, enter the attribute type. |
|
Primary Alias |
Select the alias you want to use for this site in the
drop-down list. The IdP will use this hostname when communicating with
Mediasite. |
The Primary
Alias setting is available only if aliases have been assigned to the
site.
SAML 2.0 Service Provider Settings (User profile provisioning
settings)
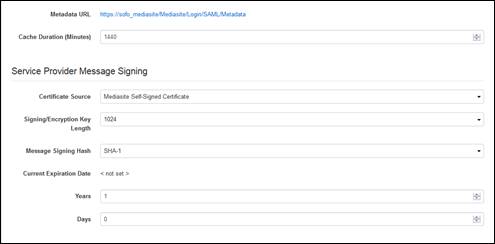
5. Set
the parameters that determine how Mediasite publishes its SP metadata. Mediasite
must provide metadata information to the IdP to establish trust as a valid
service provider:
|
Settings |
Details |
|
Metadata URL |
This is a read-only value. This URL, which is generated
by Mediasite (Service Provider), provides SP metadata. The Metadata URL
link becomes active once you have specified and saved all of the settings
on this page. Once the Metadata URL link is active, use it or the
statically generated metadata to configure your IdP, the scope of which is
outside the limits of this documentation. |
|
Cache Duration
(Minutes) |
Specify in minutes how long the SP metadata provided by
Mediasite should be cached by the IdP before being refreshed. The default
cache duration is 1440 minutes (24 hours). |
|
Certificate Source |
Select the
type of certificate that Mediasite will
use to sign SP messages:
•
Mediasite Self-Signed Certificate: Select
this option to use the self-signed certificate included with Mediasite.
Select the Signing/Encryption Key Length, which
defines the key size for the generated certificate used to sign and
encrypt SAML messages. Mediasite supports values of 1024, 1536, 2048,
3072, and 4096.
•
Third Party Certificate Authority: Select this option
to use a third-party certificate of your choice. Click Select a file to navigate to your certificate. Once
the file successfully uploads, enter the Certificate
Password.
In addition to a valid password,
the date you are uploading the third-party certificate file (today) must
be included in the certificate’s valid dates range. |
|
Message Signing Hash |
Select the secure hash algorithm that Mediasite should
use when communicating with the IdP: SHA-1 or
SHA-256. The value you select here should match
what is configured on your IdP. |
|
Current Expiration
Date |
The date on which the most recently requested SP
metadata will expire. The expiration date is automatically set once you
have specified and saved all of the settings on this page and tested the
Metadata URL above. Each time the metadata is requested from the metadata
URL, for example when the cache is refreshed, the expiration date is
updated by the specified expiration duration. |
|
Years/Days |
Specify the amount of time for which the SP metadata
will be considered valid between requests for metadata. The default value
is 1 year and 0 days. |
Enable user profile provisioning for SAML 2.0 (Metadata,
Server Provider Message settings)
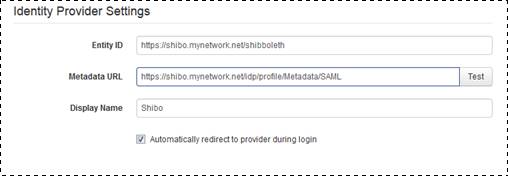
6.
Specify the Identity provider settings Mediasite needs
to connect to the identity provider and redirect authenticated users when they
attempt to access secure content:
|
Settings |
Details |
|
Entity ID |
Enter the unique identifier provided by the
IdP. |
|
Metadata URL |
Enter a URL pointing to the published IdP metadata,
provided either by the IdP, or a trusted federation. Mediasite will go to
this location to obtain and refresh metadata required to gain trust
information about the IdP. Click Test to verify
the validity of the URL and the metadata it returns. When the confirmation
message appears, click OK. |
|
Display Name |
Specify a simple name for the IdP
as this name will appear in the UI (Mediasite SSO Login page, Portal,
Player, etc.) when a user is authenticated using the IdP. |
|
Automatically redirect to provider
during login |
Select this check box to direct users to the IdP
authentication page when they attempt to access secure content. Otherwise,
users will be directed to Mediasite SSO login page each time they attempt
to log into Mediasite.
For true SSO functionality, we
highly recommended enabling the Automatically redirect
to provider during login option. |
SAML 2.0 Configuration Identity Provider Settings