 Modules must be
enabled on Mediasite to update these settings. For more information, contact
your Mediasite administrator or see the Mediasite Configuration
Guide.
In the Portal, you can quickly update general, player, and interactivity settings for multiple templates.
To quickly edit multiple presentations:
1. Right-click the folder containing the presentations you want to update and select Browse > Presentations.
2. Select the check boxes next to the items you want to update or click the check box at the top to select all items.
3. Click Edit > Presentation and select the items you want to edit from the list. In the Presentation Quick Edit dialog and update the settings (see below) as needed.
4. Click Reset Media to remove all videos and slides associated with the selected presentations. You will receive confirmation before the system deletes these files. This option is for presentations only and you cannot reverse this action.
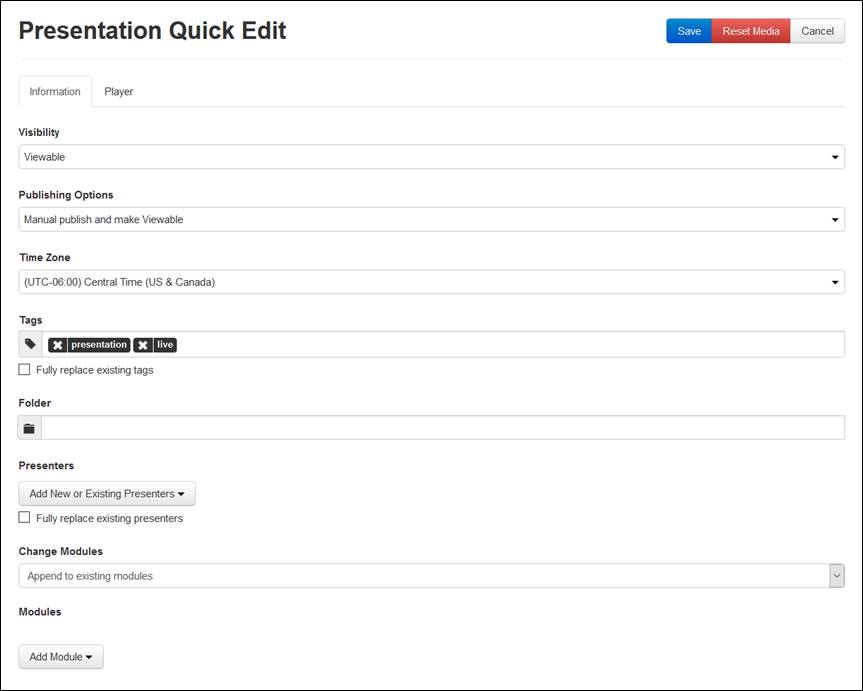
5. Click the Information tab to update general presentation properties:
|
Settings |
Details |
|
Visibility |
Select Viewable to make presentations available to users for viewing. Select Offline if you do not want presentations available to users for viewing. Presentations will still be visible to you in the Portal for updating as needed. |
|
Publishing Options |
Select how you want the Mediasite to handle presentations once they have been recorded |
|
Time Zone |
Choose a new time zone for the presentations. |
|
Tags |
Enter new tags for all selected presentations. Select the Fully replace existing tags check box to replace the current tags with the newly added ones. Otherwise, the specified tags are appended to the original ones for the selected items. |
|
Presenters |
Click Add New or Existing Presenters to add presenters. Use the search feature to find presenters already added on the Mediasite. Select the Fully replace existing presenters check box to replace the current presenters with the newly added ones. Otherwise, the specified presenters are appended to the original ones for the selected items. |
|
Change Modules |
From the drop-down list, select how you want to change the modules in the selected presentations: •Append to existing modules: Select this option to keep your existing modules when you add new ones. •Replace existing modules with these modules: Select this option to replace existing modules when you add new ones. •Delete these modules: Select this option to delete the current modules. |
|
Modules |
Click Add Module and locate the modules you want to add to the selected presentations or templates. |
 Modules must be
enabled on Mediasite to update these settings. For more information, contact
your Mediasite administrator or see the Mediasite Configuration
Guide.

Presentation Quick Edit (Information tab)
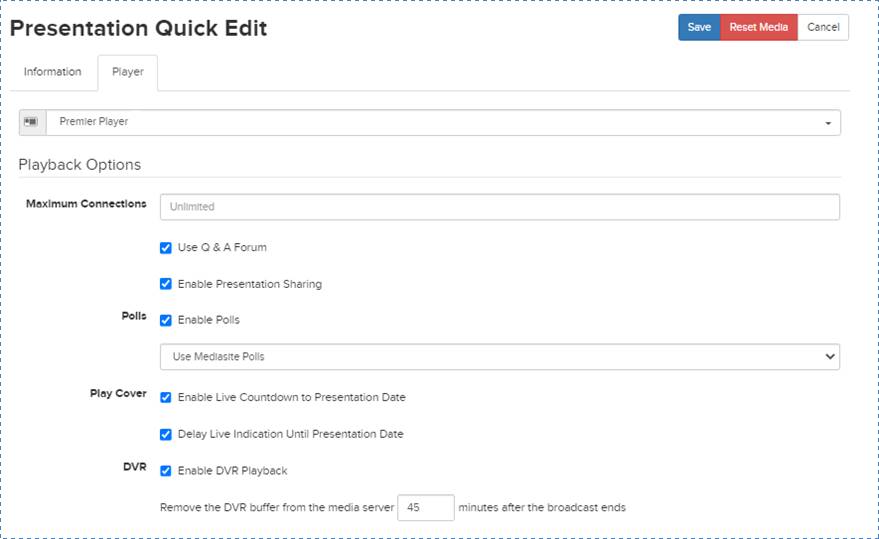
6. Click the Player. Update the player and interactive features for the presentations or templates:
|
Settings |
Details |
|
Player |
Select a player from the drop-down list. Use the search feature as needed to locate the player you are seeking. |
|
Maximum Connections |
Enter a number if you would like your presentation to only be viewable to a certain number of concurrent viewers. The default value is unlimited connections. |
|
Use Q & A Forum |
Select the check box to allow audience members to ask questions during live and on-demand presentations using the Mediasite Player. Any user whose user profile has been assigned “Moderate” permissions for a presentation will receive audience questions when this feature is enabled. |
|
Enable Presentation Sharing |
Select this check box to allow users to share this presentation using the Player. |
|
Enable Polls |
Select this check box to use polls in the presentation. Polls allow you to interact with your audience during a presentation and receive direct feedback. |
|
Polls |
Select the type of polls you want to use in your presentations: •Use Mediasite Polls: Select this option to add polls to your presentations using Mediasite. •Link to External Polls: Select this option and then enter a URL if you want to use a third-party survey system. |
|
Enable Live Countdown to Presentation Date |
Select this check box to display a countdown in the play cover. Users who navigate to the presentation in a video collection or launch the presentation using its link will see the countdown. |
|
Delay Live Indication Until Presentation Date |
Select this check box if you want to hide the icon indication a presentation will be broadcast live until the presentation’s scheduled date. |
|
Enable DVR Playback |
Select this check box to allow your audience to seek within and pause a live broadcast. Specify the buffer time (minutes). When the live broadcast has ended, the media duration + buffer is the window available for viewing the "live" broadcast. |

Presentation Quick Edit (Player tab, Playback options)
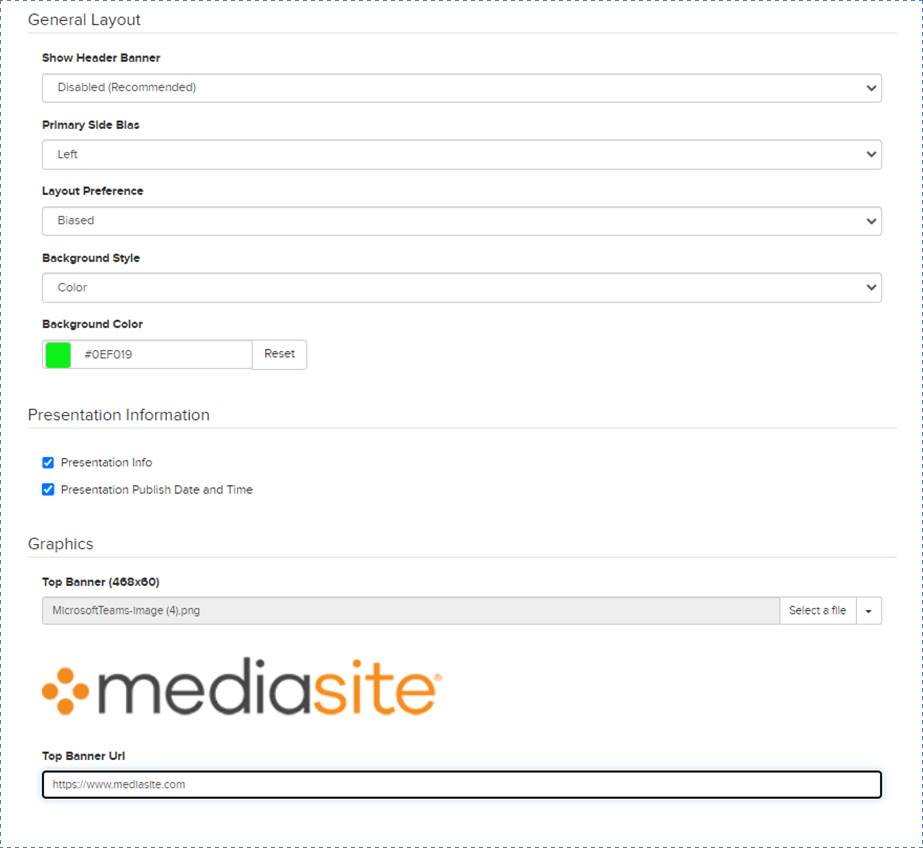
7. Click the Player tab. Update the General Layout and Graphics settings. From the Background Style list, choose the option you want. Additional options will appear based on your choice.
|
Color |
Select this option to change the background color from the default color (black). Click the color preview swatch to the left to choose a color in the color grid or enter the color code (hex) in the field. |
|
Image |
Select this option to use a custom image as the background. When the Background Image setting appears, click Select to file to navigate to and select the file containing the 1920x1080 image you want to use. A preview of the selected image is displayed below. If you select the wrong image, use the drop-down list to select Delete and remove the file. |
8. Under the Graphics > Top Banner settings, click Select a file to navigate to and select the file containing the 480x60 image you want to use.
9. In the Top Banner URL field, enter the URL of the website you want users to go to when they click on the banner.
10. Once you have finished your updates, click Save.

Presentation Quick Edit (Player tab, General Layout & Graphics settings)