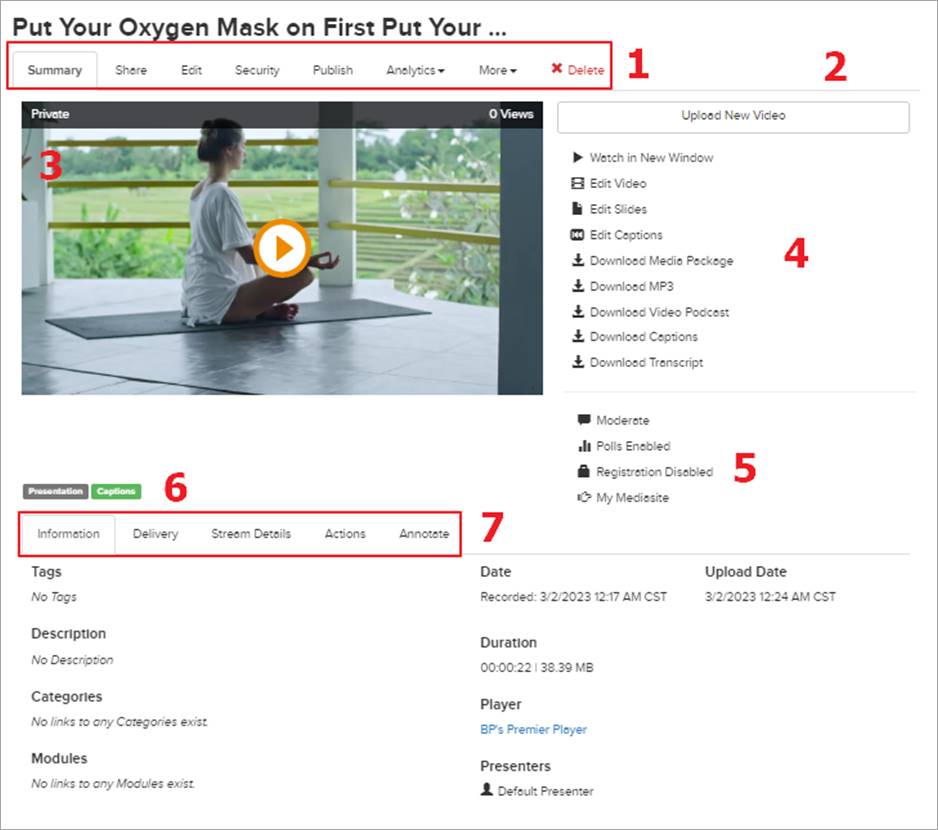
On a presentation’s properties page, you will initiate most management tasks, including updating the presentation’s settings, interacting with the audience, editing video and slides, and sharing it with your audience.

Sample presentation properties (Summary page)
|
1 |
•Click Summary to view details about the presentation. This is the default view. •Click Share to share the presentation’s link or embed it in a website or LMS. •Click Edit to update a presentation’s general, information, player, and delivery settings, and schedule actions. •Click Security to secure the presentation by assigning permissions to it. You can also change the owner. •Click Publish to view or update the presentation’s publishing options. Users can publish presentations to showcase channels, channels, and as video podcasts to YouTube. In some systems, you may have to submit an external publishing request to publish to YouTube. You will also come here to see the presentation’s shortcuts and feeds they are included in. •Click Analytics to view detailed viewing statistics (number of views, top users, how presentation viewed, etc.), monitor real-time statistics, and download report data. Access to real-time statistics is permission-based. •Click More to view drop-down menu with the following additional options: o Click More > External Publishing Requests to submit a request to publish a presentation to YouTube. o Click More> Add Like to add a new item with the same settings as this presentation. o Click More > Copy To to create a copy of your presentation in a folder. o Click More > Registration to enable registration on the presentation. Users must enter the information you specify before they can view the presentation. o Click More > Shortcut to create a shortcut for this presentation. A shortcut points to the same content as the original presentation but can have a different title, Player, folder location, and permissions. o Click More > Export To to move or copy your presentation to another Mediasite. o Click More > Custom Fields to customize your presentation by adding custom fields. •Click Delete to send the presentation to the Recycle Bin. |
|
2 |
Click Upload New Video to upload a video (MP4) file for the presentation. If the presentation already has video or audio associated with it, the uploaded video file will replace it. |
|
3 |
In the video preview window, you will see the presentation’s visibility: Viewable or Private, and the number of times the presentation has been viewed. Click the play button to watch the presentation.
|
|
4 |
•Click Watch in New Window to launch the presentation in the Player. This allows you to view the presentation in the same manner your audience will. •Click Edit Video to use the web-based Editor to update slides and remove unwanted sections in your presentation. For more information, see the Editor Help. •Click Edit Slides to launch the Slide Editor, which you will use to navigate the slides, choose a slide as the presentation’s thumbnail and add title and descriptions to the slides. •Click Edit Captions to launch the Caption Editor, which you will use to add and update a presentation’s captions. •Click Download Media Package to download the on-demand presentation as a .zip file to allow your audience to view your content without being connected to a network. •Click Download MP3 to download the presentation as an audio podcast (MP3 file). •Click Download Video Podcast to download the presentation as a video podcast (MP4 file). •Click Download Captions to download your captions as a DFXP file. •Click Download Transcript to download audio transcripts as text files. Audio transcripts are created from the presentation’s captions. |
|
5 |
•Click Moderate to launch the Presentation moderation application where you will moderate questions from the audience, comments, and annotations. Only users with appropriate permissions can moderate presentations. •Click Polls Enabled to launch the Poll Admin page on which you can add and manage your presentation’s polls and poll templates. •Click Registration Disabled or Registration Enabled to enable and/or update the registration settings. •Click My Mediasite to view the presentation in My Mediasite. Opening the presentation in My Mediasite gives you access to the Caption Editor, which you can use to create or modify captions. You can also manage the presentation’s quizzes and view quiz results. |
|
6 |
Use the presentation labels to identify the features available in the presentation such as quizzes and captions. |
|
7 |
Navigate the presentation’s summary: •Click the Information tab to view general information about the presentation: tags, description, date, duration, total video file size, player, categories, modules, and presenters. You can also view links associated with the presentation. •Click the Delivery tab to view stream group settings, the presentation's source, ways that presentation is made available to your audience, and servers included in the selected server group. Click the link for a setting, for example a content server, to view its details. You can also resubmit a video podcast job from this page. •Click the Stream Details tab to view information about the presentation's streams: content servers, URLs (distribution, storage server, and local), encoding settings, and transcoding status. •Click the Actions tab to view scheduled and completed actions (visibility updates, move to Recycle Bin, and Remove Adaptive Bitrate) for the presentation. •Click the Annotate tab to view the presentation's annotation mode: moderated or unmoderated. |