Adding new channels
When you add new channels to a showcase, you can aggregate
content into them automatically by using a search term or linking to a Mediasite
folder and optionally filtering on a search term. You can also allow multiple
users to aggregate content in a channel by allowing them to add presentations to
it using the Publish tab.
To add a new channel:
1. Click
Publishing > Channels > Add Channel.
2. Enter
a name and description for the channel that will help you and other users
identify it easily.
3.
Specify a Friendly Name for the channel to customize
its URL. This value will replace the channel ID number in the URL. For example,
if you give a channel “mychannel” as its friendly name, the URL uses this name
instead of the channel ID:
URL using channel
ID:
http://myserver.mynetwork.net/Mediasite/Channel/
ed968dc9872f456e93500b35872b334e21
URL using friendly
name:
http://myserver.mynetwork.net/Mediasite/Channel/mychannel
4. Click
in the Menu Bar Color field to update the color that
will be used for the channel’s menu by entering the color code or using the
color selector.
5. If
modules are available on your system, click Add Module
to search for and select the modules you want to associate with this channel.
This is useful if the channel will be associated with a course in a Learning
Management System (LMS).
6. From
the Add content to this channel...drop-down list,
select the aggregation method you want to use:
|
Settings |
Details |
|
Automatically by linking
to a Mediasite folder |
Select this option to aggregate content in a channel
by linking it to a Mediasite folder. All presentations in the folder and
its sub-folders are visible in the channel at the same level since
channels are flat lists. In addition, all permissions assigned to
presentations carry over to the channel. You can optionally filter the
linked channel using a search term.
Click in the Link to Folder
field to see a list of available folders or use the search feature. Click
on a folder to select it.
 You can also
add a linked channel by right-clicking a folder in Management Portal and
selecting Publish to Channel. However, in this
case, only the name, friendly name, and description settings are
available. Additionally, in the dialog, you will see a listing of all
channels published using this folder. You can also
add a linked channel by right-clicking a folder in Management Portal and
selecting Publish to Channel. However, in this
case, only the name, friendly name, and description settings are
available. Additionally, in the dialog, you will see a listing of all
channels published using this folder.
Some features, such as continuous
playback can be set on a channel, but do not apply when a channel is
included in a showcase. In this case, you need to globally enable
continuous playback on the showcase, which turns this feature on for all
channels in the showcase. |
|
Automatically by using a
search term |
Select this option to aggregate content in a channel
by automatically discovering presentations matching specific search
criteria. When you create a search-based channel, it will only include
presentations you have read and write permissions on.
Under the Content Options, specify
the search term and select the check box next to the presentation metadata
you want included in the search. For example, if you want to search only
titles and tags, select the check box next to each of these
items. |
|
Manually by using a
presentation’s Publish tab |
Select this option to aggregate content in
a channel by allowing users to add presentations to it using the Publish tab. Since this method allows multiple users
to add content to the channel, you can optionally link terms and
conditions to it. Users must accept the terms specified to publish content
to the channel.
Once you select this option, click Add Terms & Conditions and select the terms and
conditions agreement you want to associate with this channel. Users must
accept this agreement before they can publish to this
channel. |
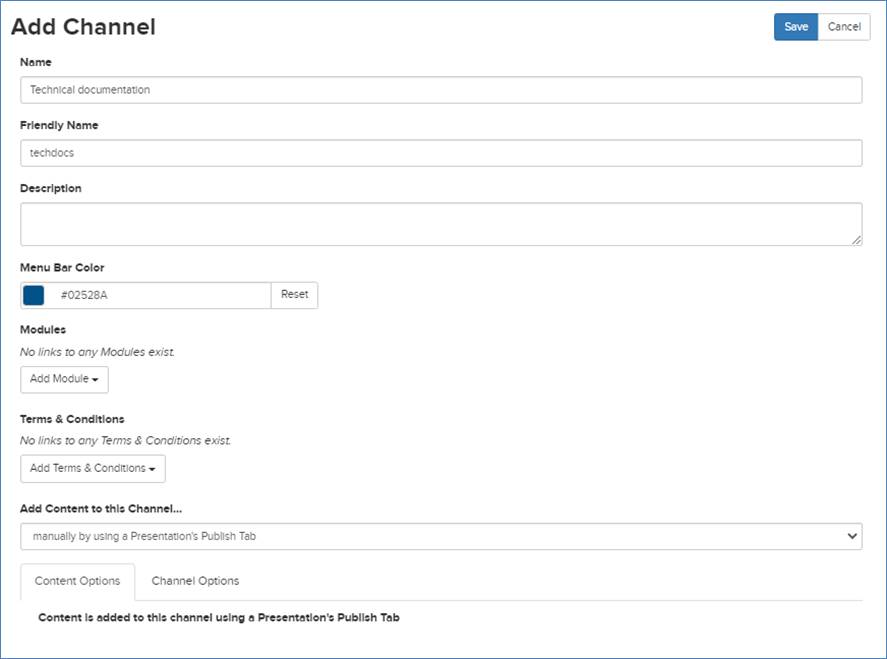
Add new channel aggregating content using the presentation’s
Publish tab
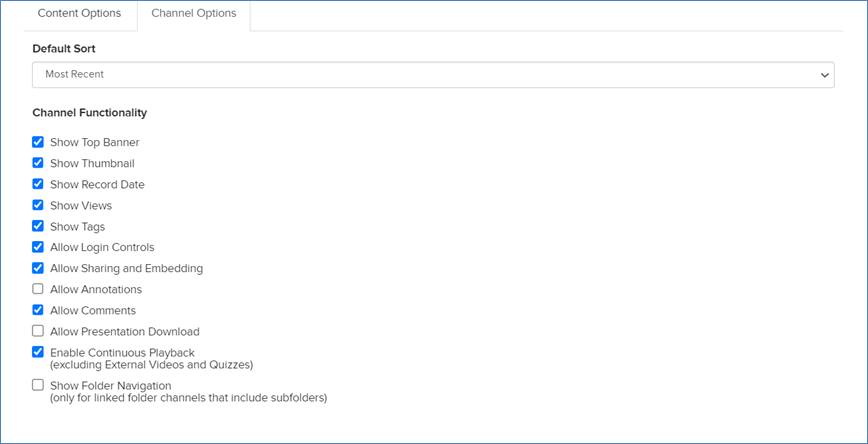
7. Click
Channel Options to specify the features that will be
available in the channel, to show folder navigation (only for channels linked to
folders with subfolders), and to select what presentation metadata will be
displayed.
|
Settings |
Details |
|
Show Top Banner |
Select to display a banner at the top of a
page. |
|
Show Thumbnail |
Select to display thumbnail wherever the channel
appears. |
|
Show Record Date |
Select this check box to include the date the
presentation was recorded on the Player page. In some instances, if you
are re-using on-demand presentations you may want to hide the date, so
content does not appear outdated. |
|
Show Views |
Select this presentation to show how many times the
presentation has been viewed on the Player page. |
|
Show Tags |
Show the presentation’s tags on the Player
page. |
|
Allow Login Controls |
Select to allow users to log in and out of Mediasite
from a channel. |
|
Allow Sharing and Embedding |
Select to display controls in the channel that will
allow users to share or embed presentations with others. Typically, if
integrating a channel with a Learning Management System (LMS), you will
disable this feature to ensure users are only accessing content in the
channel through the LMS. |
|
Allow Annotations |
Select to allow users with appropriate permissions to
add annotations to presentations. |
|
Allow Comments |
Select to allow users to provide feedback on
presentations via comments. |
|
Allow Presentation Download |
Select the check box to allow users to download
podcasts and vodcasts from the channel.
 For users to be able to download
podcasts and vodcasts, they must have permission for the “Download
Mediasite Content” Portal resource. For more information, see the
Mediasite Configuration Guide. For users to be able to download
podcasts and vodcasts, they must have permission for the “Download
Mediasite Content” Portal resource. For more information, see the
Mediasite Configuration Guide.
 CAUTION: Once you download
a podcast or vodcast, it is outside of the Mediasite system. Therefore,
the security features available with live and on-demand presentations are
not available with downloadable content. CAUTION: Once you download
a podcast or vodcast, it is outside of the Mediasite system. Therefore,
the security features available with live and on-demand presentations are
not available with downloadable content.
|
|
Enable Continuous Playback |
Select this check box to allow auto-play of a
channel’s presentations. When a user watches a presentation, successive
presentations will automatically load and begin playing in the channel’s
player. External videos, and presentations containing quizzes, will be
excluded from continuous playback. |
|
Show Folder Navigation |
Select this check box to allow users to navigate
through a channel’s folders and sub-folders. This feature is available
only for channels that have been linked to folders that have
subfolders. |
|
Change Default Sort |
Select this check box to update how presented are
listed in the channel by default. Once you select this option, you will
see a drop-down list that you will use to update this
setting. |
Some features, such as continuous playback can
be set on a channel, but do not apply when a channel is included in a
showcase. In this case, you need to globally enable continuous playback on
the showcase, which turns this feature on for all channels in the showcase. For
more details on the features included in Channel Options, see Adding new
channels.
8. Click
Save.
9. Click
the Edit tab on the channel’s properties page to link
to a module, add a thumbnail image for it or add a banner image. To update or
add a channel’s top banner to reflect your organization’s brand, update the
settings as follows:
|
Settings |
Details |
|
Top Banner Image
Upload |
Browse to the image you want to use for the
top banner. The recommended size of the image is 320 pixels x 60
pixels. |
|
Top Banner Area
Background Color |
Specify the color you want to appear behind
the top banner area. Click Match Banner Image to
match the background color based the colors in the right most pixels of
the uploaded banner image. |
|
Top Banner
Link |
Enter a URL to link the top banner to a web
address. When a user clicks on the Top Banner image in the channel, the
specified web address will load in another browser
window. |
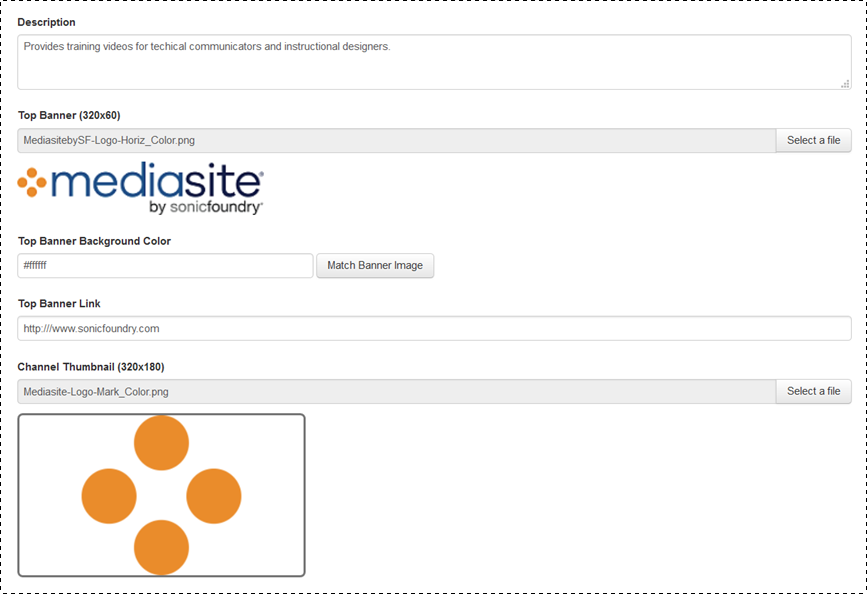
Channel top banner properties
10. Click the
Security tab to assign permissions to the channel.
Make sure to click Save.