Quota levels are templates used to create user quota policies. Administrators can use quota policies to monitor and restrict users’ storage usage as needed.
To add a new quota level:
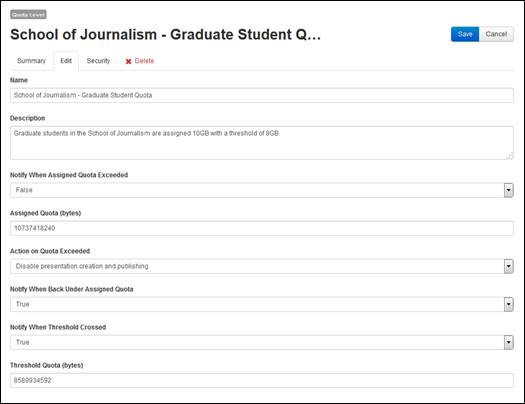
1. Click Setting > Quota Levels > Add New and specify the following settings:
|
Settings |
Details |
|
Name/Description |
•Enter a name and description that will help you and other users identify this quota easily. |
|
Notify When Assigned Quota Exceeded |
•Select True to have an email notification sent to users when they exceed their allocated storage space. Users will also see a notification when they log into Management Portal or My Mediasite. |
|
Assigned Quota (bytes) |
Specify the amount of storage space (bytes) users at this quota level will be given. • |
|
Action on Quota Exceeded |
Select what should happen when users exceed their quotas: •Disable presentation creation and publishing: Select to disable users’ ability to create new presentations, upload new media, and publish audio and video podcasts when they go over their quota. Users will receive a notification and these features will be disabled in the UI. •Nothing: Select if you are just tracking storage usage but do not want to impose any consequences. |
|
Notify When Back Under Assigned Quota |
•Select True to have an email notification sent to users when they have reduced their storage back to the allocated storage space. All restrictions on their accounts are lifted. |
|
Notify When Threshold Crossed |
•Select True to have an email notification sent to users when they exceed a certain threshold quota. Users will also see a notification when they log into Management Portal or My Mediasite indicating that are getting close to exceeding their allocated storage space. |
|
Threshold Quota (bytes) |
Specify the amount of storage space (GB) that will trigger the threshold crossed notification, if enabled. A good rule of thumb is 80% of the assigned quota. For example, if the assigned quota is 10 GB than you will make the threshold quota 8 GB. |
2. Click Save.

Sample Quota Level
 You must enable quota levels on
Mediasite and add quota levels on the Settings >
Quota Levels page before you can select a default
quota level.
Once you have created your quota levels, you will use them to apply quota policies to user profiles. You can apply quota policies in in bulk or on individual user profiles.
 You can remove quota limits on users at
any time. However, if a user is over their limit when you remove the quota
policy and the system has disabled their ability to create presentations, you
must manually give them “create presentations” permissions in Security > Operations.
Apply quota policies on multiple user profiles
To apply quota polices on multiple user profiles:
1. Click Security > Profiles and select the check boxes next to each user profile you want to update.
2. Click More > Change Quota Policy.
3. Select Apply Quota Limit and select the quota level you want to apply from the drop-down list.
4. Click Save.

Apply quota limits to multiple user profiles
Apply quota policies on individual user profile
To apply quota polices on a user profile:
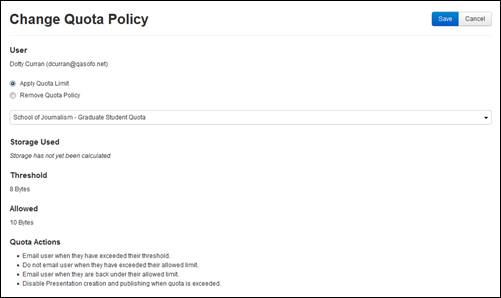
1. Select the user profile you want and click Change Quota Policy on the summary page.
2. Select Apply Quota Limit and select the quota level you want to apply from the drop-down list.
3. Once you select a quota level additional details appear. Verify these are the correct settings.
4. Click Save.

Apply quota limits on user profile