 Please note that your
Mediasite administrator has full access to all channels and will be able to view
your private channels and its contents when managing your account.
Please note that your
Mediasite administrator has full access to all channels and will be able to view
your private channels and its contents when managing your account.
Create a channel to share your presentations with a specific audience. You will share the channel’s link with your audience directly. Only users with access to the channel will be able to view the presentations in the channel.
Once you have created a channel, you can edit it, view it as it will appear to your audience, and add presentations to it.
Please note that your
Mediasite administrator has full access to all channels and will be able to view
your private channels and its contents when managing your account.
To create a channel in My Mediasite:
1. Click Browse Channels > Add Channel.
2. On the Create a New Channel page, specify the following information:
|
Option |
Details |
|
Channel Name |
Enter an easily identifiable name for your channel. |
|
Friendly Name |
Specify a friendly name for the channel to customize its URL. This value will replace the channel ID number in the URL. For example, if you give a channel “mychannel” as its friendly name, the URL uses this name instead of the channel ID: URL using channel ID: http://myserver.mynetwork.net/Mediasite/Channel/ ed968dc9872f456e93500b35872b334e21 URL using friendly name: http://myserver.mynetwork.net/Mediasite/Channel/mychannel |
|
Channel Description |
Enter a short description for your channel. |
|
Top Banner Image |
Click Upload Top Banner Image and browse to the image you want to use for the top banner. The recommended size of the image is 320 pixels x 60 pixels. |
|
Banner Background Color |
Specify the color you want to appear behind the top banner area. Click Match Banner Image to match the background color based the colors in the right most pixels of the uploaded banner image. |
|
Top Banner Link |
Enter a URL to link the top banner to a web address. When a user clicks on the Top Banner image in the catalog, the specified web address will load in another browser window. |
|
Channel Thumbnail |
Click Upload Channel Thumbnail and browse to the image you want to use as the channel’s thumbnail. |
|
Default Sort |
Select the default order of videos when a user browses through the channel: Date (newest to oldest), Date (oldest to newest), or Title. |
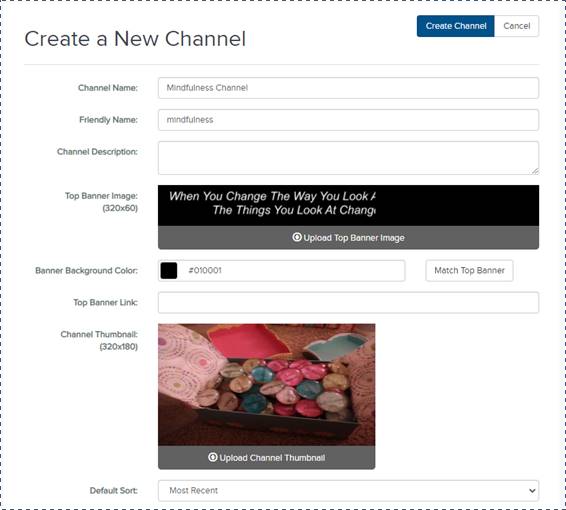
Specify channel information and choose images
3. Select which features will be available in the channel:
|
Option |
Details |
|
Show Top Banner |
Select this check box to display a banner at the top of the channel. When you select this option, additional banner settings appear once you create the channel. |
|
Show Thumbnail |
Select this check box to display the channel’s thumbnail image next to its title. |
|
Allow Login Controls |
Select this check box to allow users to log in and out of Mediasite from the channel page. |
|
Allow Sharing and Embedding |
Select this check box to display controls in the channel that will allow users to share or embed presentations with others.
|
|
Allow Annotations |
Select this check box to allow users with appropriate permissions to add annotations to presentations.
|
|
Allow Comments |
Select this check box to allow users to provide feedback on presentations via comments.
|
|
Allow Presentation Download |
Select the check box to allow users to download portable presentations, podcasts, caption files, and video podcasts from the channel.
|
|
Enable Continuous Playback (excluding external videos and quizzes) |
Select this check box to allow auto-play of a channel’s presentations. When a user watches a presentation, successive presentations will automatically load and begin playing in the channel’s player. Presentations with quizzes and external videos will be skipped. |
4. Click Create Channel.
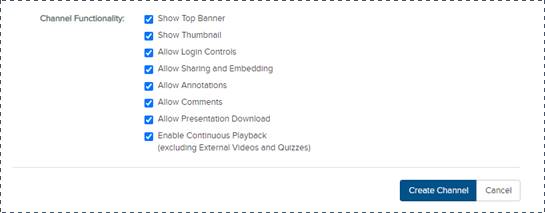
Select channel features
5. Once you have created a channel, click Browse Channels. Optionally, make it a favorite so you can quickly access it.
6. Click the channel’s title to see additional channel management options. Click View to see how the channel will appear to your users.
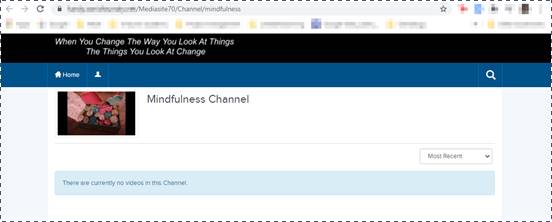
View channel
 Typically, if integrating a
channel with a Learning Management System (LMS), you will disable this
feature to ensure users are only accessing content in the channel through
the LMS.
Typically, if integrating a
channel with a Learning Management System (LMS), you will disable this
feature to ensure users are only accessing content in the channel through
the LMS. Members of your audience
must have the appropriate permissions to download content from the channel
even after you enable this feature. These permissions are typically
assigned by Mediasite administrators. Contact your Mediasite administrator
for more information.
Members of your audience
must have the appropriate permissions to download content from the channel
even after you enable this feature. These permissions are typically
assigned by Mediasite administrators. Contact your Mediasite administrator
for more information.