Before you can record calls on your Join Appliance, you must connect it. You will connect equipment to the output ports to monitor your outputs. You will also connect peripheral devices to your Recorder to connect to the network and power source.
Included equipment
Before you get started, verify all equipment is present and optionally mount your Join Appliance to a wall or rack.
The following equipment is included with each Join device:
•Power cable
•Rack mount brackets and screws
•DisplayPort to HDMI adapter
 If anything is missing or you
are not sure what version you have, contact your sales representative or visit
the Mediasite Customer Care Portal at www.sonicfoundry.com/support.
If anything is missing or you
are not sure what version you have, contact your sales representative or visit
the Mediasite Customer Care Portal at www.sonicfoundry.com/support.
Attach rack mount brackets (optional)
All Join Appliance devices include rack mount brackets. Before you configure the Join hardware, you should attach the brackets and install the device in a rack. The brackets attach to the sides of the Join Appliance and are placed towards either the front or the back of the chassis.
To attach the rack mount brackets:
1. Remove the screws from the side of the chassis where the rack mount will be attached.
2. Line the bracket up with the screw holes and connect it to the chassis using the included flat-head screws.
3. Repeat steps 1-2 on the other side of the chassis.
A rail mount kit is available
as a separate add-on. Contact your Sonic Foundry sales representative for more
details.
Connect output devices
|
Output ports |
Instructions |
|
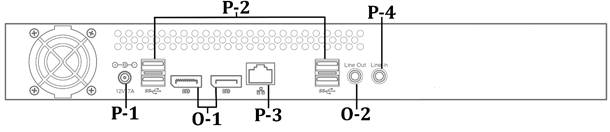
O-1. DisplayPort |
To send the Recorder desktop to a monitor or projector, connect the monitor’s input to this port using a DisplayPort cable. You can also use a HDMI, VGA, or DVI adapter to convert to a corresponding video format. |
|
O-2. Line Out (Headphone) Port |
When monitoring, playing back, or editing a presentation, connect headphones or speakers to this port to listen to the audio. |
Connect peripheral devices
|
Ports |
Instructions |
|
P-1. Power Connector |
Once you have connected all your devices, you will turn on your Recorder. To turn on your Recorder, plug the power cord into the Power Connector, plug the DC power adapter into a grounded power outlet, and press the Power Switch on the left side of the Recorder. |
|
P-2. USB Ports |
You can optionally connect a USB capture device to this port to capture video or audio. You can also optionally connect a keyboard and mouse (not provided) to two of these ports. |
|
P-3. Network (Ethernet) Ports |
Connect an Ethernet network cable to one of the Network (Ethernet) Ports and to your network to manage the Recorder remotely and connect it to Mediasite. |
|
P-4. Line In Port |
N/A |
After you have finished connecting devices to your Join Appliance, power on the machine, and you will begin the configuration process.