To import Windows media files, you will add a Windows media import project.
To add a Windows media import project:
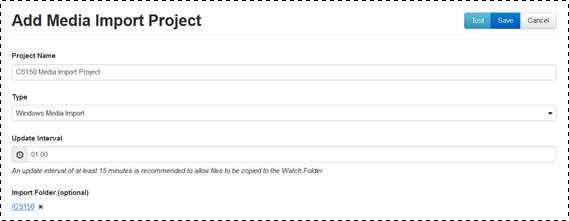
1. Click Settings > Media Import > Add New and specify the settings needed to import content into the Mediasite system:
|
Options |
Details |
|
Project Name |
Enter a name for the project that will help you easily identify it. |
|
Type |
Select External Media Import if you are importing Camtasia Relay recordings, integration packages, or MP4 files. |
|
Update Interval |
Specify in hours and minutes how often Mediasite will check the drop location for new content. The minimum update interval is 15 minutes. |
|
Import Folder (optional) |
Click Select a folder and navigate to the folder that will contain the newly created presentation. If you do not select a folder, the presentation will be in the same folder as the template used to create it. |
Adding a new Windows media import project (general settings)
|
Setting |
Details |
|
Location |
Enter the FTP location of the files being imported. For example: ftp://ftpserver.yourcompany.com/storagelocation |
|
Username/Password |
Enter the credentials required to connect to the FTP location.
|
|
Delete file from Watch Folder after successful import |
Select check box to remove all media files after they are imported. |
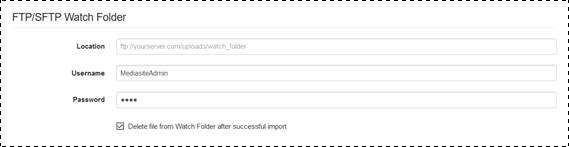
Adding a new Windows media import project Watch folder settings)
|
Setting |
Details |
|
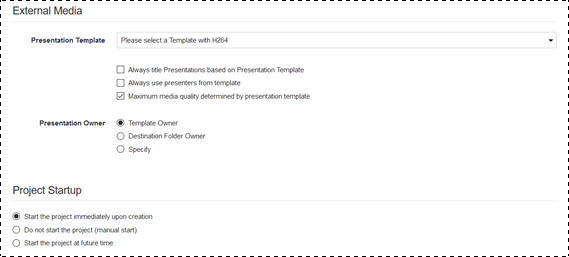
Presentation Template |
Select the template that will be used for imported external media. |
|
Always title presentations based on presentation template |
Select the check box to make the template's name the basis of the newly created presentation's title instead of the one specified in the original media file. |
|
Always use presenters from template |
Select the check box to use the template's presenters instead of the presenter information specified in the original media file. |
|
Maximum media quality determined by presentation template |
Select the check box to use the template's encoding settings instead of most closely matching the settings used by the original media file. |
|
Presentation Owner |
Select the radio button next to the item that best describes how you want to assign owners to presentations created using imported media: •Template: Select this option to have presentation inherit the owner of the template used to create it. •Destination Folder Owner: Select this option to have presentation inherit the owner of the folder where it will be located. •Specify: Select this option to specify an owner for the presentations. You will search a directory connected to Mediasite to locate the user you want to make the presentation owner. |
|
Project Startup |
Select the radio button that best fits how you want to start the importing process for this project: •Start the project immediately upon creation: Select this option to start the media importing process once you click Save. •Do not start the project (manual start): Select this option to start the import process manually by clicking Start. •Start the project at future time: Select this option to specify the start date and time that the media importing process should begin. |
2. Click Test to verify you can connect to the drop box location using the specified credentials. Click Save.
Media import, adding a new external media import project
 If you are using SFTP for
your file storage, you may need to adjust the location’s URI slightly. For
more information, see KBA 3686 available on the Customer Care
Portal at www.sonicfoundry.com/support.
If you are using SFTP for
your file storage, you may need to adjust the location’s URI slightly. For
more information, see KBA 3686 available on the Customer Care
Portal at www.sonicfoundry.com/support.