 For more information on setting up
Camtasia Relay, see TechSmith’s documentation.
For more information on setting up
Camtasia Relay, see TechSmith’s documentation.
To import Camtasia Relay recordings, integration packages, or MP4 files, you will add an external media import project.
Automatic import of Camtasia Relay recordings
Mediasite and Camtasia Relay 3.0 together provide an end-to-end workflow for recording user generated content using the Relay Recorder and automatically publishing it to Mediasite. This integrated workflow requires setting up an SFTP/FTP drop box location as a bridge between the two systems.
Before you create a media import project using Management Portal, you must configure the Camtasia Relay server for use with Mediasite. First you will set up a publishing destination that includes the FTP location (SFTP/FTP drop box location) where Camtasia will publish content and from where Mediasite will retrieve it. The publishing destination settings also include the Mediasite Player URL that will be used by your presentations. You will then create a profile that uses the specified publishing destination.
When a Camtasia recording is imported, the following metadata is imported along with the media file: title, description, air date, presenter, and owner. The presentation’s captioning and table of contents are also imported to Mediasite. The table of contents in a Camtasia presentation appears as chapter points in Mediasite.
For more information on setting up
Camtasia Relay, see TechSmith’s documentation.
Automatic import of video files
To work with Mediasite, third-party encoding and recording solutions that generate video files must place (transfer) the media files into an SFTP/FTP drop box. Mediasite imports the following metadata along with the video file: title, description, duration, and presenter. The airdate is always set to the date/time of the import.
Presenter information
By default, when you are importing content from Camtasia Relay, Mediasite will first look for a presenter in the Mediasite database that matches the one specified in the original Camtasia Relay recording. If the presenter does not exist in the database, Mediasite will create a new presenter using the recording’s presenter information.
When you import Windows media files, by default, the first name specified in the “Artist tag” is used as the presenter name. In both cases, when you create media import projects, you can override the default behavior and use the presenter from the presentation template instead.
 When importing Camtasia
Relay recordings, Sonic Foundry recommends that you DO NOT override the default
behavior since matching is done on the presenter’s name and email address.
However, when importing video files, Sonic Foundry recommends that you DO
override the default behavior and use the presenter information in the template
instead since matching is done only on presenter names, which may not be very
accurate.
When importing Camtasia
Relay recordings, Sonic Foundry recommends that you DO NOT override the default
behavior since matching is done on the presenter’s name and email address.
However, when importing video files, Sonic Foundry recommends that you DO
override the default behavior and use the presenter information in the template
instead since matching is done only on presenter names, which may not be very
accurate.
To add an external media import project:
1. Click Settings > Media Import > Add New and specify the settings needed to import content into the Mediasite system:
|
Options |
Details |
|
Project Name |
Enter a name for the project that will help you easily identify it. |
|
Type |
Select External Media Import if you are importing Camtasia Relay recordings, integration packages, or MP4 files. |
|
Update Interval |
Specify in hours and minutes how often Mediasite will check the drop location for new content. The minimum update interval is 15 minutes. |
|
Import Folder (optional) |
Click Select a folder and navigate to the folder that will contain the newly created presentation. If you do not select a folder, the presentation will be in the same folder as the template used to create it. |
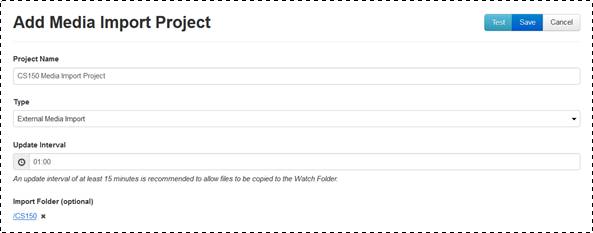
Media import, adding a new external media import project (general settings)
|
Options |
Details |
|
Location |
Enter the FTP location (publishing destination) of the files being imported. When using Camatasia Relay, this will be the same location specified in the profile. For example, ftp://ftpserver.yourcompany.com/publishinglocation
|
|
Username/Password |
Enter the credentials required to connect to the FTP location. |
|
Delete file from Watch Folder after successful import: |
Select check box to remove all media files after they are imported.
|

Media import, adding a new external media import project (watch folder settings)
|
Options |
Details |
|
Presentation Template |
Select the template that will be used for imported external media |
|
Always title presentations based on presentation template |
Select the check box to make the template's name the basis of the newly created presentation's title instead of the one specified in the original media file. |
|
Always use presenters from template |
Select the check box to use the template's presenters instead of the presenter information specified in the original Camtasia recording or media file. |
|
Maximum media quality determined by presentation template |
Select the check box to use the template's encoding settings instead of most closely matching the settings used by the original media file. |
|
Presentation Owner |
Select the radio button next to the item that best describes how you want to assign owners to presentations created using imported media: •Template: Select this option to have presentation inherit the owner of the template used to create it. •Destination Folder Owner: Select this option to have presentation inherit the owner of the folder where it will be located. •Specify: Select this option to specify an owner for the presentations. You will search a directory connected to Mediasite to locate the user you want to make the presentation owner. |
|
Project Startup |
Select the radio button that best fits how you want to start the importing process for this project: •Start the project immediately upon creation: Select this option to start the media importing process once you click Save. •Do not start the project (manual start): Select this option to start the import process manually by clicking Start. •Start the project at future time: Select this option to specify the start date and time that the media importing process should begin. |
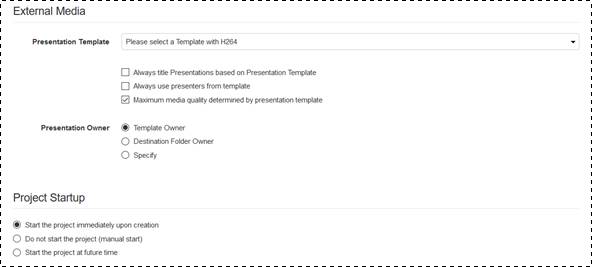
Media import, adding a new external media import project (external media, project start up settings)
2. Click Test to verify you can connect to the drop box location using the specified credentials. Click Save.