Filtering report data
Before you run a new report, you can limit the data
retrieved for your reports by specifying report options, applying filters, and
including or excluding data from certain IP addresses. This ensures that you
only see the data that you want. You can also specify the data range and time
zone used for a report. The filters available depend on the report type.
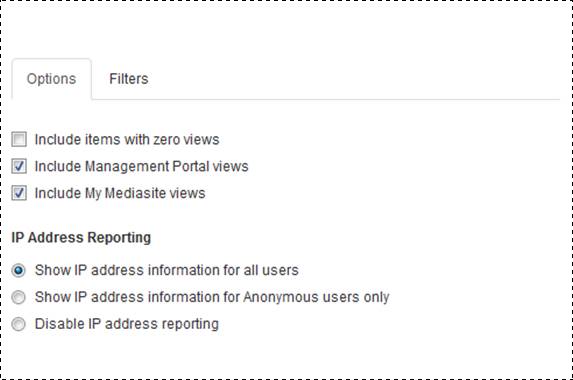
Report options
Select the following report options on the new report’s
properties page:
|
Settings |
Details |
|
Include Items with Zero
views |
Select check box to include
presentations with zero views in a report. For example, if you create a
new presentation statistics report for a specific set of users or a user
report for a specific set of presentations, you’ll be able to see which
presentations users haven’t viewed yet. |
|
Portal view
items |
Select the Include Management Portal views check box to include
presentations that were launched via Management Portal. |
|
Include Management
Portal views |
Select check box to include presentations
that were launched via Management Portal. |
|
Include My Mediasite
views |
Select check box to include
presentations that were launched via My Mediasite. |
|
IP Address
Reporting |
Select the radio button that best describes how you
want IP addresses reported:
•
Show IP address information for all
users: Select this option to include the IP addresses for all
members of your viewing audience in your report.
•
Show IP address for anonymous users only:
Select this option to identify the IP addresses of users who viewed
presentations anonymously.
•
Disable IP address reporting: Select this
option if you do not want any IP addresses included in the report. The
report will only include usernames and Anonymous to identify
users. |
Report options
 IP address reporting
options are available when your Mediasite administrator has enabled this feature
as part of the global reporting settings. For more information, see “Update
reporting settings” in the Configuration Guide.
IP address reporting
options are available when your Mediasite administrator has enabled this feature
as part of the global reporting settings. For more information, see “Update
reporting settings” in the Configuration Guide.
Specify filters
There are different filters available for each report
type. You can apply one or more of the available filters to a report:
|
Report filters |
Details |
|
Add Presentations |
Click and browse to the folders
containing the presentations you want to include, select the check box
next to each presentation you want to include. Click Add. |
|
Add Folders |
Click and select the check box next to each folder
you want to include. Click Add. If you do not
want to include sub-folders in the selected folders, clear the Include subfolders check box. |
|
Add Catalogs |
Click and select the check box next to each catalog
you want to include. Click Add. |
|
Add Channels |
Click and select the check box next to each channel
you want to include. Click Add. |
|
Add Showcases |
Click and select the check box next to each showcase
you want to include. Click Add. |
|
Add Presenters |
Click and select the check box next to each presenter
you want to include. Click Add. |
|
Add Owners |
Click and select the check box next to each
presentation owner you want to include. Click Add. |
|
Add Users |
Click and enter the user IDs for the users you want
to include making sure to separate them with a semi-colon. Click
Add. |

Report filters
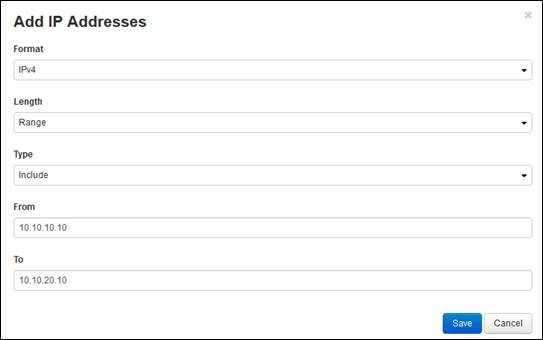
Include or exclude IP ranges
When you create reports, filter out data from specific
users by excluding data from certain IP addresses. For example, to filter out
the activities of internal viewers in your organization, you would exclude the
IP address range for users in your organization. Similarly, to view only the
activities of users in your organization, you would include only the IP
addresses in that range. You can filter out IP addresses by specifying an IP
range or by specifying an IP address and subnet mask.
To filter out IP addresses:
1. On the
new report’s properties page, click Add IP Addresses
and choose IPv4 or IPv6 from
the Format drop-down list.
2. From
the Length drop-down list, select Address to enter a specific IP address or Range to specify a range of IP addresses.
3. Choose
Include or Exclude from the
Type drop-down list to include or exclude,
respectively, the specified IP addresses.
4. If you
selected Range, enter the IP addresses in the From and
To fields. If you selected Address, enter the IP
address in the appropriate fields.
5. Click
Add. Repeat for each IP address or IP range you
want to include or exclude.
Report, specify IP address
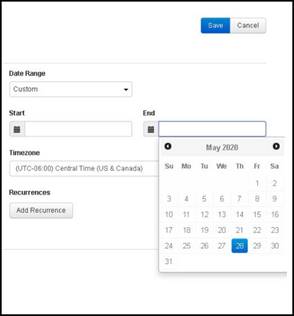
Specify the date range and time zone
For each report, you will specify the time range you want
covered and the time zone.
Specify date range
To specify the date range:
1. On the
new report’s properties page, choose the period you want to cover in the report
from the Date Range drop-down list.
2. To
enter specific dates, choose Custom dates and select
the start and end dates using the calendars.
Specify time zone
Instead of using the Mediasite’s time zone in a report, you
can specify a different time zone. This is helpful when the server is located in
a different time zone, but you want to see data using your local time.
To specify the reporting time zone:
1. From
the task bar, select the type of report you want and on the bottom of the page
click Reporting Time Zone.
2. Select
a time zone from the drop-down list and click OK.
Specify report’s date range and
time zone
 You can specify the time
zones available in the drop-down list as part of the Mediasite settings. For
more information, see the Mediasite Configuration Guide.
You can specify the time
zones available in the drop-down list as part of the Mediasite settings. For
more information, see the Mediasite Configuration Guide.