Adding showcase channels
Channels are searchable, online collections with
presentations displayed as a flat list. After you create a showcase, you can add
channels to it. Channels are unique to a showcase.
You will add content to a showcase by adding channels and
aggregating content within them. There are three ways to aggregate content into
channels: automatically by linking to a Mediasite folder, automatically by using
a search term, and manually using a presentation’s Publish tab.
Add linked showcase channels
Aggregate content in a channel by linking it to a Mediasite
folder. Showcase channels with content added using this method are linked
channels. You can optionally filter the linked channel using a search term.
All presentations in the folder and its sub-folders are
visible in the channel at the same level since channels are flat lists. In
addition, all permissions assigned to presentations carry over to the
channel.
To add a linked showcase channel:
1. Click
Publishing > Showcases and locate the
showcase you want.
2. On the
showcase’s properties page, click Channels > Add New
Channel and enter a name and description for the channel that will help
you and other users identify it easily.
3.
Specify a Friendly Name for the channel to customize its URL.
This value will replace the channel ID number in the URL. For example, if you
give a channel “mychannel” as its friendly name, the URL uses this name instead
of the channel ID:
URL using channel
ID:
http://myserver.mynetwork.net/Mediasite/Channel/ed968dc9872f456e93500b35872b334e21
URL using friendly
name:
http://myserver.mynetwork.net/Mediasite/Channel/mychannel
4. By
default, the channel will be visible in the showcase. If you want to hide the
channel while you add content, clear the Viewable in
Showcase check box.
5. To
require users to register before they can view presentations in this channel,
select the Use Showcase Registration check box.
6. If you
want the default sort order of videos when users browse the channel or when
returned in search results to be different from those selected for the showcase,
select them from the Browse Default Sort or Search Default Sort drop-down lists.
7. From
the Add content to this channel... drop-down list,
select automatically by
linking to a Mediasite folder.
8. Click
in the Link to Folder field to see a list of available
folders or use the search feature. Click on a folder to select it.
9. Click
Save. Click the Edit tab on
the channels properties page to add a thumbnail image for it. Click the Security tab to assign permissions to the channel.
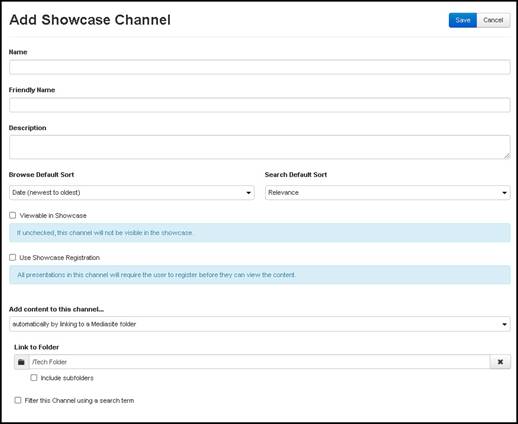
Add a linked channel (add content
automatically by linking to a Mediasite folder)
Add search-based showcase channels
Aggregate content in a channel by automatically discovering
presentations matching specific search criteria. Channels with content added
using this method are search-based channels. When you
create a search-based channel, it will only include presentations you have read
and write permissions on.
To add a search-based showcase channel:
1. Click
Publishing > Showcases and locate the
showcase you want. On the showcase’s properties page, click Add New Channel and enter a name and description for the
channel that will help you and other users identify it easily.
2.
Specify a Friendly Name for the channel to customize
its URL. This value will replace the channel ID number in the URL. For example,
if you give a channel “mychannel” as its friendly name, the URL uses this name
instead of the channel ID:
URL using channel ID:
http://myserver.mynetwork.net/Mediasite/Showcase/ShowcaseNameorID/Channel/
ed968dc9872f456e93500b35872b334e21
URL using friendly
name:
http://myserver.mynetwork.net/Mediasite/Showcase/ShowcaseNameorID/Channel/mychannel
3. By
default, the channel will be visible in the showcase. If you want to hide the
channel while you add content, clear the Viewable in
Showcase check box.
4. To
require users to register before they can view presentations in this channel,
select the Use Showcase Registration check box.
5. If you
want the default sort order of videos when users browse the channel or when
returned in search results to be different from those selected for the showcase,
select them from the Browse Default Sort or Search Default Sort
drop-down lists.
6. From
the Add content to this channel...drop-down list,
select automatically by using a search term.
7.
Specify the search term and select the check box next to the presentation
metadata you want included in the search. For example, if you want to search
only titles and tags, select the check box next to each of these items.
8. Click
Save. Click the Edit tab on
the channels properties page to add a thumbnail image for it. Click the Security tab to assign permissions to the channel.
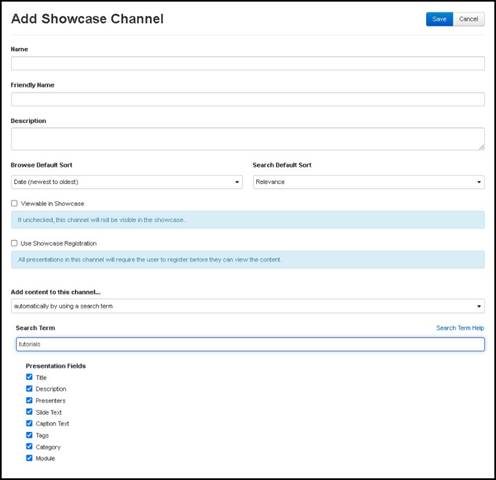
Add search-based channel (add
content automatically by using a search term)
Add custom showcase channels
Aggregate content in a channel by allowing users to add
presentations to it using the Publish tab. Channels
with content added using this method are custom
channels. Since this method allows multiple users to add content to the
channel, you can optionally link terms and conditions to it. Users must accept
the terms specified to publish content to the channel.
To add a custom showcase channel:
1. Click
Publishing > Showcases and locate the
showcase you want. On the showcase’s properties page, click Channels >
Add New Channel and enter a name and description for
the channel that will help you and other users identify it easily.
2.
Specify a Friendly Name for the channel to customize
its URL. This value will replace the channel ID number in the URL. For example,
if you give a channel “mychannel” as its friendly name, the URL uses this name
instead of the channel ID:
URL using channel
ID:
http://myserver.mynetwork.net/Mediasite/Showcase/ShowcaseNameorID/
ed968dc9872f456e93500b35872b334e21
URL using friendly
name:
http://myserver.mynetwork.net/Mediasite/Showcase/ShowcaseNameorID/
mychannel
3. If you
want the default sort order of videos when users browse the channel or when
returned in search results to be different from those selected for the showcase,
select them from the Browse Default Sort or Search Default Sort
drop-down lists.
4. By
default, the channel will be visible in the showcase. If you want to hide the
channel while you add content, clear the Viewable in
Showcase check box.
5. To
require users to register before they can view presentations in this channel,
select the Use Showcase Registration check box.
6.
(Optional) Click Add Terms & Conditions and select
the terms and conditions agreement you want to associate with this catalog.
Users must accept this agreement before they can publish to this catalog.
7. From
the Add content to this catalog… drop-down list,
select manually by using a Presentation's Publish Tab.
8.
Click Save.
9. Click
the Edit tab on the channels properties page to add a
thumbnail image for it. Click the Security tab to
assign permissions to the channel.

Add custom channel (add content manually using a
presentation's Publish Tab)
Considerations when deleting showcase channels
When deleting showcase channels, consider the
following:
•
If you send a showcase channel to the Recycle Bin but not the showcase it
is included in, the channel appears in the Recycle Bin where you can permanently
delete or restore it.
•
Deleting a showcase also deletes its player and channels. However, only
the showcase will appear in the Recycle Bin.
•
Restoring a showcase will restore the showcase, player and all channels.
Similarly, permanently deleting the showcase permanently removes the player and
all channels.
•
Sending a channel featured in the spotlight to the Recycle Bin will
return the spotlight to displaying videos added manually. If you restore the
channel, it is not automatically restored to the spotlight. You must re-select
it.