Custom catalogs provide the most flexibility when organizing your presentations because you have full control over what presentations and folders are included. Typically, you will use custom catalogs when adding content in bulk. Presentations added to custom catalogs retain their original permissions. In addition, you cannot associate terms and conditions agreements with custom catalogs.
To add a custom catalog:
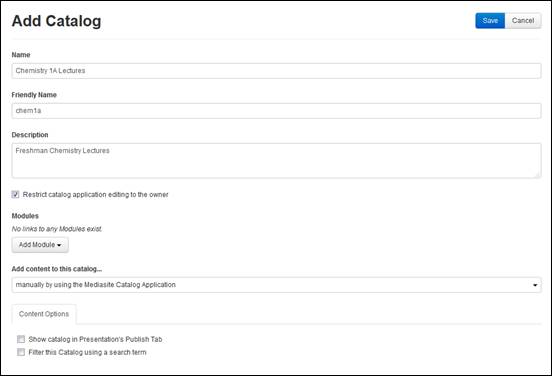
1. Click Publishing > Catalogs > Add Catalog and enter a name and description for the catalog that will help you and other users identify it easily.
2. Specify a Friendly Name for the catalog to customize its URL. This value will replace the catalog ID number in the URL. For example, if you give a catalog “mycatalog” as its friendly name, the URL uses this name instead of the catalog ID:
URL using catalog ID:
http://myserver.mynetwork.net/Mediasite/Catalog/Full/ ed968dc9872f456e93500b35872b334e21
URL using mycatalog as the friendly name
http://myserver.mynetwork.net /Mediasite/Catalog/catalogs/mycatalog
3. (Optional) Select the Restrict catalog application editing to the owner check box so only the catalog owner can launch the catalog in edit mode.
4. (Optional) If you are integrating your catalog into a Learning Management System using modules, click Add Module to link the module you want to your catalog.
5. From the Add content to this catalog… drop-down list, select manually by using the Mediasite Catalog Application.
6. (Optional) Select the Show catalog in Presentation’s Publish Tab check box to allow users to publish from a presentation’s Publish tab also.

Add custom catalog (add content manually using Catalog application)
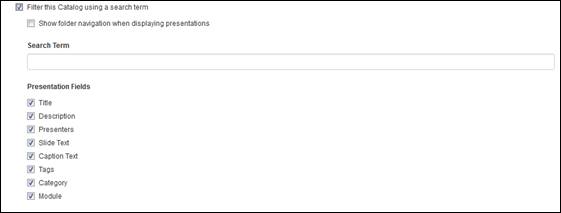
7. (Optional) Select the Filter this catalog using a search term check box to make this a search-filtered custom catalog.
8. Select the Show folder navigation when displaying presentations check box to display folders in the catalog. Specify the search term and select the check box next to the presentation metadata you want included in the search.

Catalog search filter options
9. Click Save.
10. In the catalog list, click View catalog below the catalog you just created to launch it in the Catalog application. Click Edit to open the catalog, in edit mode, in a separate browser tab.
11. Customize the catalog as needed. Once you have made all of your changes, click Save.